
HP P6000 Continuous Access Implementation Guide (T3680-96431, August 2012)


NOTE: Failsafe mode is available only in synchronous write mode. Host I/O can be recovered
by changing affected DR groups from failsafe-enabled mode to failsafe-disabled mode. This action
will begin logging of all incoming writes to the source member of the Data Replication group.
Failsafe on Link-down/Power-up
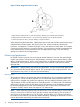
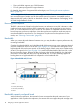
Failsafe on Link-down/Power-up is a setting that specifies whether or not virtual disks in a DR group
are automatically presented to hosts after a power-up (reboot) of the source array when the links
to the destination array are down and the DR group is not suspended. This prevents a situation
where the virtual disks in a DR group are presented to servers on the destination array following
a failover and then the virtual disks on the source array are also presented when it reboots.
Values for Failsafe on Link-down/Power-up are as follows:
• Enabled—Virtual disks in a source DR group are not automatically presented to hosts. This is
the default value assigned to a DR group when it is created. This behavior is called presentation
blocking and provides data protection under several circumstances. Host presentation remains
blocked until the destination array becomes available (and can communicate with the source
array) or until the DR group is suspended.
• Disabled—Virtual disks in a source DR group are automatically presented to hosts after a
controller reboot.
This feature can be disabled only after the DR group is created. See the HP P6000 Enterprise
Virtual Array Compatibility Reference to determine if your controller software supports disabling
this feature.
Implementation checklist
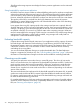
Table 1 (page 11) provides an overview and checklist of the primary tasks involved in planning
and implementing an HP P6000 Continuous Access environment. Table 1 (page 11) also provides
a link from each task to more detail elsewhere in this guide. Use the checklist to record your progress
as you perform each task. For links to the documentation identified, see “Documentation” (page 128).
IMPORTANT: Table 1 (page 11) is provided as an aid for implementing HP P6000 Continuous
Access. It should be used in conjunction with the remaining content of this guide. If you are installing
your first HP P6000 Continuous Access environment, before starting the installation read through
this entire guide to ensure that you implement HP P6000 Continuous Access successfully.
Table 1 HP P6000 Continuous Access implementation checklist
Planning tasks (Perform before implementing HP P6000 Continuous Access)
“Designing a remote application solution” (page 14)
Things you will need:
Appropriate tool for gathering SAN latency data. See “Tools for gathering SAN data” (page 14).
__ Evaluate all factors impacting selection of a remote site.
__ Define the RTO.
__ Consider the impact of intersite latency on all applications.
“Bandwidth capacity and peak loads” (page 18)
Things you will need:
Appropriate tool for gathering I/O data. See “Tools for gathering SAN data” (page 14).
__ Monitor and record sustained I/O load.
__ Monitor and record burst I/O load.
“Choosing the intersite link” (page 17)
Things you will need:
Implementation checklist 11