
HP XP7 Command View Advanced Edition Installation and Configuration Guide (TK981-96001, May 2014)

When a user is using the System account, a top folder named System is created in the private logical
groups. A system account user cannot reference or edit private logical groups other than the System
folder. If the user wants to manage private logical groups other than the System folder, create another
user account and have that account belong to the relevant user group.
For details about public logical groups and private logical groups, see the HP XP7 Command View
Advanced Edition User Guide.
Using event notifications
You can use event notifications in Tiered Storage Manager after upgrading HP XP7 Command View
Advanced Edition from 7.1.0 or earlier.
For more information, see the HP XP7 Command View Advanced Edition Administrator Guide.
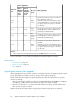
1. In the server.properties file for Device Manager, set the following:
• server.mail.enabled
• server.mail.smtp.host
• server.mail.from
• server.mail.errorsTo
• server.mail.smtp.port
• server.mail.smtp.auth
• server.eventNotification.mail.to
2. Register SMTP authenticated users to Device Manager.
3. Customize the email template (optional).
Synchronizing Replication and Device Manager databases
After performing an overwrite installation or upgrade, you must synchronize the Replication and
Device Manager databases.
1. If Replication Manager Application Agent version 7.1 or later is installed on the management
server, set the value of the base.refreshdginfo.exec property in the Replication Manager
base.properties file to 0.
The base.properties file is stored in the following location:
• In Windows:
installation-folder-for-HP-XP7-Command-View-Advanced-Edition\Replic-
ationManager\conf
• In Linux:
installation-directory-for-HP-XP7-Command-View-Advanced-Edition/
ReplicationManager/conf
2. Restart the HP XP7 Command View Advanced Edition product services.
3. Log in to Device Manager using the System account.
4. On the Actions menu, select Manage Replication.
5. In the Explorer menu, select Settings and then select Refresh Setting.
6. In the tree view, select Configuration Setting.
Installation and Configuration Guide 49