
HP StorageWorks XP Command View Advanced Edition Software 6.4 Server Administrator Guide for Device Manager and Provisioning Manager (web) (T1780-96341, July 2010)
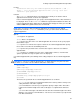
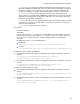

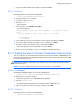
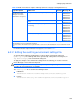
Table Of Contents
- Overview
- 1-1 System configuration
- 1-2 Network configuration
- 1-2-1 Common security risks
- 1-2-2 Most secure configuration: separate management LAN plus firewall
- 1-2-3 Second-most secure configuration: separate management LAN plus firewalled devices under management
- 1-2-4 Third-most secure configuration: dual-homed management servers plus separate management LAN
- 1-2-5 Least secure configuration: flat network
- 1-3 Management server requirements
- 1-4 System requirements for storage subsystems
- 1-5 Host requirements
- 1-6 Products related to Device Manager
- 1-7 System requirement for managing copy pairs
- Settings for various network configurations
- 2-1 Port settings
- 2-2 Settings required to use a management server that has multiple NICs
- 2-3 Settings required to operate in an IPv6 environment
- 2-4 Changing the IP address or host name of the management server
- 2-5 Changing the URLs for accessing XP Command View AE Suite products
- 2-6 Settings required when disconnecting the management server network
- Settings required for managing user accounts
- Security settings for Device Manager
- Settings required for linking with related products
- Setting up logs and alerts
- Settings for CIM/WBEM (SMI-S CIMOM)
- 7-1 Device Manager and CIM/WBEM
- 7-2 CIM/WBEM features of Device Manager
- 7-3 Basic settings required to use the CIM/WBEM features
- 7-4 Settings for ports used by CIM/WBEM features
- 7-5 Properties file settings for executing CIM
- 7-6 Settings for the service discovery feature
- 7-7 The performance information acquisition feature
- 7-8 User permissions for using CIM/WBEM features
- Starting and stopping the Device Manager server
- 8-1 Before controlling the Device Manager server
- 8-2 Starting the Device Manager server
- 8-3 Stopping the Device Manager server
- 8-4 Checking the operating status of the Device Manager server
- 8-5 Starting the Device Manager server and Common Component
- 8-6 Stopping the Device Manager server and Common Component
- 8-7 Checking the operating status of Device Manager server and Common Component
- Managing the database
- Troubleshooting
- Support and other resources
- Appendix A Specifying properties
- A-1 Properties overview
- A-2 Device Manager server configuration properties
- A-2-1 server.http.host
- A-2-2 server.http.port
- A-2-3 server.https.port
- A-2-4 server.http.default
- A-2-5 server.http.request.timeout
- A-2-6 server.http.connection.priority
- A-2-7 server.http.connection.bufSize
- A-2-8 server.http.socket.backlog
- A-2-9 server.http.socket.maxThreads
- A-2-10 server.http.socket.linger
- A-2-11 server.http.socket.noDelay
- A-2-12 server.http.headers.maxNumber
- A-2-13 server.http.headers.maxLength
- A-2-14 server.http.entity.maxLength
- A-2-15 server.http.log.reverseDNS
- A-2-16 server.http.cache.size
- A-2-17 server.http.cache.maxFileSize
- A-2-18 server.http.fileTypes.noLog
- A-2-19 server.http.mode
- A-2-20 server.installTime
- A-2-21 server.base.home
- A-2-22 server.horcmconfigfile.hostname
- A-2-23 server.base.initialsynchro
- A-2-24 server.cim.agent
- A-2-25 server.cim.support
- A-2-26 server.cim.support.job
- A-2-27 server.cim.support.protocol
- A-2-28 server.cim.http.port
- A-2-29 server.cim.https.port
- A-2-30 server.configchange.enabled
- A-2-31 server.configchange.autorefresh.lastrefreshed
- A-2-32 server.mail.enabled
- A-2-33 server.mail.from
- A-2-34 server.mail.smtp.host
- A-2-35 server.mail.smtp.port
- A-2-36 server.mail.smtp.auth
- A-2-37 server.mail.alert.type
- A-2-38 server.mail.alert.status
- A-2-39 server.subsystem.ssid.availableValues
- A-2-40 server.smisclient.indication.port
- A-3 Device Manager database properties
- A-4 Device Manager logger properties
- A-5 Device Manager dispatcher properties
- A-5-1 server.dispatcher.agent.priority
- A-5-2 server.dispatcher.message.timeout
- A-5-3 server.dispatcher.message.timeout.in.processing
- A-5-4 server.dispatcher.daemon.pollingPeriod
- A-5-5 server.dispatcher.traps.purgePeriod
- A-5-6 server.dispatcher.startTimeOfIgnoringConnectionAlert
- A-5-7 server.dispatcher.endTimeOfIgnoringConnectionAlert
- A-5-8 server.dispatcher.daemon.receiveTrap
- A-5-9 server.dispatcher.daemon.configUpdate.detection.interval
- A-5-10 server.dispatcher.daemon.autoSynchro.doRefresh
- A-5-11 server.dispatcher.daemon.autoSynchro.type
- A-5-12 server.dispatcher.daemon.autoSynchro.dayOfWeek
- A-5-13 server.dispatcher.daemon.autoSynchro.startTime
- A-5-14 server.dispatcher.daemon.autoSynchro.interval
- A-5-15 server.dispatcher.daemon.autoSynchro.refresh.interval
- A-5-16 server.dispatcher.daemon.autoSynchro.refresh.timeout
- A-6 Device Manager MIME properties
- A-7 Device Manager client properties
- A-8 Device Manager security properties
- A-9 Device Manager SNMP trap log output function properties
- A-10 Device Manager mainframe host agent properties
- A-11 Device Manager report function properties
- A-12 XP Provisioning Manager server configuration properties
- A-13 XP Provisioning Manager server log properties
- A-14 XP Provisioning Manager client properties
- Glossary
- Index

Setting up logs and alerts
94
3. Type the desired number of trace log files, and then click OK.
6-1-1-2 In Linux
The utility program is stored in the following path:
/opt/hitachi/HNTRLib2/bin/hntr2util
To specify the number of trace log files:
1. Log in to the system as root.
2. Execute hntr2util.
A menu appears.
3. From the menu, select Number of log files.
The submenu appears.
Hitachi Network Objectplaza Trace Library 2 - Configuration Utility
Rel 1.0
Type the number of files [1-16] (Type '!' to return)
Current Number: 4
New Number:
4. In the submenu, enter the desired number for trace log files, and then press Enter.
5. If you do not want to change the number, enter !, and then press Enter.
6. Check the contents you specified, enter e, and then press Enter.
A message appears to check if you want to save the changes.
7. Enter y to save your changes or enter n to exit without saving your changes.
6-1-2 Setting the size of Common Component trace log files
You can set the size of each Common Component trace log file, from 8 KB to 4 MB (4096 KB). The
Common Component trace log monitoring program switches to the next file when the current output
file reaches the specified size.
CAUTION: Changing the common trace log settings affects other program products that use the
common trace logs.
NOTE: The value should be larger than the value that you have set for the buffer.
6-1-2-1 In Windows
The Windows HNTRLib2 utility is stored on the following path:
program-files-folder\Hitachi\HNTRLib2\bin\hntr2util.exe
To change the size of the trace log files:
1. Log in to the system as a user with Administrator privileges.
2. Execute hntr2util.exe.
The Hitachi Network Objectplaza Trace Utility 2 window is displayed (see
).
3. Type the desired size for the trace log files, and then select OK.
6-1-2-2 In Linux
The utility program is stored in the following path:
/opt/hitachi/HNTRLib2/bin/hntr2util