
HP StorageWorks XP Tiered Storage Manager Server Installation and Configuration Guide (December 2005)


Windows System Installation 26
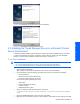
8. Either browse to a desired destination or specify the repository for the storage database files, then select
Next. The destination file name has the following requirements:
• Specify an absolute path.
• You may use a maximum of 104 bytes, including the backslash at the end.
• The default file location is
<tiered storage manager installation folder>\TieredStorageManager\database.
Note that if the length of the installation folder is greater that 74 bytes, the default path will exceed
104 bytes. You may need to re-enter the path so that you don’t exceed the maximum.
• You may use single-byte spaces and the following characters and symbols:
• A to Z
• a to z
• 0 to 9
• .
• Do not use the single-byte spaces at the beginning or end of the folder name.
• Do not use path names that contain CON, AUX, COMn (where n = 1 to 9), LPTn (where n = 1 to 9),
PRN, NUL, CLOCK$, or the drive name.
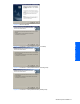
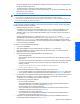
9. The Pre-installation Confirmation window displays (refer to
Figure 2-21). Verify the displayed information,
then select Next to begin the installation. The installation information and the information on the installed
components includes the Tiered Storage Manager server version and build date. Also, in the installation
folder, the folder of the currently installed Tiered Storage Manager server is displayed.
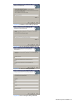
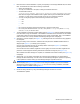
10. Select Next. A window displays (see
Figure 2-10), indicating that the user information is being applied to
the setup data.
During the setting of user information, sometimes the Setup window for HiRDB Embedded Server is
displayed (see Figure 2-11) for setting up the repository.
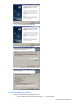
Once the user information has been set, the "Setup Status" window (see
Figure 2-12) is displayed,
indicating that the files are being installed.
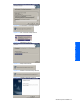
Once the files have been installed, registration into the registry and service information registration are
performed. A window appears indicating that software information is being set (see
Figure 2-13).
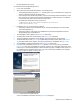
When software information settings are complete, the "Installation has finished" window (see
Figure 2-15)
is displayed.
11. Select Finish. In a non-cluster configuration the Component, Device Manager, and Tiered Storage
Manager will start automatically. Once the version of Tiered Storage Manager is updated, the repository
is also updated. As a result, starting up Tiered Storage Manager might take some time.
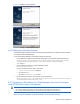
CAUTION: If you cancel the installation processing partway through, the Installation Stopped (Cancel)
Window displays (see Figure 2-16). If an error occurs during the installation process, the Installation
Stopped (Error) window displays (see
Figure 2-17). If an error occurs during installation, the installer
trace log is output. For details on this log, see
5-2 .
12. Refresh all storage domains by using Tiered Storage Manager web client or CLI client.
The database is updated.