HP StorageWorks Command View XP Advanced Edition Device Manager Web Client User Guide Part number: T1780-96012 Second edition: October, 2005
Legal notices © Copyright 2005 Hewlett-Packard Development Company, L.P. Hewlett-Packard Company makes no warranty of any kind with regard to this material, including, but not limited to, the implied warranties of merchantability and fitness for a particular purpose. Hewlett-Packard shall not be liable for errors contained herein or for incidental or consequential damages in connection with the furnishing, performance, or use of this material.
Contents Revision history Revision tables ..................................................................................................................................................... 11 1 Overview of Command View XP Advanced Edition Device Manager 1-1 1-2 1-3 1-4 1-5 Overview of Command View XP Advanced Edition Device Manager ....................................................... 12 Related Software Products.........................................................................................
5-5-1 Viewing Alerts................................................................................................................................. 51 5-5-2 Monitoring Alerts............................................................................................................................. 52 5-5-3 Deleting Alerts ................................................................................................................................ 53 5-6 Viewing the Task List ...........................
10 Performing Storage Subsystem Operations 10-1 10-1-1 10-1-2 10-1-3 10-1-4 10-1-5 10-1-6 10-2 10-2-1 10-2-2 10-2-3 10-2-4 10-3 10-3-1 10-3-2 10-3-3 10-3-4 10-4 10-4-1 10-4-2 10-4-3 10-4-4 10-4-5 Overview of Storage Subsystem Operations................................................................................ 146 Viewing a List of Storage Subsystems ......................................................................................... 146 Adding a Storage Subsystem ................................
Figures Figure 1-1 Command View XP Advanced Edition Device Manager System and Software Components.................. 14 Figure 2-1 Using the Storage Logical Partition Function ........................................................................................... 21 Figure 3-1 Java™ Web Start Application Manager Window ...................................................................................... 27 Figure 4-1 Command View XP AE Device Manager Login Panel with License Warning ....................
Figure 8-1 All Storage or My Storage ........................................................................................................................ 99 Figure 8-2 Viewing a Storage Subsystem Group in All Storage/My Storage ........................................................... 100 Figure 8-3 Viewing the Allocated Group for a Storage Subsystem..........................................................................
Figure 10-27 Modify WWN Group Panel ................................................................................................................. 176 Figure 10-28 Changing the Channel Adapter Mode (XP1024/XP128) .................................................................... 178 Figure 10-29 Changing the Channel Adapter Mode Confirmation........................................................................... 179 Figure 10-30 Allocating Storage – Defining Host/Port Connections ...................
About this guide This document describes and provides instructions for using the HP StorageWorks XP Advanced Edition Device Manager Web Client software to manage storage on the HP StorageWorks XP Disk Array. Intended audience This document assumes that the user: • Has a background in data processing and understands peripheral storage device subsystems and their basic functions.
HP technical support Telephone numbers for worldwide technical support are listed on the HP web site: http://www.hp.com/support/ Collect the following information before calling: • Technical support registration number (if applicable) • Product serial numbers • Product model names and numbers • Applicable error messages • Operating system type and revision level • Detailed, specific questions For continuous quality improvement, calls may be recorded or monitored.
Revision tables Table 2 Revisions Date Edition Revision July, 2005 First Initial Release October, 2005 Second • • • • The displayed character string for the copy type has been changed. Linkage to Provisioning Manager, Replication Monitor, and Tiered Storage Manager is now supported. A link to the online manual site of Hewlett Packard has been added. Warning messages have been changed.
1 Overview of Command View XP Advanced Edition Device Manager This chapter provides an overview of Command View XP Advanced Edition Device Manager: • Overview of Command View XP Advanced Edition Device Manager (section 1-1) • Related software products (section 1-2) • Command View XP Advanced Edition Device Manager software components (section 1-3) • Important terms and concepts (section 1-4) 1-1 Overview of Command View XP Advanced Edition Device Manager Command View XP Advanced Edition Device Manag
1-2 Related Software Products The following software products are related to Device Manager: • ® ® Hitachi Dynamic Link Manager (HDLM) for Solaris™ and Hitachi Dynamic Link Manager for IBM AIX (from 03-00 to 05-60) The Hitachi Dynamic Link Manager (HDLM) for Sun™ Solaris™ and Hitachi Dynamic Link Manager (HDLM) for IBM® AIX® software products are installed on the host and manage access paths to storage: for example, for automatic failover and failback and load balancing.
• Web Client. Device Manager Web Client provides two types of user interfaces, an HTML GUI and a Java™ GUI, for Device Manager functions. Web Client communicates with and runs as a client of the Device Manager server. The HTML GUI is a browser-based application that can be accessed from Web browsers. This GUI provides the windows and dialog boxes for features other than the storage subsystem management and user management features.
• Continuous Access XP: The Continuous Access XP feature enables the user to make backup copies of volumes in a different storage subsystem. For details, refer to the Continuous Access XP manual. • Continuous Access XP Journal: The Continuous Access XP Journal feature enables the user to asynchronously make backup copies of volumes between different storage subsystems.
• Snapshot XP: The Snapshot XP feature (for StorageWorks XP12000/XP10000 only) allows the user to make backup copies of volumes in the same storage subsystem. For details on Snapshot XP, refer to the HP StorageWorks Snapshot XP User Guide. • Storage group: A user-defined set of paths (LUNs) which can be manipulated as a group. Adding storage to an empty logical group renders that group a storage group. The LUNs in the same storage group must physically reside in the same storage subsystem.
Table 1-2 Syntax Conventions Font or Symbol How Used [ ] An item or items enclosed in brackets are optional. | Only one of the options separated by a vertical bar can be used at one time. ... Ellipses (...) indicate that the item or items enclosed in () or [] and which immediately precede the ellipses can be repeated. () The items enclosed by the parentheses are in the range to which | or ... are applied.
2 Device Manager Operations This chapter describes Device Manager operations: • User groups and user access levels (see section 2-1) • Storage management operations (see section 2-2) • Subsystem and volume configuration operations (see section 2-3) • Data management operations (see section 2-4) • Link-and-Launch operations (see section 2-5) • Report operations (see section 2-6) • System security operations (see section 2-7) 2-1 User Groups and User Access Levels Device Manager provides two set
Table 2-1 Device Manager User Roles User Role Description Storage Administrator Configures and manages storage subsystems. Can access all Device Manager functions and resources, but cannot configure user accounts. Guest Can view all Device Manager resources. Local System Administrator Manages user accounts within a user group. Also performs operations on the users in the user group. Can use all Device Manager functions to access the resources assigned to the user group.
for each storage subsystem on which the LUN Scan is performed. This logical group is created in the LUN SCAN group of the Logical Groups object. Beneath the logical group, a storage group is created for each port and host, and all unregistered LUNs are placed in this storage group. The LUN scan also causes Device Manager to register unique hosts for all WWNs in the storage subsystem.
The cache logical partition function allows you to establish an environment in which I/O operations on a specific volume do not affect the processing performance of other volumes. For details, refer to the Disk/Cache Partition manual. Device Manager can display attributes of the cache logical partition function on the logical volume. You can set up the cache logical partition function from the physical view. For details about the physical view, see section 10-2-1. • Storage logical partition function.
is the default mode. High-speed mode provides faster access speed by using more processors to handle data access. However, high-speed mode limits the number of available ports to one port on the channel adapter (CHA) board. • Create/Delete LDEVs. Device Manager allows you to create new LDEVs and delete existing LDEVs on the StorageWorks XP1024/XP128 storage subsystem (see sections 10-4-3, and 10-4-4).
NOTE: The data management function must be installed and available on the storage subsystem. 2-4-1 Managing Data on the StorageWorks XP12000/XP10000 LUN Security. Device Manager allows you to perform the following LUN security functions on the StorageWorks XP12000/XP10000 storage subsystem: • Secure/Unsecure Volumes. Device Manager allows you to secure and unsecure volumes (LUNs) as needed (such as add host(s) to or remove host(s) from a host storage domain).
• Continuous Access XP. Continuous Access XP allows you to perform synchronous and asynchronous remote copy operations. • Business Copy XP. Business Copy XP allows you to perform local (subsystem-internal) copy operations that can provide up to nine copies of a primary volume (P-VOL). 2-5 Link-and-Launch Operations The Device Manager link-and-launch feature allows administrators to easily move across storage management software for a full view of their storage resources.
3 Installing Device Manager Web Client This chapter describes the requirements for Web Client operations, preparations for accessing the Web Client, and the requirements and procedures for installing the Java™ environment.
• Storage subsystems. Before adding a storage subsystem to Device Manager using Web Client (or another client), you must make sure that the storage subsystem is configured for Device Manager operations. For subsystem configuration requirements, refer to the HP StorageWorks Command View XP Advanced Edition Device Manager Server Installation and Configuration Guide. See section 4-3 for copy pair requirements.
To install JRE and JWS: 1. Download the platform-specific installer for JRE version 1.4.2_xx (xx: 06 or later) from the Sun™ JRE website. 2. Read the installation instructions and release notes for JRE provided on the website. 3. Install the JRE 1.4.2_xx (xx: 06 or later) software using the JRE installer. Make sure that you read the Readme file for the JRE software. NOTE: Installing JRE version 1.4.2 automatically installs JWS 1.4.2.
browser proxy configuration (such as automatic configuration in Internet Explorer), Java™ Web Start does not configure its proxy properly. Use manual configuration. 4. Select the Manual button. 5. In the HTTP Proxy and HTTP Port boxes, enter the address and port of the proxy server, respectively. 6. If you use the proxy with all applications except for communications with a Device Manager server, enter the host name of the Device Manager server in the No Proxy Hosts box. 7.
To clear the cache in Java™ Web Start: 1. Start the Java™ Web Start application manager. 2. Select the File menu, and then select Preferences. 3. On the Java™ Web Start – Preferences panel, select the Advanced tab. 4. Select the Clear Folder button to open the Clear Applications Folder panel. 5. Select the Yes button. 6. Select OK to save your changes, and exit the Java™ Web Start application manager.
3-6 Setting Up Secure Communication with Device Manager When setting up a Device Manager system, you need to perform security setup to ensure safe communication over the Internet or an intranet. With Device Manager, you can use secure sockets layer (SSL) and transport layer security (TLS) to encrypt network communications between Web Client and either the Device Manager server or Common Web Service.
4 Preparing for and Starting Operations This chapter describes the preparation required before using Device Manager and provides instructions for starting Device Manager operations: • Preparing to start Device Manager operations (see section 4-1) • Link-and-launch requirements (see section 4-2) • Copy pair requirements (see section 4-3) • Logging in to Device Manager the first time after installation (see section 4-4) • Starting Device Manager operations (see section 4-5) • Linking with External
If Device Manager and another management tool (such as XP12000/XP10000, XP1024/XP128 Remote Web Console) modify the storage subsystem configuration at the same time, the operation(s) might not be performed correctly. Before using Device Manager Web Client (or CLI) to modify the configuration of a storage subsystem, make sure that the storage subsystem is not being accessed by any other management tool. The StorageWorks XP Disk Array SVP must be in the View mode (and not in the Modify mode).
CAUTION: When using Netscape® or Mozilla™ in a Solaris™ or HP-UX environment, you must specify the following settings to start Remote Web Console. 1 2 ® Specifying Netscape or Mozilla™ used for Remote Web Console.
Third-Party Software Application Requirements If the third-party software applies to a specific array, Device Manager allows the link and launch of a URL from the physical view dialog box or Show Properties - Subsystem Name subwindow for each storage subsystem. For details, refer to the HP StorageWorks Command View XP Advanced Edition Device Manager CLI User Guide. Specifically refer to the addURLLink, GetURLLink, and DeleteURLLink API commands.
Table 4-1 Requirements for a logical device to be selectable as a primary volume (SP-volume) Storage subsystem Requirements for a logical device to be selectable as a primary volume (SP-volume) Conditions for Business Copy XP • • • • StorageWorks XP1024/XP128 and StorageWorks XP512/XP48 Conditions for Continuous Access XP • Conditions for Business Copy XP • • • • The logical device must not be the secondary volume for a Business Copy XP SP-volume.
Table 4-2 Requirements for a logical device to be selectable as a secondary volume Storage subsystem Requirements for a logical device to be selectable as a secondary volume StorageWorks XP12000/XP10000* Common conditions for copy pairs • • • • StorageWorks XP1024/XP128 and StorageWorks XP512/XP48 The logical device must be applicable to StorageWorks XP Disk Array. The emulation type must be the same as that of the selected primary volume.
To log in to Device Manager: 1. Launch the web browser, and enter the URL for the Device Manager server: http://Device-Manager-server-address:port-number/DeviceManager/ Device-Manager-server-address = IP address or host name of the Device Manager server, such as “localhost” port-number = port number of the Common Web Service (default = 23015) NOTE: Use https and port 23016 (default) for SSL.
Figure 4-1 Command View XP AE Device Manager Login Panel with License Warning Figure 4-2 Version Information for Device Manager Preparing for and Starting Operations 38
Figure 4-3 Command View XP AE Device Manager Main Window – Initial Start-Up 4-5 Starting Device Manager Operations After you have installed Device Manager, prepared for Device Manager operations, and logged in to the Device Manager server, you are ready to start Device Manager operations. This section provides an overview of the tasks required to set up and start using Device Manager. To set up your Device Manager environment efficiently, perform the following procedure in the indicated sequence.
4. Add the connected storage subsystems to the Device Manager server (see section 10-1-2). Volumes that the system administrator or the storage administrator are allowed to manage are placed in a logical group called All Storage that is created by Device Manager. CAUTION: The Device Manager server requires exclusive access to a storage subsystem (see section 4-1).
Figure 4-4 System Configuration Using External Storage XP When using External Storage XP, you can manage volumes of another storage subsystem as virtual StorageWorks XP12000/XP10000 volumes by mapping them to the StorageWorks XP12000/XP10000 subsystem. In such a case, the storage subsystem connected to the StorageWorks XP12000/XP10000 subsystem is called an external subsystem.
3. Specify an external subsystem port to be connected to the external port. For details on the setting values for a port, see the External Storage XP documentation. 4. Specify an external volume in the external subsystem. Select the port specified in step 3 and add storage. When adding storage, select a host that is recognized as an external port to add LUN security. For details on how to add storage, see section 7-6-2. 5.
5 Performing Device Manager System Operations This chapter describes Device Manager system operations.
Figure 5-1 Command View XP AE Device Manager Login Panel 5-1-2 Logging Out of Device Manager Each Device Manager user must log out of Device Manager when finished performing operations to prevent unauthorized use of Device Manager. Device Manager maintains an audit log of all user actions to enable verification and traceability of Device Manager operations.
CAUTION: If you are using Netscape® as your Web browser, multiple unnecessary windows will be displayed if you repeatedly click a method in the Device Manager method frame. If an unnecessary window appears, close it by clicking the Close button in the upper-right frame in the window. CAUTION: If you close the window indicating operation progress during an update operation, results information indicating the success or failure of the update operation will not be displayed.
• Method frame. Displays the available operations for the object selected in the navigation frame. When an operation is selected in the method frame, Device Manager displays either a pop-up window or a subwindow in the information frame to allow you to perform the selected operation. • Information frame. Displays the detailed information for the selected object (navigation frame) and/or operation (method frame) and allows you to select the settings for and perform the selected operation.
A link to Product Documentation Home Page appears in Other Application. Clicking this link displays the online manual site provided by HP. • Logout. Allows you to log out of Device Manager • Close. Allows you to close the browser • Profile. Displays user information • About. Displays the Device Manager version and license information, and allows you to enter your license key when required • Help. Displays the Device Manager online help.
Figure 5-4 Pop-up Window The common items displayed on all pop-up windows are described below: • Object address. Displays the location of the object selected in the navigation frame within the Device Manager object hierarchy, starting from the root object (Device Manager) and with the objects separated by right angle brackets (>). For example, when you select host_0 in the navigation frame, the pop-up window displays: Device Manager > Hosts > host_0 • Window name.
5-3 Viewing Version and License Type Information The Version Information of Device Manager panel, shown in Figure 5-5, displays the following: • Device Manager version information • License type information • Serial or logical number of the storage subsystem associated with the license key • Licensed capacity Enter your license key in this panel when you first log in after installation.
Figure 5-6 Show User Profile Panel 5-5 Performing Alert Operations The Device Manager alert operations include: • Viewing alerts (see section 5-5-1). System administrators, storage administrators, and guests can view storage subsystem alerts. • Monitoring alerts (see section 5-5-2). System administrators, storage administrators, and guests can monitor storage subsystem alerts. • Deleting alerts (see section 5-5-3). System administrators and storage administrators can delete alerts.
Figure 5-7 Alerts 5-5-1 Viewing Alerts Device Manager allows you to view a list of all alerts for all storage subsystems, the detailed information for a specific alert, and the alerts for a specific subsystem. Note that local system administrators, local storage administrators, and local guests do not have access rights to these functions. Viewing all alerts. To view a list of all alerts for all storage subsystems, select the Alerts object in the navigation frame.
CAUTION: If you remove a storage subsystem that has alert information, and then attempt to display the alert information for the removed storage subsystem, ARRAY, storage-subsystem-type (ARRAY.XP10000) is displayed as the source. If this happens, either delete the alert information if it is not needed, or add the storage subsystem to Device Manager again. Figure 5-8 Detailed Information – Alert Panel Viewing alerts for a specific subsystem.
Figure 5-9 Monitor – Alerts Panel Showing Monitoring Figure 5-10 Monitor – Alerts Panel Showing Occurrence of Alerts 5-5-3 Deleting Alerts Device Manager allows system administrators and storage administrators to delete alerts from the Device Manager server. Guests, local system administrators, local storage administrators, and local guests do not have access to this function. To delete one or more alerts from the Device Manager server: 1.
2. Select the checkbox for each alert that you want to delete. To select all checkboxes, click the Select All button. To clear (deselect) all checkboxes, select the Unselect All button. 3. After you have selected the alert(s) that you want to delete, select the Delete button. The selected alert(s) are deleted from the Device Manager server. 5-6 Viewing the Task List Device Manager allows the logged-in user to view task information within the access range permitted for that user.
NOTE: If you log out of Command View XP AE Suite software that you launched using the link-and-launch feature, you will also be logged out of Device Manager. If you then attempt a link-and-launch operation, try to use the Java™ GUI, or open a report window, an error message displays. If you launched more than one instance of Command View XP AE Suite software, make sure that no operations are in progress before logging out.
• Physical view dialog box. For StorageWorks XP1024/XP128, the Remote Web Console drop-down list appears in the physical view dialog box (see Figure 5-12). For details on the physical view dialog box, see section 10-2-2. For a System Administrator or Storage Administrator, from among the functions in the Remote Web Console, the licensed functions are displayed in a drop-down list. Select the function you want to use from the drop-down list. If the user is a Guest, Login appears in the drop-down list.
Figure 5-13 Starting Remote Web Console for StorageWorks XP1024/XP128 (Show Properties - subsystemname Subwindow) 5-7-6 Launching a Third-Party Application When third-party software applies to a specific array, Device Manager provides a URLLink that allows you to link and launch from the physical view dialog box and Show Properties - Subsystem Name subwindow to a URL specific to the storage subsystem. Only system administrators and storage administrators can use URLLink.
4. Check the message in the download dialog box and choose the Save button. The Save As dialog box appears. 5. In the Save As dialog box, specify the desired storage destination and save the file. Install the software.
6 Performing User Management Operations This chapter describes Device Manager user management operations. • Overview of User Management Operations (see section 6-1) • User Account Operations (see section 6-2) • User Group Operations (see section 6-3) 6-1 Overview of User Management Operations The Device Manager user management operations include: • User account operations (see section 6-2) • User group operations (see section 6-3) User account operations.
6-2 User Account Operations System administrators can manage all user accounts The local system administrator can perform user account operations for users in the assigned user group and its descendant user groups. Storage administrators and local storage administrators can edit their own user properties. Guests and local guests can view their own user properties. Device Manager maintains a database of authorized users and an audit log of all user actions.
To create a new Device Manager user: 1. Log in to Device Manager as a system administrator or local administrator. 2. Select the User Management object in the navigation frame, and then select Users in the information frame to open the User Administration panel (refer to Figure 6-2). 3. Select CREATE to open the User Properties panel, as shown in Figure 6-3. Figure 6-3 User Properties – Creating a New User 4. Enter the following information for the new Device Manager user: • User ID.
6-2-2 Viewing and Editing User Properties All Device Manager users except for guests and local guests can view and edit their own user properties. Guests and local guests can view their own user properties. The system administrator can edit the user properties of all users. The local system administrator can edit the user properties of the users in the specified user group and its descendant user groups. To view and edit the Device Manager user properties: 1. Log in to Device Manager. 2.
NOTE: The password is case-sensitive and must be 4 to 25 bytes long. You can use the following characters (Unicode characters from 0020 to 007E): A-Z, a-z, 0-9, !, #, $, %, &, ', (, ), *, +, -, ., =, @, \, ^, _, |. NOTE: If you change the password and then select CANCEL in the User Properties panel, the new password is still applied. Figure 6-5 Changing a Password 6-2-4 Deleting a User The system administrator can delete existing Device Manager users as needed.
Figure 6-6 Deleting a User –Confirmation 5. Select YES to delete the user, or select NO to cancel your request. The User Administration panel displays. 6-3 User Group Operations User group operations allow the system administrator and local administrator to control access to resources (storage and hosts) on Device Manager. The system administrator has access to all user groups. The local system administrator has access to the assigned user group and its descendant user group(s).
When a user group is created, the name of the user group is entered and the resources (logical groups, hosts, and LDEVs) that can be accessed by the user group are allocated.
Figure 6-8 Creating a New User Group 6-3-2 Viewing and Editing User Group Properties The system administrator can edit the user group properties and change the resources of all user-defined user groups. The system-defined user groups (admin, storageadmin, guest) cannot be modified. The local system administrator can modify the user group properties and change the resources of the assigned user group and its descendant user groups.
To view and edit the user group properties: 1. Log in to Device Manager as system administrator or local system administrator. 2. Select the User Management object in the navigation frame, and then select User Groups in the information frame to open the User Group Administration panel (see Figure 6-7). 3. Select the desired user group, and select EDIT to open the User Group Properties panel (see Figure 6-9). 4. Make the desired changes (if any) on the User Group Properties panel.
NOTE: Users in the selected user group and its descendant groups (if any) will be deleted. 5. When the confirmation panel displays (see Figure 6-10), select YES to delete the specified user group, or select NO to cancel your request to delete the user group.
7 Performing Logical Group Operations This chapter describes logical group operations: • Overview of Logical Groups (see section 7-1) • Viewing the list of logical groups (see section 7-2) • Creating a logical group (see section 7-3) • Viewing and editing the logical group properties (see section 7-4) • Deleting a logical group (see section 7-5) • Storage group operations (see section 7-6) 7-1 Overview of Logical Groups The Logical Groups object in the navigation frame, as shown in Figure 7-1, a
group contains an Open-Allocated group and an Open-Unallocated group. For the StorageWorks XP Disk Array, the storage subsystem group also contains a Mainframe-Unspecified group. • Open-Allocated group: Displays the LUs or LDEVs that are available to the logged-on user, and that have one or more paths assigned, on open volumes in the specified storage subsystem.
NOTE: In Web Client, increasing the amount of data that is displayed in the window increases the amount of memory that is used. To avoid a memory shortage, we recommend that you do not create more than 1,000 logical groups. To create a logical group to Device Manager: 1. Log in to Device Manager as a system administrator, storage administrator, local system administrator, or local storage administrator. 2.
1. Select the Logical Groups object in the navigation frame, expand the tree as needed (click on + ), and select the group for which you want to view or edit the properties. 2. In the method frame, select the Modify Properties operation to open the Modify Properties panel as shown in Figure 7-3. The Modify Properties panel displays and allows you to change the parent group, group name, and icon for the selected group. Figure 7-3 Modifying Properties 3.
NOTE: For instructions on deleting a storage group (contains LUNs) or a parent group which contains one or more storage groups, see section 7-6-6. NOTE: You cannot delete a logical group that is associated with a user group. To delete such a logical group, you must first delete the corresponding user group. To delete a logical group from Device Manager: 1. 2. Select the Logical Groups object in the navigation frame, expand the tree as needed (click on + ), and select the group that you want to delete.
Figure 7-5 Deleting a Logical Group with Subgroups – Confirmation 3. Select OK to delete the logical group and its subgroups or Cancel to cancel your request. 7-6 Storage Group Operations The system administrator, storage administrator, local system administrator, and local storage administrator can perform storage group operations. Guest and local guest users can only view the storage group information. A Device Manager storage group is a user-defined set of LUNs that can be manipulated as a group.
7-6-1 Viewing the Contents of a Storage Group When you view the contents of a storage group, you can view property information on the selected storage group and information on the LDEVs managed under that storage group. To view the contents of a storage group: 1. Log in to Device Manager as a system administrator, storage administrator, local system administrator, or local storage administrator to perform storage group operations. Guest and local guest users can only view the contents of a storage group.
Figure 7-7 Detailed Information – LDEV-Number Panel Table 7-1 describes the information displayed on the Detailed Information – LDEV-number panel. Table 7-1 LDEV-Number Panel Detailed Information Item Detailed Information Path Information Description LDEV Logical device number. For the LUSE volume, the LDEV numbers of logical devices that make up the LUSE volume are displayed in the dropdown list. Type Displays the LDEV type. This item is displayed only for StorageWorks XP12000/XP10000.
Table 7-1 LDEV-Number Panel Detailed Information Item Pair Information Description File System Displays the mount point on the host. Host Bus/TID/LUN Displays SCSI information recognized by the host. Capacity Displays the volume capacity. % Used Displays the percentage of volume usage. The unit is %. For detailed information about the displayed item, see %Used in section 8-2-1. Last Updated Displays the date and time when the Device Manager agent performed the last update.
Table 7-1 LDEV-Number Panel Detailed Information Item Description Disk/Cache Partition Information External Subsystem Information Displays information about SLPR and CLPR. This item is only displayed for a StorageWorks XP12000/XP10000 that can use Disk/Cache Partition. LDEV Displays the LDEV number. SLPR Displays the SLPR number. CLPR Displays the CLPR number.
If the selected storage group is empty or different security settings are specified for the paths in the selected storage group, the Add Storage (STEP: Define Host/Port Connections) wizard opens. Perform steps 5 to 11. If all the paths in the selected storage group have the same security settings and all the LDEVs are set with paths to the same port, the Add Storage panel opens (see Figure 7-9). Select the desired type of storage addition operation, and then select OK to open the Add Storage wizard.
NOTE: Each StorageWorks XP12000/XP10000 and XP1024/XP128 port has its own host storage domains with LUN security settings. The same WWN can only be assigned to one host storage domain on each port. NOTE: When the port is recognized as an Initiator port or an External port, the Port checkbox is displayed in the inactive state and cannot be selected. For details about Initiator ports, refer to the Continuous Access XP manual for the storage subsystem.
8. Define LUs step (optional). The Define LUs panel (Figure 7-18) allows you to create LUSE devices. If you do not want to create LUSE devices, select Next to continue. This step is not displayed if the storage subsystem is started from the Open-Allocated group in the All Storage object. To optionally create LUSE devices from unallocated LDEVs, select the desired LDEVs for each LUSE device, and select the Create LUSE button. See section 8-6 for LUSE device requirements.
Figure 7-8 Adding Storage – Selecting the Group Figure 7-9 Adding Storage – Selecting the Storage Addition Operation Performing Logical Group Operations 82
Figure 7-10 Selecting the Logical Group Figure 7-11 Adding Storage – Selecting Ports Performing Logical Group Operations 83
Figure 7-12 Adding Storage – Defining Host/Port Connections NOTE: You can only select a storage subsystem if the selected storage group is empty.
Figure 7-14 Host Storage Domain Info Figure 7-15 Adding Storage – Allocating Storage Performing Logical Group Operations 85
Figure 7-16 Adding Storage – Browsing for LDEVs Figure 7-17 Adding Storage – Storage Found Performing Logical Group Operations 86
Figure 7-18 Adding Storage – Defining LUs Figure 7-19 Adding Storage – Assigning Host/Port Connection Performing Logical Group Operations 87
Figure 7-20 Adding Storage – Assigning LUNs Figure 7-21 Adding Storage – Confirmation 7-6-3 Moving Storage from One Group to Another The system administrator, local system administrator, storage administrator, and local storage administrator can move storage (LUNs) from one storage group to another. Guest and local guest users do not have access to this function. When you move storage, the selected LUN (path) is moved to another storage group or an empty group.
1. 2. Log in to Device Manager as a system administrator, storage administrator, local system administrator, or local storage administrator. Select an object to move storage from. If you are executing from the Logical Groups object, select a storage group that contains the LUN that you want to move. The List-Objects - Group Name subwindow is displayed in the information frame.
Figure 7-22 Moving Storage – Selecting the Path(s) Figure 7-23 Moving Storage – Selecting the Target Group Performing Logical Group Operations 90
Figure 7-24 Moving Storage – Confirmation 7-6-4 Modifying LUN Security for a Group The system administrator, local system administrator, storage administrator, and local storage administrator can modify the LUN security of the LUN(s) in a storage group. Guest and local guest users do not have access to this function. When you add a host WWN to a LUN, you secure that LUN to that WWN. When you remove a host WWN from a LUN, you unsecure that LUN from that WWN.
• Not assigned (Current Status) • Assign this security to all selected paths b. If the selected WWNs are assigned to all of the selected paths, the security properties that can be set are as follows: • Assigned to all paths (Current Status) • Delete this security from all selected paths c.
Figure 7-26 Modifying Security – Step 2: Select WWNs Figure 7-27 Modifying Security – Warning Performing Logical Group Operations 93
Figure 7-28 Modifying Security – Step 3: Summary of Changes and Confirmation 7-6-5 Removing Storage from a Group The system administrator, local system administrator, storage administrator, and local storage administrator can remove storage (LUNs) from an existing storage group. Guest and local guest users do not have access to this function. When you remove storage, you remove the selected LUN(s) from the storage group.
The Remove Storage – Confirmation panel displays, with a list of LUNs you are deleting, as shown in Figure 7-29. Figure 7-29 Removing Storage Groups – Confirmation 4. Do one of the following to either keep or delete the access paths to the LDEVs: • Select the Keep access path checkbox to remove the path from the storage group. The path itself remains registered and the logical unit to which the path is set remains in the Open-Allocated group. • Do not select the Keep access path checkbox.
CAUTION: Data may be lost if LUNs are released. Before deleting a storage group, you should back up the data that is stored on the LDEVs in the storage group. In addition, you should check that you will no longer have any need to use the storage in that storage group. CAUTION: Before deleting a LUN, make sure that no access is underway from a host. When a LUN is deleted, all I/Os being executed between a host and that LUN are canceled.
CAUTION: Before deleting a path, make sure that the path is no longer in use. NOTE: For LUSE: If all paths of the LUSE volume will be deleted, Device Manager allows you to delete or keep the LUSE volume if desired. To delete a LUSE volume, in the Delete Logical Group Confirmation panel, choose OK without selecting Keep access path. In the Confirmation - LUSE panel, choose the Delete LUSE button. To retain the LUSE volume, select the Keep LUSE button, except for the StorageWorks XP512/XP48.
8 All Storage/My Storage Operations This chapter describes All Storage/My Storage logical group operations: • Overview of All Storage/My Storage Operations (see section 8-1) • Viewing the All Storage/My Storage group (see section 8-2) • Performing a LUN scan operation (see section 8-3) • Allocating storage (see section 8-4) • Unallocating storage (see section 8-5) • Creating LUSE devices (see section 8-6) • Deleting LUSE devices (see section 8-7) 8-1 Overview of All Storage/My Storage Operatio
Figure 8-1 All Storage or My Storage • Number of LDEVs = total number of LDEVs in the All Storage or My Storage group (including all storage subsystems) • Open-Allocated Capacity* = total capacity of the LDEVs in the All Storage/My Storage group with paths set on open volumes • Open-Unallocated Capacity* = total capacity of the LDEVs in the All Storage/My Storage group without paths set on open volumes • Mainframe-Unspecified Capacity* = total capacity of the mainframe volume in the All Storage/My St
Figure 8-2 Viewing a Storage Subsystem Group in All Storage/My Storage When you select and expand a storage subsystem group in the All Storage/My Storage group, Device Manager displays the Open-Allocated group (see section 8-2-1), Open-Unallocated group (see section 8-2-2) and the Mainframe-Unspecified group (see section 8-2-3) for the selected storage subsystem. *The GB and TB capacity values are rounded down to two decimal places. The MB capacity values are rounded down to whole numbers.
Figure 8-3 Viewing the Allocated Group for a Storage Subsystem Select Allocate Storage to add paths to the selected LDEV(s) (see section 8-4). Select Unallocate Storage to remove paths from the selected LDEV(s) (see section 8-5). Select Move to Group to move the selected LDEV(s) to a storage group. The operations are the same as the operations for moving storage, see section 7-6-3). This panel provides the filtering feature.
Table 8-1 Open-Allocated Group Information under All Storage/My Storage Column Description SLPR Displays the SLPR number. This item is only displayed for a StorageWorks XP12000/XP10000 that can use Disk/Cache Partition. If no SLPR is set, 0 is displayed.
Table 8-1 Open-Allocated Group Information under All Storage/My Storage Column Description % Used Displays the volume usage. The unit is %. This item is updated when the Device Manager agent reports the volume usage to the Device Manager server. Use the following expression to obtain the storage usage: Amount of used file system capacity established on the target storage ÷ storage capacity x 100 (%) The usage cannot be calculated when the values required for calculation are incorrectly obtained.
Table 8-1 Open-Allocated Group Information under All Storage/My Storage Column Description Copy Type Displays copy type: BC = Business Copy XP CA-XP(Sync) = Continuous Access XP Synchronous CA-XP(Async) = Continuous Access XP Extension CA-XP = Continuous Access XP with unidentifiable synchronous mode* Snapshot = Snapshot XP CA-XP(Jrnl) = Continuous Access XP Journal Unpaired = unpaired Blank = pair status unknown Use this item for filtering.
• Name. Name of the storage subsystem. • Number of LDEVs. Number of LDEVs/LUs for which paths are not allocated, for open volumes in the storage subsystem. • Open-Unallocated Capacity. Total capacity of LDEVs/LUs for which paths are not allocated, for open volumes in the storage subsystem. The GB and TB capacity values are rounded down to two decimal places. The MB capacity values are rounded down to whole numbers.
Table 8-2 Unallocated Group Information under All Storage/My Storage Column Description LDEV LDEV number. For LUSE, only a representative LDEV number is displayed. Select the link to display the Detailed Information panel for the LDEV (refer to Figure 7-7). You can use this item for filtering by specifying a range. Type Displays the LDEV type. This column displays only for StorageWorks XP12000/XP10000.
Table 8-2 Unallocated Group Information under All Storage/My Storage Column Description Copy Status Copy status: Simplex = SMPL status Pair = PAIR status Copying = COPY (PD), COPY (RS), COPY (SP), or COPY status Reverse-Copying = COPY (RS-R) copy status Split = PSUS or PSUS (SP) copy status Suspended = PSUE copy status Error in LUSE = PDUB copy status Suspending = Suspending status Deleting = Deleting status None = copy status is unknown. Use this item for filtering.
Figure 8-5 Viewing the Mainframe-Unspecified Group for a Storage Subsystem Table 8-3 Information for the Mainframe-Unspecified Group under All Storage/My Storage Item Description LDEV Displays the LDEV number. For LUSE, only a representative LDEV number is displayed. Select the link to display the Detailed Information panel for the LDEV (refer to Figure 7-7). This item can be used for filtering. You can set conditions for filtering by specifying a range. Type Displays the LDEV type.
Table 8-3 Information for the Mainframe-Unspecified Group under All Storage/My Storage Item Description Volume Attr Displays volume attributes for LUN Expansion, LUSE, Virtual LVI/LUN (CVS), or Snapshot XP.
NOTE: If you display the contents of the LUN SCAN group while LUN Scan is being executed and before the operation is completed, the value displayed for the number of LUNs may be less than the actual number. To display the correct LUN count, display the contents of the LUN SCAN group again after LUN Scan ends. To perform a LUN Scan operation: 1. Log in to Device Manager as a system administrator or storage administrator. 2.
group using the information that was detected by the LUN Scan. For LUN information displayed in the Open-Allocated group, see section 8-2-1. After the LUN Scan operation, you can leave the LUNs in the LUN SCAN storage groups and manage the storage there, or you can create your own logical groups and move the LUNs from the LUN SCAN group into your customized groups. To move LUNs to another group, select the desired LUNs in the LUN SCAN group, and then select Move Storage (see section 7-6-3 for instructions).
Figure 8-7 Unallocating Storage – Confirmation 4. 5. Review the warning message. Select OK to delete the specified path(s) or Cancel to cancel your request. If you selected a volume with more than one path, Device Manager displays the paths and asks you to select the path(s) to be deleted, as shown in Figure 8-8. Figure 8-8 Unallocating Storage – Selecting the Path(s) 6. Select the desired path(s) and select OK to continue or Cancel to cancel your request.
Figure 8-9 Unallocating Storage LUSE – Confirmation 7. Review the warning message and do one of the following: CAUTION: The delete LUSE operation is destructive. Read and observe the important warning on the LUSE Confirmation panel. • To delete a LUSE volume, select the Yes, I have confirmed it check box, and then select the Delete LUSE button only if it is acceptable to lose the data on the LUSE volume. • To retain the LUSE volume, select Keep LUSE, except for the StorageWorks XP512/XP48.
• • An LDEV set as a command device cannot be used. • An LDEV registered as an external volume cannot be used. • An LDEV allocated to a copy pair cannot be used. However, for StorageWorks XP12000/XP10000, a Snapshot XP V-VOL can create a LUSE volume with another Snapshot XP V-VOL. StorageWorks XP Disk Array LUSE requirements: • The LDEVs in a LUSE device must be the same emulation type such as: OPEN-3, OPEN 8, OPEN-9, OPEN-K, OPEN-E, OPEN-L, OPEN-M, and OPEN-V.
Figure 8-10 Creating LUSE – Selecting LDEVs For StorageWorks XP12000/XP10000 and XP1024/XP128, the smallest LDEV number in the LUSE volume automatically becomes the representative LDEV number of a new LUSE volume. NOTE: You cannot delete/reconstruct existing LUSE devices during this procedure. You must delete a LUSE device first in order to use the individual LDEVs. NOTE: For an LDEV that is being used as an external volume, the checkbox is displayed in the inactive state and cannot be selected.
Figure 8-11 Create LUSE Confirmation and Warning 6. Review the warning information and select the Yes, I have confirmed it checkbox if you want to create the LUSE devices and lose the data on the related LDEVs/LUs. 7. Select Confirm to create the LUSE devices or Cancel to cancel your request. 8-7 Deleting LUSE Devices CAUTION: Deleting a LUSE device destructive. Data stored on the LUSE device will be lost. You should back up data before deleting LUSE devices.
Figure 8-12 Delete LUSE Confirmation and Warning 4. Review the warning information and select the Yes, I have confirmed it checkbox if you want to delete the LUSE devices and lose the data on the related LDEVs/LUs. 5. Select Confirm to delete the LUSE devices or Cancel to cancel your request.
9 Performing Host Operations This chapter describes Device Manager host operations: • Overview of Device Manager host operations (see section 9-1) • Viewing the list of hosts (see section 9-2) • Adding a host (see section 9-3) • Viewing host properties and volume information (see section 9-4) • Modifying host properties (see section 9-5) • Updating (Refreshing) host information (see section 9-6) • Managing copy pairs (see section 9-7) • Removing a host (see section 9-8) 9-1 Overview of Devic
9-2 Viewing the List of Hosts All Device Manager users can view the list of hosts for which they have access permission. To view the list of hosts, select the Hosts object in the navigation frame, and then expand the tree hierarchy under the Hosts object by clicking on + (see Figure 9-1). NOTE: When External Storage XP of StorageWorks XP12000/XP10000 is used, the external port for StorageWorks XP12000/XP10000 displays in a list of hosts.
9-3-1 Adding Hosts by Executing a LUN Scan When you execute a LUN scan operation on a storage subsystem, Device Manager detects the WWNs and automatically registers a temporary host per WWN. The names of the temporary hosts are host_serial-number (such as host_1) except for the WWNs in a WWN group. For the WWNs in a StorageWorks XP512/XP48 WWN group, Device Manager uses a naming convention that indicates the WWN group name: WWN-group-name_serial-number.
Figure 9-2 Adding a Host – Entering the Name 3. Enter the name for the new host using a maximum of 50 bytes. You can use the following characters: A-Z, a-z, 0-9, -, _, ., @ The host name may include spaces, but cannot consist only of spaces. Leading or trailing spaces are discarded. NOTE: The host name is not case-sensitive. 4. Add the World Wide Names (WWN) associated with the new host. Select Add to display the following prompt, as shown in Figure 9-3. Figure 9-3 Adding a Host – Entering a New WWN 5.
2. Select the desired host in the navigation frame (in this example, aibetsu). The Show Properties subwindow for aibetsu displays in the information frame, as shown in Figure 9-4. Figure 9-4 Viewing Host Properties The Show Properties subwindow displays the following information for the host you selected: Name, IP address, Capacity (total capacity of storage (volumes) allocated to the host), Type (host type), and WWNs assigned to the host.
NOTE: The Create Pair, Modify Pair, and Delete Pair buttons do not appear when you have logged on as a guest or local guest. • If HDLM is installed on the selected host. When the Device Manager agent and HDLM are installed on the selected host, the information frame displays the Dynamic Link Manager button for launching ® ® HDLM for Sun™ Solaris™ and HDLM for IBM AIX . For details on launching HDLM for Sun™ ® ® Solaris™ and HDLM for IBM AIX , see sections 4-2 and 5.7.
Figure 9-6 Modifying Host Properties 4. Modify the host properties as needed on the Modify Properties panel. You cannot remove or add a WWN when the external port is selected. • To rename the host, edit the name in the Name field. The host name can be a maximum of 50 bytes. You can use the following characters: A-Z, a-z, 0-9, -, _, ., @ The host name may include spaces, but cannot consist only of spaces. Leading or trailing spaces are discarded. • To remove WWNs, select the WWNs, and then click Remove.
Figure 9-8 Modifying Host Properties – Selecting LUN Security Changes Select at least one checkbox for the storage for which you want to set the LUN security by using the newly added WWN(s). NOTE: For HSD: For the StorageWorks XP12000/XP10000 and XP1024/XP128, any changes to the LUN security setting for storage belonging to a host storage domain (HSD) will apply to all storage in the same host storage domain.
Figure 9-9 Modifying Host Properties – Confirming LUN Security Changes 9-6 Updating (Refreshing) Host Information The system administrator, storage administrator, local system administrator, and local storage administrator can update the host information reported by Device Manager. Guest and local guest users can view the host information, but cannot update it.
CAUTION: When you update the host information, the status of the copy pairs managed by the host is updated, but the modification of the configuration definition file is not reflected. In this case, you must update the storage subsystem information. For details on updating the storage subsystem information, see section 10-1-4. For details on the configuration definition file, see the RAID Manager documentation.
Figure 9-11 Refreshing Host Information – Confirmation 9-7 Managing Copy Pairs The system administrator, local system administrator, storage administrator, and local storage administrator can manage Business Copy XP, Continuous Access XP, and Snapshot XP copy pairs. Guest and local guest users cannot manage copy pairs. You can operate Continuous Access XP Journal copy pairs from the Physical View dialog box. For details, see section 10-2-1.
2. Select and expand the Hosts object in the navigation frame (refer to Figure 9-1). 3. In the navigation frame select the host that contains the P-VOL(s) of the copy pair(s) that you want to create (refer to Figure 9-4). 4. In the information frame, select the checkbox for each volume that will become the P-VOL of a new copy pair to be created (see Figure 9-12).
Group. Select the desired copy group for all copy pairs being created, or create a new group if desired. For details on copy groups, refer to the Business Copy XP or Continuous Access XP manual for the storage subsystem. The following combinations of copy pairs cannot be registered to the same copy group or to an existing copy group. • The LDEVs making up the copy pair are allocated to different hosts.
Figure 9-12 Creating a Pair – Selecting P-VOLs Figure 9-13 Creating a Pair – Choosing Pair(s) Step Performing Host Operations 131
Figure 9-14 Creating a Pair – Selecting S-VOL(s) Figure 9-15 Creating a Pair – Defining Pair(s) Step Performing Host Operations 132
Figure 9-16 Creating a Pair – Viewing Pair Information NOTE: The displayed host is the host that manages copy pairs. If pair management is performed by a central management method, the host that manages copy pairs centrally is displayed.
Figure 9-18 Creating a Pair – Confirmation Step Figure 9-19 Creating a Pair – Warning of Data Loss 9-7-2 Modifying Copy Pairs The system administrator, storage administrator, local system administrator, and local storage administrator can modify Continuous Access XP, Business Copy XP, and Snapshot XP copy pairs. Guest and local guest users cannot modify copy pairs. Table 9-1 shows the operations that you can perform when you modify a copy pair.
Table 9-1 Modify Pair Operations Target of Operation Operations that can be performed Copy group If one or more copy pairs in the group are in the Suspend or Error In LUSE status: • For Continuous Access XP Sync and Continuous Access XP Extension, select Resync. • For Business Copy XP, select Resync or Restore. If all copy pairs in the group are in the Split status: • For Continuous Access XP Sync and Continuous Access XP Extension, select Resync.
5. Select Modify Pair(s) Step. The Select Modify Pair(s) panel (see Figure 9-21) allows you to select the copy group(s) and/or copy pair(s) for which you want to modify the status. When you are finished selecting copy groups/pairs, select Next. NOTE: You can only perform one type of operation at a time (split, resync, or restore), so make sure to select copy groups/pairs for one operation type only. 6. Modify Pair(s) Step.
Figure 9-20 Modifying a Pair – Selecting the Host Figure 9-21 Modifying a Pair – Select Modify Pair(s) Step NOTE: The displayed host is the host that manages copy pairs. If pair management is performed by a central management method, the host that manages copy pairs centrally is displayed.
Figure 9-22 Modifying Pair(s) Step Figure 9-23 Modifying a Pair – Summary of Changes Step Performing Host Operations 138
Figure 9-24 Modifying a Pair – Warning of I/O Activity on P-VOL 9-7-3 Notes on Copy Pair Operations This subsection provides information on copy pair operations. Table 9-3 lists items to consider before creating copy pairs. Table 9-3 Items to Consider Before Creating Copy Pairs Item Description Existing copy pair A copy pair can be created by using storage subsystem management tools such as Remote Web Console and SVP.
Table 9-3 Items to Consider Before Creating Copy Pairs Item Description Central management method When a single host centrally manages the creation, status change, and deletion of copy pairs, disable the command device security functionality on the host that manages the copy pairs. If the command device security functionality is enabled, an LU not recognized by the host cannot be managed by the copy pair.
Table 9-4 Notes on Copy Pair Operations Item Description Error code 7774 Error code 7774 occurs when the Device Manager agent fails to create a HORCM configuration file, start the HORCM instance, or execute the pair creation or status change command. In this case, the error messages output by Web Client and their causes are as follows: 1 This Config File could not be modified.
Table 9-4 Notes on Copy Pair Operations Item Description 1 * An error might occur when attempting to create a copy pair by using an LU that satisfies the following conditions: • A path using CL1-A (for the StorageWorks XP Disk Array) was assigned to the LU, and a path that used LUN0 was also assigned to the LU. • The host used for creating the copy pair recognizes the above path.
Table 9-5 Notes on Managing the Host Item Description When buttons for copy pair functionality are not displayed If the copy pair functionality (such as the Create Pair button) is not displayed, perform the following operations: • Note that RAID Manager must be installed on the host managed by Device Manager. • Specify the Device Manager agent in the host settings of the server.properties file. • Check the switch partition. • Make sure that the command device is not mounted.
Figure 9-25 Deleting a Pair – Select Delete Pair(s) Step NOTE: The displayed host is the host that manages copy pairs. If pair management is performed by a central management method, the host that manages copy pairs centrally is displayed. Figure 9-26 Delete Pair Confirmation (Summary of Changes Step) NOTE: The displayed host is the host that manages copy pairs. If pair management is performed by a central management method, the host that manages copy pairs centrally is displayed.
1. Log in to Device Manager as a system administrator, storage administrator, local system administrator, or local storage administrator. 2. Select and expand the Hosts object in the navigation frame (refer to Figure 9-1). 3. Select the host to be removed, and then select the Remove Host operation in the method frame. 4. Device Manager displays the LUN security changes associated with the remove host operation (if any) (see Figure 9-27) and asks you to confirm the operation.
10 Performing Storage Subsystem Operations This chapter describes Device Manager storage subsystem operations in the following sections: • • • • Overview of storage subsystem operations (see section 10-1) • Viewing the list of subsystems (see section 10-1-1) • Adding a storage subsystem (see section 10-1-2) • Viewing and editing storage subsystem properties (see section 10-1-3) • Performing a Refresh operation (see section 10-1-4) • Handling a change to the IP address of a subsystem (see sectio
When the Subsystems object is selected in the navigation frame, the method frame displays the Add Subsystem method (see section 10-1-2), and the information frame displays the list of storage subsystems. You can view the information about a storage subsystem by selecting the link for the storage subsystem name in this list.
NOTE: If you are using StorageWorks XP12000/XP10000 External Storage XP, note the following points when you configure an external subsystem under Device Manager: • • If an external subsystem is added to Device Manager, but StorageWorks XP12000/XP10000 is not added, Device Manager will be unable to recognize that the external subsystem is connected as an external system. Make sure that when you add an external subsystem to Device Manager, you also add StorageWorks XP12000/XP10000.
Figure 10-2 Adding a Subsystem 10-1-3 Viewing and Editing Storage Subsystem Properties The system administrator and storage administrator can view and edit storage subsystem properties. Guest users can only view storage subsystem properties. Local users (the local system administrator, local storage administrators, and local guests) do not have access to these functions. To view and edit the properties of a storage subsystem: 1.
3. To modify the storage subsystem properties, select the Modify Properties method in the method frame to open the Modify Properties panel for the storage subsystem (see Figure 10-4). You can change the following storage subsystem properties: • Name: Enter a name that identifies the storage subsystem. Enter no more than 50 bytes, using the following characters: A-Z, a-z, 0-9, -, _, ., @ The name can include spaces, but cannot consist only of spaces. Leading or trailing spaces are discarded.
Figure 10-4 Modifying Properties (StorageWorks XP1024/XP128) 10-1-4 Performing a Refresh Operation The system administrator and storage administrator can perform refresh operations. Guests, local system administrators, local storage administrators, and local guests cannot perform a refresh. A refresh operation rediscovers the storage subsystem.
2. Select and expand the Subsystems object in the navigation frame, and then select the desired storage subsystem (refer to Figure 10-1). 3. In the method frame, select the Refresh method. 4. When the Refresh Storage Subsystem – Confirmation panel displays (see Figure 10-5), click OK to refresh the storage subsystem information, or select Cancel to cancel your request. You are notified when the refresh operation is complete.
NOTE: If you remove a storage subsystem that has alert information, and then attempt to display the alert information for the removed subsystem, ARRAY.storage -subsystem-type (such as ARRAY.XP10000) is displayed as the source. In this case, either delete the alert information if it is not needed, or add the storage subsystem to Device Manager again. To remove a storage subsystem from the Device Manager system: 1. Log in to Device Manager as a system administrator or storage administrator. 2.
• Viewing detailed information for StorageWorks XP1024/XP128 (see section 10-2-2) • Viewing detailed information for StorageWorks XP512/XP48 (see section 10-2-3) • Viewing detailed LDEV information (see section 10-2-4) NOTE: The total size that is displayed is not the total size of the physical disk. It is the total available disk size, which means the total of the sizes of all logical devices on the machine. Thus, this total size is increased or decreased by creating or deleting logical devices.
belonging to the representative VDEV. No information displays for array groups that do not belong to the representative VDEV. For a discrete VDEV configuration, the Frame Information panel displays the information shown in Figure 10-11. NOTE: For a 7D+1P array group, Coupled displays next to the parity group number (Parity Group 1-2(Coupled:2-2)). In this case, information about the parity group indicated by Coupled (example: 2-2) is not displayed (see Figure 10-9). 8.
Figure 10-8 Physical View for StorageWorks XP1024/XP128 (Array Groups) The StorageWorks XP1024/XP128 physical view (Array Groups) panel displays the following information and buttons: • Array Groups: Displays the number of array groups and capacity for each array control processor (ACP) and the total number of array groups and total capacity for all ACPs. NOTE: The displayed capacity of the array group is truncated to two decimal places.
Figure 10-9 Frame Information Panel for StorageWorks XP1024/XP128 (Level 1) The StorageWorks XP1024/XP128 Frame Information (level 1) panel displays the storage subsystem name, ACP number, frame number, and list of parity groups (maximum 32) for the frame that you selected using the VIEW button on the array group view of the physical view. The StorageWorks XP1024/XP128 has a maximum of 512 array groups on one chassis (the parts displayed in pair both at the top and bottom of the frame).
Figure 10-10 Discrete VDEV Configuration for StorageWorks XP1024/XP128 Performing Storage Subsystem Operations 158
Figure 10-11 Frame Information Panel for Discrete VDEV Configuration Performing Storage Subsystem Operations 159
Figure 10-12 Frame Information Panel for StorageWorks XP1024/XP128 (Level 2) The Frame Information (level 2) panel displays the storage subsystem name, ACP number, frame number, and list of array groups (16 maximum) for the parity group that you selected in the Frame Information (level 1) panel.
Figure 10-13 Physical View for StorageWorks XP1024/XP128 (Disks) The disks view of the StorageWorks XP1024/XP128 physical view displays the following information and buttons: • ACP: Displays the number of disks and capacity for each array control processor and the total number of disks and total capacity for all ACPs • PORT CONTROLLERS button: opens the Port Controller panel (see section 10-3-4) • Port buttons (such as E under Cluster 1 for port CL1 E): open the Port Information panel for the selected
8. In the Frame Information panel, you can select the desired array group to open the LDEV Information panel. For details on the LDEV Information panel, see section 10-2-4. 9. In the physical view, select the DISKS FRONT or DISKS BACK button (DISKS button for StorageWorks XP48) to view the disk information (see Figure 10-17).
Figure 10-15 Physical View for StorageWorks XP512/XP48 (Array Groups) The StorageWorks XP512/XP48 physical view (Array Groups) displays the following information and buttons: • Array Groups: Displays the number of array groups and capacity for each array control processor (ACP) and the total number of array groups and total capacity for all ACPs NOTE: For the StorageWorks XP512/XP48 storage subsystem, 0 GB is determined as the capacity of an array group for which a mainframe emulation type (such as 3390-3)
Figure 10-16 Frame Information Panel for StorageWorks XP512/XP48 The Frame Information panel displays the storage subsystem name, ACP number, frame number, and list of array groups for the selected frame. The following information is displayed for each array group: • Array group ID • Number of disks in the array group and their capacity (4 x 72 GB: Four 72-GB disk drives) • Capacity of the array group Selecting an array group opens the LDEV Information panel (see section 10-2-4).
10-2-4 Viewing LDEV Information The system administrator, storage administrator, and guest users can view detailed LDEV information. Local users cannot view LDEV information. To view the detailed LDEV information: 1. Log in to Device Manager as a system administrator, storage administrator, or guest. 2. Select and expand the Subsystems object in the navigation frame, and then select the desired storage subsystem (refer to Figure 10-1). 3.
Figure 10-18 LDEV Information Panel – Detail Tab The Detail tab of the LDEV Information panel displays the following information. You can sort the displayed information by selecting the desired column heading. • LDEV: LDEV number. For a LUSE volume, you can select a logical device number from the drop-down list of the logical devices that make up the LUSE volume. Selecting a logical device displays its information. • Capacity: capacity of the logical devices.
Figure 10-19 LDEV Information Panel – Path Info Tab The Path Info tab of the LDEV Information panel displays the following information. You can sort the displayed information by selecting the desired column heading. • LDEV: LDEV number. For a LUSE volume, displays only the representative LDEV number. To select the path of the logical device to be the target of ALLOCATE or UNALLOCATE, select the checkbox of the path.
Figure 10-20 LDEV Information Panel – Pair Info Tab The Pair Info tab of the LDEV Information panel displays the following information. You can sort the information by selecting the desired column heading. • Copy Type: BC (Business Copy), CA-XP(Sync) (Continuous Access XP Synchronous), CA-XP(Async) (Continuous Access XP Extension), CA-XP (Continuous Access XP whose synchronization mode is unknown), Snapshot (Snapshot XP), Unpaired, none (pair status unknown).
10-3 Port Operations Device Manager port operations include: • Configuring the ports (StorageWorks XP1024/XP128 and XP512/XP48) (see section 10-3-1) • Managing LUN groups (XP512/XP48 only) (see section 10-3-2) • Managing WWN groups (XP512/XP48 only) (see section 10-3-3) • Configuring the fibre-channel adapters (XP1024/XP128 and XP512/XP48) (see section 10-3-4) NOTE: For the iSCSI ports (StorageWorks XP1024/XP128), and mainframe ports (StorageWorks XP1024/XP128 or StorageWorks XP512/XP48), you can re
NOTE: If you change the Topology (Connection) settings, the attributes displayed by Web Client may not change because it takes time for the change to take effect in the storage subsystem. In such a case, wait for ten seconds after changing the setting, and then refresh the storage subsystem (see section 10-1-4). The updated Topology (Connection) value should appear. NOTE: If you change the Fibre Addr setting, the new setting may not take effect immediately.
• • Fibre Addr: In fabric environments, the port address is assigned automatically by fabric switch port number and is not controlled by the StorageWorks XP1024/XP128 port settings. In arbitrated loop environments, the port address is set by entering an AL-PA (or loop ID). Refer to Table 10-1 for the available AL-PA values.
• Modify WWN Group: Opens the Modify WWN Group panel (see section 10-3-3) • WWN Info button: Displays the WWN(s) registered to the port and the WWN Group to which each WWN belongs (if any) 10-3-2 Managing LUN Groups The system administrator and storage administrator can manage LUN groups on the StorageWorks XP512/XP48 storage subsystem. Guests, local system administrators, local storage administrators, and local guests cannot manage LUN groups.
4. Select MODIFY LUN GROUP to open the Modify LUN Group panel (refer to Figure 10-23). 5. Select CREATE NEW GROUP, enter the desired name for the new LUN group, and select OK. The name must be no more than 8 bytes and must consist of the following Basic_Latin (Unicode 0020 to 007E) characters only (it must not contain spaces or any of the following characters): A-Z, a-z, 0-9, !, #, $, %, &, ', (, ), +, -, ., =, @, [, ], ^, _, `, {, }, ~ LUN group names are case-sensitive.
Figure 10-25 Creating a New LUN Group – Selecting the WWN(s) Figure 10-26 Creating a New LUN Group – Selecting the WWN Group(s) 10-3-2-2 Modifying a LUN Group To modify an existing LUN group: 1. Log in to Device Manager as a system administrator or storage administrator. 2. Select the Subsystems object in the navigation frame, select the desired storage subsystem, and then select the Physical View button. 3.
5. Select the desired LUN group, and make the desired changes to the LUN group. Select the LUN tab to add/ remove LUN(s), select the WWN tab to add/ remove WWN(s), and select the WWN Group tab to add/ remove WWN group(s). To change the name of a LUN group, enter the new name in the Select LUN Group field. 6. When the Modify LUN Group panel displays the desired changes for the selected LUN group, select SAVE, or select CANCEL to cancel your request to modify the LUN group. 7.
Figure 10-27 Modify WWN Group Panel The Select WWN Group drop-down list box allows you to select the desired WWN group. The DELETE THIS GROUP button allows you to delete the selected WWN group. The CREATE NEW GROUP button allows you to create a new WWN group to the selected port. The Unsecured list box displays the WWN(s) that can be added to the selected WWN group. The Secured list box displays the WWN(s) in the selected WWN group. The ADD>> button moves the selected WWN(s) to the Secured list.
2. Select the Subsystems object in the navigation frame, select the desired storage subsystem, and then select the Physical View button. 3. In the physical view, select the desired port (for StorageWorks XP512/XP48 port CL1-A, click A in Cluster 1) to open the Port Information panel. 4. Select the desired WWN group, and use the ADD>> and <
4. Make the desired channel adapter mode changes, and select OK. 5. Before changing the fibre PCB mode, Device Manager displays a warning that you cannot change the fibre PCB mode while I/O operations with the host are underway. You must stop the host, change the fibre PCB mode, and then restart the host. After reviewing the information displayed in the warning message and stopping the hosts, select OK. To cancel your request to change the fibre PCB mode, select CANCEL. 6.
Figure 10-29 Changing the Channel Adapter Mode Confirmation 10-4 LDEV Operations Device Manager LDEV operations include: • Allocating storage (see section 8-4) • Unallocating storage (see section 8-5) • Creating an LDEV (see section 10-4-3) • Deleting an LDEV (see section 10-4-4) • Setting a command device (see section 10-4-5) NOTE: To perform an operation on a port for StorageWorks XP12000/XP10000, use the physical view for StorageWorks XP12000/XP10000 (see section 10-2-1).
4. Define Host/Port Connections Step. The Define Host/Port Connections panel (see Figure 10-30) allows you to select the desired port(s) and (optionally) the desired host WWN(s) to secure to the LDEV. After defining the port(s) and host/port connection(s), select NEXT to continue. NOTE: For StorageWorks XP1024/XP128, the following ports are not displayed: CL1-S, CL1-T, CL1-U, CL1-V, CL1-W, CL1-X, CL1-Y, CL1-Z, CL2-S, CL2-T, CL2-U, CL2-V, CL2-W, CL2-X, CL2-Y, CL2-Z.
Figure 10-31 Allocating Storage – Assigning Host/Port Connections Figure 10-32 Allocating Storage – Assigning LUNs Performing Storage Subsystem Operations 181
Figure 10-33 Allocating Storage – Confirmation 10-4-2 Unallocating Storage (Removing Volume Paths) System administrators and storage administrators can unallocate storage. Guests, local system administrators, local storage administrators, and local guests cannot unallocate storage. When you unallocate storage, you remove one or more access paths from an LDEV. When you unallocate a LUSE device, you can also optionally delete the LUSE device to make the individual LDEVs available for use.
Figure 10-34 Unallocating Storage – Confirmation Figure 10-35 Unallocating Storage – Delete LUSE or Keep LUSE 10-4-3 Creating an LDEV The system administrator and storage administrator can create an LDEV on an array group. Guests, local system administrators, local storage administrators, and local guests cannot create an LDEV. When you create an LDEV, you select an existing array group with free space and specify the desired LDEV parameters: device size and emulation type for XP1024/XP128 and XP512/XP48.
CAUTION: For the StorageWorks XP1024/XP128 and StorageWorks XP512/XP48 storage subsystems, you cannot create an LDEV whose size is the same size as the maximum size of free space in an array group because a control area is also created in the storage subsystem. At least 30 MB of free space must be left available.
Figure 10-36 Creating an LDEV – Specifying LDEV Parameters (XP512/XP48) Figure 10-37 Creating an LDEV – Confirmation 10-4-4 Deleting an LDEV CAUTION: The delete LDEV operation is destructive. Data on the LDEV you are deleting will be lost. You should back up data before performing this operation. The system administrator and storage administrator can delete LDEVs. Guests, local system administrators, local storage administrators, and local guests cannot delete LDEVs.
• An LDEV used as a command device • An LDEV specified as a copy volume (P-VOL, S-VOL, or SP-VOL) To delete an LDEV: 1. Log in to Device Manager as a system administrator or storage administrator. 2. Make sure that the LDEV to be deleted is no longer in use, that the data has been backed up, and that all access paths to the LDEV have been removed. 3.
• Command device security can be set. For XP512/XP48, when you delete a command device, its security properties are released. You cannot set or release only the security properties of a XP512/XP48 command device. To set or cancel a command device: 1. Log in to Device Manager as a system administrator or storage administrator. 2. Select the Subsystems object in the navigation frame, select the desired storage subsystem, and then select the Physical View button to open the physical view. 3.
11 Performing Report Operations This chapter describes the different types of Device Manager reports that you can run: • Overview of Device Manager Reports (see section 11-1) • Physical configuration of storage subsystem (see section 11-2) • Storage utilization by host (see section 11-3) • Storage utilization by logical group (see section 11-4) • Users and permissions (not available to guest users) (see section 11-5) 11-1 Overview of Device Manager Reports Device Manager allows system users to gen
Figure 11-2 Physical Configuration of Storage Subsystem Report – HTML Figure 11-3 Physical Configuration of Storage Subsystem Report – CSV 11-3 Storage Utilization by Host Report The Storage Utilization by Host report displays storage utilization statistics and detailed storage information for each host added to the Device Manager server (see Figure 11-4).
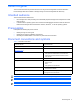
Figure 11-4 Storage Utilization by Host Report (HTML) 11-4 Storage Utilization by Logical Group Report The Storage Utilization by Logical Group report (see Figure 11-5) displays the following information: • For each storage subsystem added to the Device Manager server: storage subsystem name, model, serial number, IP address, configured capacity, allocated capacity, and percentage of allocated capacity in use by the host OS(s).
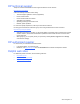
Figure 11-5 Storage Utilization by Logical Group Report (HTML) 11-5 Users and Permissions Report The Users and Permissions report (see Figure 11-6) displays the following information for Device Manager users: • User groups managed by the Device Manager server. (The Peer group is reserved for use by the Device Manager agent only.
12 Troubleshooting This chapter describes Device Manager Web Client troubleshooting. • For general information on troubleshooting, see section 12-1. • For information on countermeasures, see section 12-2. • For information on warning messages output from Device Manager, see section 12-3. • For information on error messages, see section 12-4.
Table 12-1 General Troubleshooting Information Problem Description The File Download panel displays when you invoke the Java™ GUI. The Java™ Web Start software may have been previously installed and removed. When JWS was removed, the association between the file extension “.JNLP” and the JWS application may not have been removed. When the link to the .JNLP file is selected, the OS tries to run but does not find JWS.
Table 12-1 General Troubleshooting Information Problem Description The Dynamic Link Manager button is not displayed in the Host view. When HDLM is installed on the host, the Device Manager server receives notification from a Device Manager agent and recognizes that HDLM for Sun™ ® ® Solaris™ and HDLM for IBM AIX is installed in that host.
Table 12-1 General Troubleshooting Information Problem Description When Device Manager has not When you are using a Flex Copy XP environment with StorageWorks created a copy pair for an LDEV, BC is XP12000/XP10000, BC is displayed in Copy Type of an LDEV for a Flex Copy XP displayed in Copy Type for that LDEV. pair. For details on Flex Copy XP, refer to the HP StorageWorks External Storage XP User Guide for the XP12000/XP10000. The contents of a message are garbled in an English language environment.
For example, depending on hardware, the servers and HBAs may not recognize the LUNs using the subject port unless a specific host mode is selected for the port. For details on how to change the port settings, refer to the manual for the corresponding storage subsystem. The mode cannot be switched if a host is currently performing I/O operation with the LUNs of the port. To proceed, shut down the host, change the mode, and then reboot the host.
12-3-8 An Internal Volume Mapped to an External Volume Is Invalid An internal volume mapped with an external volume may become invalid when you delete an external volume or change a security setting. The following warning message displays: An assigned volume of External Storage XP may be invalid. Are you sure you want to continue? Check any changes. If you perform this operation, you may have to execute Disconnect Volume in Remote Web Console.
Confirm that all hosts have been added into the host view before running a LUN Scan. After LUN Scan, Device Manager creates new hosts that have WWNs associated with the LUNs and have not been added into the Host View. You will need to clean up these hosts after the attributes of them are updated when the Device Manager Agent reports information about them. Are you sure you want to continue? Check the list of hosts to make sure that all WWNs managed by Device Manager have been registered as hosts.
Acronyms and Abbreviations ACP array control processor (back-end array processor on the XP1024/XP128 and XP512/XP48) AG array group AL arbitrated loop API application program interface ACP array control processor BC Business Copy XP CA-XP Continuous Access XP CA-XP(Async) Continuous Access XP Extension CHA channel adapter CLI command line interface CLPR cache logical partition cmd dev command device CSV comma-separated value CU control unit CVS customized volume size (another te
JRE Java™ Runtime Environment JWS Java™ Web Start software KB kilobyte (1024 bytes) LAN local area network LDEV logical device LU logical unit LUN logical unit number, logical unit LUSE LUN Expansion, LU Size Expansion MB megabyte (1024 KB) MCU main control unit (for Continuous Access XP) OS operating system PA port address PC personal computer PCB printed circuit board PG parity group P-VOL primary volume (for Continuous Access XP or Business Copy XP) RAID redundant array o
URL uniform resource locator VDEV virtual device VM Volume Manager VPN virtual private network VxVM VERITAS™ Volume Manager WWN worldwide name XGA eXtended graphics array XML eXtensible markup language Acronyms and Abbreviations 201