
HP StorageWorks Command View XP Advanced Edition Device Manager Server Installation and Configuration Guide (December 2005)


Windows® Systems Installation 38
2. Restart Windows.
3. Release the SLP daemon registration.
4. Register the SLP daemon again.
3-2-2-2 Upgrading Device Manager Server and Common Component
To upgrade the Device Manager server and Common Component:
1. Log on to the system as an administrator.
2. Stop any other Command View XP AE Suite software that is running.
3. Stop the Device Manager server: -Select Start, Programs, HP Command View XP AE, Device
Manager, and then Stop Server (see Figure 3-27).
CAUTION: Do not use the Windows
®
Services panel to stop the Device Manager server.
4. Stop the Common Component services: <common component installation folder>\
bin\hcmdssrv /stop.
NOTE: Do not stop the Common Component services while another Command View XP AE Suite program
is running.
5. For version upgrades, Device Manager automatically upgrades old data files to the latest
version.
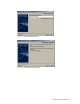
6. Insert the Device Manager server CD. The Command View XP AE Device Manager Already
Installed panel (see Figure 3-20) displays. Select Next to continue.
CAUTION: If you attempt to downgrade Device Manager, the installer will display the Command View XP AE
Device Manager Upgrade Error panel (see
Figure 3-21) and exit.
NOTE: If the Command View XP AE Suite software is running panel (refer to Figure 3-3) is displayed, you
must stop all of the Command View XP AE Suite software before installation.
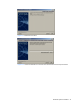
7. The Choose the Database for Command View XP AE Device Manager panel is displayed (refer
to Figure 3-11). Specify the file location for the Device Manager server:
• You must have at least 100 MB of free space in this location.
• The file name and path have the same restrictions as the Common Component file name
and path.
8. Select Next to continue.
9. If the Windows
®
Firewall function is installed on the system, the Adding to the Windows Firewall
exceptions panel displays (see Figure 3-13). Check the contents of the panel, and select Next to
continue.
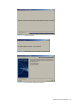
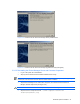
10. The Pre-installation Summary panel displays (refer to Figure 3-14). The product name,
installation folder, information on installation disk capacity, the IP address or host name of the
server machine, and the port number to be used are displayed. Verify that the information is
correct, then select Install to begin.
11. If you select Cancel, the Cancellation Warning panel will display (refer to Figure 3-15), warning
you that if you cancel now installation will not complete.
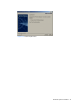
12. The Please Wait panel displays (refer to Figure 3-16), then the Progress panel displays (refer to
Figure 3-17).
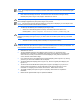
13. The Secure Socket Certificates Note panel (refer to
Figure 3-18) displays. If you plan to run
secure socket communications, note the information in this panel for later use. For more
information on configuring secure sockets, see section
6 . Select Next to continue.
14. The Install Complete panel (refer to
Figure 3-19) displays. Select Finish to complete the
installation.
15. Refresh all the registered disk arrays to update the database.