HP StoreFabric CN1100R Dual Port Converged Network Adapter User Guide Abstract This document is for the person who installs, administers, and troubleshoots servers and storage systems. HP assumes you are qualified in the servicing of computer equipment and trained in recognizing hazards in products with hazardous energy levels.
© Copyright 2013, 2014 Hewlett-Packard Development Company, L.P. The information contained herein is subject to change without notice. The only warranties for HP products and services are set forth in the express warranty statements accompanying such products and services. Nothing herein should be construed as constituting an additional warranty. HP shall not be liable for technical or editorial errors or omissions contained herein. Microsoft® and Windows® are U.S.
Contents Technician notes ........................................................................................................................... 4 Warnings, cautions, and notes.................................................................................................................... 4 Introduction .................................................................................................................................. 5 Overview ........................................................
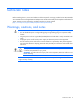
Technician notes Before installing the unit, review and adhere to all device-specific warnings provided in the HP StoreFabric CN1100R Dual Port Converged Network Adapter User Guide and in Safety and Compliance Information for Server, Storage, Power, Networking, and Rack Products on the HP website (http://www.hp.com/support/Safety-Compliance-EnterpriseProducts).
Introduction Overview The HP StoreFabric CN1100R 2P CNA is a dual-port converged network adapter that supports Gen8 ML and DL ProLiant servers and uses the Broadcom 57810s Meru-D. For more information about the HP StoreFabric CN1100R 2P CNA, see the HP website (http://www.hp.com/go/cna). Downloading files 1. Go to the HP website (http://www.hp.com/go/cna). 2. Select the adapter. 3. Select Technical Support/Manuals, and then select Drivers, Software & Firmware. 4.
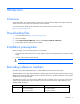
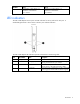
Identifier Port 1 Port 2 WWN (20:00:[Port 1 MAC address +1]) 20:00:AC-16-2D-83-00-B1 Port 1 WWN: (20:00:[Port 2 MAC address +1]) 20:00:AC-16-2D-83-00-B5 Port 2 WWN: LED indicators The CN1100R Adapter has two ports with LED indicators for activity and link for each port. A standard-height bracket is shown below with SFP+ ports and LED indicators. The CN1100R Adapter LED indicators operate as described in the following table.
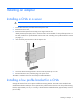
Installing an adapter Installing a CNA in a server WARNING: Disconnect the host from the power source before installing the CNA. 1. Power down the server, and then remove the power cord. 2. Remove the server case. 3. Remove the blank panel from an empty x8 or larger PCIe bus slot. Identify the PCI Express option slot in which the CNA is to be installed. If a low profile option slot is to be used, install the low profile bracket onto the CNA. See "Installing a low profile bracket for a CNA (on page 7).
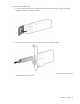
To install a low profile bracket: 1. To remove any SFP transceivers or cables from the CNA transceiver cage assembly, pull the bail (handle) out and down to release the latch. 2. Gently pull the SFP transceiver out. Store the transceiver in an ESD-safe place. 3. Using a correctly sized slotted screwdriver, carefully remove the two board lock screws located at the top and bottom of the connector.
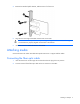
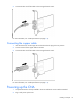
4. Remove the standard profile bracket, and then store it for future use. 5. Align the new mounting bracket tabs with the holes in the CNA. IMPORTANT: Do not push the bracket past the grounding tabs on the transceiver housing. Be sure the LEDs are properly aligned with the holes in the bracket. 6. Install the screws that attach the CNA to the bracket. Attaching media Connect the CNA with either removable SFP optical transceivers or copper interface cables. Connecting the fiber optic cable 1.
3. Connect the other end of the cable to the converged network switch. For more information, see "Cable specifications (on page 14)". Connecting the copper cable 1. Insert the transceiver into the cage. Be sure that the tab on the plug clicks into position. 2. Connect one end of the copper cable to the CNA. 3. Connect the other end of the cable to the converged network switch. For more information, see "Cable specifications (on page 14)". Powering up the CNA 1.
3. Observe the link and activity LEDs to be sure the CNA connects to the switch. 4. Watch the server console for any POST error messages and the CNA for the correct BIOS startup message.
Installing the device drivers Installing drivers on the OS The CNA runs on the following drivers: NIC, iSCSI, and FCoE. The drivers are bundled in one kit. Download the appropriate kit, and then run the Smart Component. Install one kit only. Install the software in the following order: 1. Install the drivers. 2. Download and update the CNA firmware. 3. Install or configure multi-pathing software (if required). 4. (Optional) Install BACS management software.
Specifications Environmental specifications Specification Value Temperature Operating: 0° to 55°C (32° to 131°F) Non-operating: -40° to 149°F (-40° to 65°C) Humidity Operating: 10 to 90% relative humidity, non-condensing Non-operating: 5 to 95% relative humidity, non-condensing Airflow 200 If/min (minimum) General specifications Specification Value Controller HP StoreFabric CN1100R Dual Port Converged Network Adapter (QW990A) Dimensions (LxW) 5.2 x 2.7 inches (13.208 cm x 6.
Copper cables and SFP+ Ethernet optical modules (SR) Part number HP 5m C-series passive copper SFP+ cable AP785A HP 7m C-series active copper SFP+ cable QK701A HP 10m C-series active copper SFP+ cable QK702A 10Gb SFP+ Ethernet optical modules (SR) -- HP 10Gb SR SFP+ 455883-B21 Optical cables * Part number PremierFlex OM3+ type cables -- 0.
Compliance Compliance Standard IEEE IEEE802.3, IEEE802.3ap, IEEE802.3xx, IEEE802.2x, IEEE802.3ad, 802.1Qaz, 802.1Qau, 802.1Qbb, 802.1Qbg, 802.1Qbh Safety UL Mark (US and Canada) EN 60950 Other x8 PCI Express V2.0 (5 GT/s) support RoHS 6 of 6 IPv4, IPv6 CE Microsoft Windows Hardware Quality Labs Server Design Guide version 3.
Electrostatic discharge Preventing electrostatic discharge To prevent damaging the system, be aware of the precautions you need to follow when setting up the system or handling parts. A discharge of static electricity from a finger or other conductor may damage system boards or other static-sensitive devices. This type of damage may reduce the life expectancy of the device. To prevent electrostatic damage: • Avoid hand contact by transporting and storing products in static-safe containers.
Regulatory compliance notices Safety and regulatory compliance For safety, environmental, and regulatory information, see Safety and Compliance Information for Server, Storage, Power, Networking, and Rack Products, available at the HP website (http://www.hp.com/support/Safety-Compliance-EnterpriseProducts). Warranty information HP ProLiant and X86 Servers and Options (http://www.hp.com/support/ProLiantServers-Warranties) HP Enterprise Servers (http://www.hp.
Support and other resources Before you contact HP Be sure to have the following information available before you call HP: • Active Health System log (HP ProLiant Gen8 or later products) Download and have available an Active Health System log for 3 days before the failure was detected. For more information, see the HP iLO 4 User Guide or HP Intelligent Provisioning User Guide on the HP website (http://www.hp.com/go/ilo/docs).
Acronyms and abbreviations BACS Broadcom Advanced Control Suite CCM Comprehensive Configuration Management CE Conformité Européenne (European Conformity) CN converged network CNA Converged Network Adaptor CSA Canadian Standards Association DSM Distributed State Machine ESD electrostatic discharge FCF Fibre Channel Forwarder FCoE Fibre Channel over Ethernet IPv4 Internet Protocol version 4 IPv6 Internet Protocol version 6 Acronyms and abbreviations 19
iSCSI Internet Small Computer System Interface LC Lucent connector MAC Media Access Control MPIO multipath I/O PCI Express Peripheral Component Interconnect Express PCIe Peripheral Component Interconnect Express PCI-X peripheral component interconnect extended PHY physical layer device POST Power-On Self Test RoHS Restriction of Hazardous Substances RPM Red Hat Package Manager SFP small form-factor pluggable SFP+ enhanced small form-factor pluggable SPOCK Single Point of Connectivity Knowledge
UDP User Datagram Protocol UTP unshielded twisted pair WWN World Wide Name Acronyms and abbreviations 21
Documentation feedback HP is committed to providing documentation that meets your needs. To help us improve the documentation, send any errors, suggestions, or comments to Documentation Feedback (mailto:docsfeedback@hp.com). Include the document title and part number, version number, or the URL when submitting your feedback.