
HP P6000 Cluster Extension Software Installation Guide (5697-0987, June 2011)

NOTE:
For more information on using this tool, see the “CLI commands and utilities” chapter
in the
HP P6000 Cluster Extension Administrator Guide
.
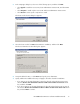
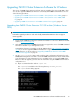
b. Select (1) View existing entries.
The Existing entries dialog appears.
c. Save the information in the Existing entries window, and then close the clxpmu window.
4. Move all of the applications from the current node to another node.
5. Double-click the P6000 Cluster Extension installation package, and follow the on-screen
instructions.
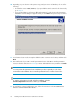
6. When the installation is complete, select the Launch P6000 CLX Configuration Tool check box,
and then click Finish.
TIP:
You can also start the P6000 Cluster Extension configuration tool by double-clicking the icon on
the Desktop.
7. Use the P6000 Cluster Extension configuration tool to add the management servers captured in
Step 3, the disk arrays, and the cluster nodes that are used with your P6000 Cluster Extension
solution. You only need to perform this step on one cluster node. When you complete the
configuration procedure on the first node, the configuration tool automatically copies the
configuration information to the other cluster nodes.
For instructions on using the configuration tool, see the “Configuring P6000 Cluster Extension”
section in the HP P6000 Cluster Extension Administrator Guide.
IMPORTANT:
The value that you enter in the Host name (or IP address) box in the P6000 Cluster Extension
configuration tool must match the value that was originally configured for the Hostname
using the clxpmu tool and P6000 Cluster Extension 2.01.00 or later.
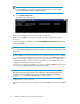
8. Restart the cluster service on the node.
9. Repeat this procedure for all other nodes that are running P6000 Cluster Extension 2.01.00 or
later.
Installing P6000 Cluster Extension Software for Windows20