
HP 3PAR StoreServ Cluster Extension Software Installation Guide (5697-2895, December 2013)


Upgrading from HP 3PAR Cluster Extension 3.0X.00 (Windows Server
2012)
IMPORTANT: Before starting the upgrade procedure, save the HP 3PAR StoreServ Cluster Extension
configuration file, if it exists.
You can save the file by using the Export feature in the HP 3PAR StoreServ Cluster Extension
configuration tool. For instructions on saving the file, see the HP 3PAR StoreServ Cluster Extension
Administrator Guide. After completing the upgrade procedure in this section, use the Import feature
in the HP 3PAR StoreServ Cluster Extension configuration tool to import the saved configuration
file.
Perform the upgrade procedure on each node locally. HP 3PAR StoreServ Cluster Extension does
not support remote upgrades.
To upgrade from HP 3PAR Cluster Extension 3.0X.00:
1. Download the HP 3PAR StoreServ Cluster Extension Software from https://
h20392.www2.hp.com/portal/swdepot/displayProductInfo.do?productNumber=CLX.
2. Move all of the applications from the current node to any other node.
3. Double-click the HP 3PAR StoreServ Cluster Extension installation package and then follow
the onscreen instructions.
4. Restart the cluster service on the node.
5. Repeat this procedure for all other nodes that are running HP 3PAR Cluster Extension 3.0X.00.
NOTE: If you upgrade to the latest HP 3PAR StoreServ Cluster Extension, ensure that the 3PAR
CLI on every failover cluster node, and the 3PAR OS on the arrays are upgraded to 3.1.2 MU3
P16, or 3.1.1. MU3 P27, or 2.3.1 MU5 P35. You can upgrade both 3PAR CLI and 3PAR OS
either before or after the CLX upgrade operation. However, you must perform the upgrade before
doing any CLX operation.
Configuring CLX after upgrading to 3.02.00 (For Windows Server
2008/2008 R2 and Windows Server 2012)
Before performing the following steps, ensure that TPDNOCERTPROMPT and TPDCERTFILE
environment variables are not set. If these environment variables are set, remove them. Complete
the following configuration steps and then set the variables.
NOTE: For information on SSL Certificate management, see the 3PAR SSL Certificate management
section in the HP 3PAR StoreServ Cluster Extension Software Administrator Guide.
After the CLX upgrade is done on all the failover cluster nodes, the same Windows user must login
to every failover cluster node and cache the HP 3PAR exception file locally on that node.
You can follow any one of the following steps to cache the exception file:
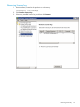
• Launch the CLX configuration tool on a cluster node. See Starting the HP 3PAR StoreServ
Cluster Extension configuration tool section in HP 3PAR StoreServ Cluster Extension Software
Administrator Guide for information on launching the CLX configuration tool. Select an array
that is already added, select Modify, and then click Connect. Select Yes when HP 3PAR CLI
prompts you to store the exception file locally. Repeat this step for all the arrays added in the
CLX configuration on all the failover cluster nodes.
• Launch the HP 3PAR CLI and try connecting to the configured array using the array user
credentials. Save the exception file locally when prompted and store it. CLX is not aware of
the exception file location as this step is performed outside the CLX configuration. You have
to make the CLX aware of the exception file. Launch the CLX configuration tool, select an
array, select Modify, and then click Connect. You will not be prompted to save the exception
again as the exception file is already stored using the 3PAR CLI. Select OK to complete the
22 Installing HP 3PAR StoreServ Cluster Extension Software