
HP 3PAR Cluster Extension Software Administrator Guide (5697-1429, March 2012)
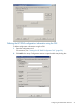

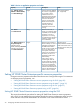

3. Enter the Array Network Name.
4. Click Browse to select the password file.
5. Click Connect to connect to the array.
The array details (Array Name, Array Serial Number, Array Model, and Array ID) and the
array target information appears on the Add Array dialog box.
NOTE: If the Remote Copy link is down between the array and the defined targets, Cluster
Extension will not be able to obtain the target array information. The value in the target array
ID will be NA and a warning message is displayed. However, you can continue with the array
configuration, but you cannot configure Cluster Extension resources between the array and
the failed targets. Verify the Remote Copy link between the array and the failed targets. Launch
the HP 3PAR Cluster Extension Configuration Tool and use the Modify array option, and click
Connect on the Modify HP 3PAR storage system Connection Settings dialog to obtain the
correct target information.
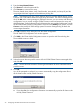
6. Click OK to add the array information into the cluster configuration.
The HP 3PAR CLX Configuration Tool window appears.
7. Click Add in the Cluster Node Configuration section to open the Add Server dialog box.
The available servers are listed.
8. Select the servers that are possible owners of the HP 3PAR Cluster Extension-managed disks,
and click OK.
NOTE: See the Microsoft Windows Clustering documentation for more information about
possible owners.
9. Click OK.
You will be prompted to confirm if you want to automatically copy the configuration file on
all the cluster nodes used by Cluster Extension.
a. If you select Yes, the configuration information is automatically copied to all cluster nodes
used by Cluster Extension.
22 Configuring HP 3PAR Cluster Extension for Windows