
UserÆs Guide and Technical UserÆs Guide - HP Carrier Grade Server cc3300


HP cc3300 Carrier Grade Server Product Guide
68 Upgrading the Hardware
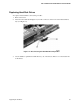
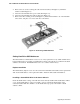
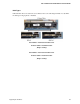
4. Remove the two screws securing the cable retention bracket (A in Figure 13) and lift the
bracket out (B in Figure 13).
5. Disconnect the hard disk drive power cable (D in Figure 13).
6. Disconnect the hard disk drive ribbon cable (C in Figure 13).
7. Remove the three securing screws (E in Figure 13), lift the hard disk drive out of the hard disk
drive carrier, and place on a clean, static-free work surface.
Figure 13. Removing a Hard Disk Drive
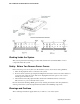
Setting Hard Drive SCSI Addresses
The hard disk drive’s SCSI address needs to be set on any replacement or any additional disk drives
being installed in the server. Improper SCSI address settings can result in a boot failure if the SCSI
addresses are identical. Disk SCSI addresses are set to 5 and/or 6 at the factory.
Replacement Disks
The SCSI address jumpers need to be removed from the failed disk and installed on the replacement
disk. Set the SCSI address on the replacement disk to match the failed disk’s SCSI address.
Installing a Second Disk Drive in the Server Chassis
Check the SCSI address setting on the disk drive that is already installed. The SCSI address will be
5 or 6. Set the SCSI address on the second disk so it doesn’t match the SCSI address of the
currently installed disk drive. Failure to set the SCSI address properly could result in a SCSI
address conflict.