
- HP All-in-One Printer Manual


194 Removing and replacing parts Q2431-90912
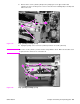
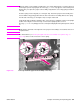
CAUTION Carefully thread the solenoid wire-harness through the hole provided in the chassis. When you
remove the pickup assembly, avoid pinching the pickup solenoid wire-harness between the
assembly and the chassis.
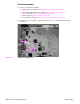
5. Rotate the left side of the assembly away from the chassis and then slide the assembly to
the left to remove it. Carefully feed the pickup assembly solenoid wire-harness through the
opening in the chassis as you remove the assembly.
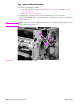
Figure 149. Tray 1 pickup assembly (4 of 4)
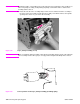
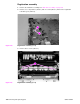
Reinstall note When you install the pickup assembly, verify that the grounding spring (located on the right-side
of the assembly near the drive gear) is correctly positioned against the dimple in the chassis.
Figure 150. Correct position of the tray 1 pickup assembly grounding spring