
- HP All-in-One Printer Manual


Q2431-90912 Chapter 6 Removing and replacing parts 185
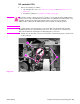
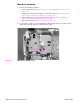
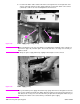
6. Remove the paper-pickup gear assembly.
Figure 135. Paper-pickup assembly (5 of 5)
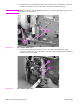
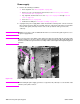
Reinstall note When you install the tray 2 drive gears and shaft, verify that the gears are seated on the shaft
locking bars and that the shaft collars are correctly positioned in the paper-pickup gear assembly
mounting bracket and printer chassis.
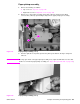
When you install the paper-pickup assembly, reach up inside the printer and push the rear feeder
roller (see figure 68 on page 142) up into its raised position. Position the paper-pickup assembly
onto the chassis (it should sit flush against the chassis) and then lower the roller into its resting
position. This ensures that the feeder lever rests correctly on the large gear in the paper-pickup
assembly.
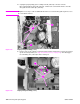
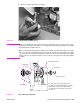
Figure 136. Tray 2 drive gear and shaft
The large gear inside of the paper-pickup
assembly is not captive and will slide off of the
shaft and be loose inside the paper-pickup
assembly when the tray 2 drive-gear/shaft is
removed.
Inner tray-drive gear
Shaft collar
E-clip retainer
Locking bars
Shaft collar