
- HP All-in-One Printer Manual


Q2431-90912 Chapter 6 Removing and replacing parts 183
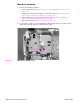
Paper-pickup assembly,
1. Remove the following assemblies:
● Top cover. See “Top cover” on page 146.
● Right-side cover. See “Right-side cover” on page 149.
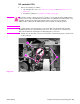
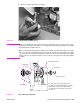
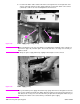
2. Remove one e-clip (callout 1) and the shaft collar (callout 2). Lift the power-switch
connector-bar (callout 3) up and swing it away from the paper-pickup gear assembly.
Figure 131. Paper-pickup assembly (1 of 5)
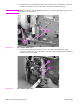
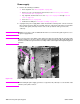
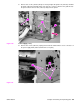
3. From the right side of the printer, push the tray drive-gear/shaft into the tray 2 cavity and
remove it.
Note The large gear inside of the paper-pickup assembly is not captive and will slide off of the shaft
and be loose inside the paper-pickup assembly (see “Tray 2 drive gear and shaft” on page 185).
Figure 132. Paper-pickup assembly (2 of 5)
2
1
3
2
1
3