
DCFM Installation Guide (53-1001817-01, July 2010)

DCFM Installation Guide 15 of 32
53-1001817-01
Professional edition configuration
Professional edition configuration
Use Table 11 to help configure Professional edition. If you are migrating data, refer to the DCFM Migration Guide.
Configuring Professional edition
1. Click Next on the Welcome screen.
2. Click No on the Copy Data and Settings screen, and click Next.
To migrate data from a previous management application version, refer to the DCFM Migration Guide.
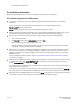
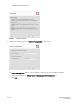
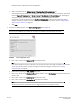
3. Select Internal FTP Server or External FTP Server on the FTP Server screen (Figure 1) and click Next.
If port 21 is busy, a message displays. Click OK to close the message and continue. Once the Management
application is configured, make sure port 21 is free and restart the server to start the FTP service.
NOTE
If you use an FTP Server that is not configured on the same machine as DCFM, the Firmware Repository feature
will not be available.
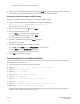
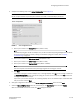
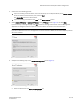
TABLE 11 Professional edition configuration
Operating system Procedures
Windows or UNIX systems To install Professional edition, review the following sections:
• “Pre-installation requirements for UNIX systems” on page 12
• “Installing the application” on page 13
• “Configuring Professional edition” on page 15
• “Troubleshooting the Linux headless installation” on page 14
• “Installing the ODBC driver” on page 26 (Windows Only)
• “Configuring an explicit server IP address” on page 27
• “Smart Card driver installation” on page 28 (UNIX Only)
UNIX systems (Headless
installation)
To install Professional edition, review the following sections:
• “Pre-installation requirements for UNIX systems (headless installation)” on page 13
• “Performing a headless installation on UNIX systems” on page 14
• “Configuring Professional edition” on page 15
• “Troubleshooting the Linux headless installation” on page 14
• “Configuring an explicit server IP address” on page 27
• “Smart Card driver installation” on page 28