53-1001817-01 14 April 2010 DCFM Installation Guide Supporting DCFM 10.4.
Copyright © 2010, Brocade Communications Systems, Incorporated. Brocade, the B-wing symbol, BigIron, DCX, Fabric OS, FastIron, IronPoint, IronShield, IronView, IronWare, JetCore, NetIron, SecureIron, ServerIron, StorageX, and TurboIron are registered trademarks, and DCFM, Extraordinary Networks, and SAN Health are trademarks of Brocade Communications Systems, Inc., in the United States and/or in other countries.
In this guide In this guide • Professional, Professional Plus, and Enterprise edition feature support . . . . . . . . . . . . . . . . . . . . 3 • System requirements . . . . . . . . . . . . . . . . . . . . . . . . . . . . . . . . . . . . . . . . . . . . . . . . . . . . . . . . . . . . . 7 • Pre-installation requirements . . . . . . . . . . . . . . . . . . . . . . . . . . . . . . . . . . . . . . . . . . . . . . . . . . . . . 12 • Installing the application . . . . . . . . . . . . . . . . . . . . . . . . . .
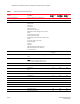
Professional, Professional Plus, and Enterprise edition feature support TABLE 1 Features supported (Continued) Feature Description Professional Edition Professional Plus Edition Encryption Layer 2 FC support Yes Yes Yes Encryption configuration and monitoring No Yes Yes Access Gateway – Cisco interop support No Yes Yes Device decommissioning No Yes Yes Fabric Binding Fabric Binding No Yes Yes Fabric Watch All Fabric Watch features Element Manager Element Manager Element Mana
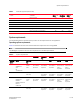
Professional, Professional Plus, and Enterprise edition feature support TABLE 1 Features supported (Continued) Feature Description Professional Edition Professional Plus Edition Limited M-EOS fabric support Meta-SAN Features that support M-EOS switches Mixed fabric support Pure fabric support No Yes Yes Routing configuration No Yes Yes Domain ID configuration No Yes Yes M-EOS Element Manager Switch configuration for M-EOS switches through Element Manager No Yes Yes Migration Migra
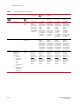
Professional, Professional Plus, and Enterprise edition feature support TABLE 1 Features supported (Continued) Feature Description Professional Edition Professional Plus Edition Security management Replicate switch policy configuration No Yes Yes SNMP configuration Yes Yes Yes SMI Agent Server Profile Fabric Profile Indications Zone Control Enhanced Zoning Enhanced Zoning Control FDMI (Fabric Device Management Interface) Profile Virtual Fabrics Sub Profile Topology View Sub Profile FC HBA (
System requirements TABLE 1 Features supported (Continued) Feature Description Professional Edition Professional Plus Edition Enterprise Edition Impact analysis Yes Yes Yes Remove offline devices No Yes Yes TI Zones Yes Yes Yes Device to Zone / zoneset participation analysis Yes Yes Yes LSAN Zones No Yes Yes Rolling back to an activated zone database No Yes Yes Import or export a zone database No Yes Yes System requirements Use the following sections to determine if you h
System requirements TABLE 2 System requirements (Continued) Professional Operating System Version Installation Type Solaris Solaris 10 Server plus 1 local client Sun Fire/Sun SPARC Enterprise T1000/T2000 Processor: 4 Core 1.0 GHz UltraSPARC T1 or equivalent Remote client only Server / Client VMware® 8 of 32 ESX Server 3.5 vSphere 4.
System requirements Memory requirements Table 3 summarizes the minimum recommended system memory requirements for running DCFM plus SMI Agent on Windows, Linux, and Solaris systems. Table 4 summarizes the minimum recommended system memory requirements for running SMI Agent only on Windows, Linux, and Solaris systems. NOTE These requirements are only applicable when no other applications are running on DCFM. NOTE Paging space should be equal to or exceed the physical memory size.
System requirements Browser requirements The launch of DCFM and the launch of Element Manager (Web Tools) from the application are supported from the following browsers with a Java plug-in: • Browsers - Windows Internet Explorer under Windows - Firefox under Windows, Solaris, or Linux • Java Plug-ins - 1.6.0_16 for DCFM - 1.5.0_06 (S) and 1.6.
System requirements TABLE 7 Professional Plus-supported limits by SAN size for pure Fabric OS fabrics Values Limits Number of Fabrics 4 Number of Domains 20 Number of Switch Ports 2560 Number of Device Ports 4096 Number of Access Gateways 20 Performance Monitoring Polling 5 minutes TABLE 8 Professional-supported limits by SAN size for pure Fabric OS fabrics Values Limits Number of Fabrics 1 Number of Domains 10 Number of Switch Ports 640 Number of Device Ports 1000 Number of Acc
Pre-installation requirements Pre-installation requirements Before you install DCFM, make sure you meet the following requirements for each platform. Pre-installation requirements for UNIX systems • To avoid errors, close all instances of the application before beginning the installation or uninstallation procedures.
Installing the application Installing the application To install the new application version, complete the following steps. 1. Insert the installation DVD into the DVD-ROM drive. • For Windows systems, if autorun is enabled, the DVD Index page launches automatically. Click the Install link. If autorun is not enabled, open this file: DVD_Drive\DCFM\windows\install.exe. • For UNIX systems, open this file: DVD_Drive\DCFM\UNIX_Platform\install.bin. 2. Click Next on the Introduction screen. 3.
Troubleshooting the Linux headless installation • Make sure you test the DISPLAY definition by running the xterm command from the same shell from which you run install.bin. A new X terminal window to the destination X Server display should open. Performing a headless installation on UNIX systems To perform a headless installation through the CLI, complete the following steps. 1. Insert the installation DVD into the DVD-ROM drive and open the following file. install.
Professional edition configuration Professional edition configuration Use Table 11 to help configure Professional edition. If you are migrating data, refer to the DCFM Migration Guide.
Configuring Professional edition FIGURE 1 FTP Server screen 4. Complete the following steps on the Server IP Configuration screen (Figure 2). FIGURE 2 Server IP Configuration screen The Server IP Configuration address is set to “localhost” by default. You cannot change this address. a. Select an address from the Switch - Server IP Configuration Preferred Address list. b. Click Next.
Configuring Professional edition 5. Complete the following steps on the Server Configuration screen (Figure 3). NOTE Do not use port 1527 for any of these port numbers. Port 1527 is used internally by the server. FIGURE 3 a. Server Configuration screen Enter a port number in the Syslog Port # field (default is 514). NOTE If the default syslog port number is already in use, you will not receive any syslog messages from the device.
Professional Plus or Enterprise edition configuration 8. Enter your user name and password. The defaults are Administrator and password, respectively. 9. Click Login. 10. Click OK on the Login Banner. Professional Plus or Enterprise edition configuration Use Table 12 to help configure Professional Plus or Enterprise edition. If you are migrating data, refer to the DCFM Migration Guide.
Professional Plus or Enterprise edition configuration 4. Choose one of the following options: • If you are installing a licensed edition, enter the license key (on the Key Certificate) on the Server License screen or browse to the license file (.xml) and click Next. The License Key field is not case-sensitive. • If you are installing a trial edition, click Next on the Server License screen. 5. Select Internal FTP Server or External FTP Server on the FTP Server screen (Figure 4) and click Next.
Professional Plus or Enterprise edition configuration b. Select an address from the Switch - Server IP Configuration Preferred Address list. If Domain Name System (DNS) is not configured for your network, do not select the “hostname” option from either the Server IP Configuration or Switch - Server IP Configuration Preferred Address list. Selecting the “hostname” option prevents clients and devices from communicating with the server.
Professional Plus or Enterprise edition configuration f. Click Next. If you enter a syslog port number already in use, a message displays. Click No on the message to remain on the Server Configuration screen and edit the syslog port number (return to step 7a). Click Yes to close the message and continue with step 8. If you enter a port number already in use, a warning displays next to the associated port number field. Edit that port number and click Next. 8.
SMI Agent only configuration 13. Click Login. 14. Click OK on the Login Banner. SMI Agent only configuration Use Table 13 to help configure the SMI Agent only.
SMI Agent only configuration b. Select an address from the Switch - Server IP Configuration Preferred Address list. If DNS is not configured for your network, do not select the “hostname” option from either the Server IP Configuration or Switch - Server IP Configuration Preferred Address list. Selecting the “hostname” option prevents clients and devices from communicating with the server.
SMI Agent only configuration f. Click Next. If you enter a syslog port number already in use, a message displays. Click No on the message to remain on the Server Configuration screen and edit the syslog port number (return to step 5a). Click Yes to close the message and continue with step 6. If you enter a port number already in use, a warning displays next to the associated port number field. Edit that port number and click Next. 6.
Launching the SMIA Configuration Tool Launching the SMIA Configuration Tool 1. Launch the Server Management Console from the Start menu. 2. Click Configure SMI Agent. The SMIA Configuration Tool Log In dialog box displays. 3. Enter your user name and password. The defaults are Administrator and password, respectively. 4. Click Login. Syslog troubleshooting If the default syslog port number is already in use, you will not receive any syslog messages from the device.
Installing the ODBC driver Stopping the process Type kill -9 “” and press Enter. For example, kill -9 “<27397>”. Solaris operating system Finding the process 1. Open a command window. 2. Type ps –ef | grep syslog and press Enter. The process running on port 514 displays. Example output: root 27154 1 0 13:49:14 ?. Stopping the process Type kill -9 “” and press Enter. For example, kill -9 “<27154>”.
Configuring an explicit server IP address Configuring an explicit server IP address If you selected a specific IP address from the Server IP Configuration screen during installation and the selected IP address changes, you will not be able to connect to the server. To connect to the new IP address, you must manually update the IP address information. To change the IP address, complete the following steps. 1. Choose one of the following options: • On Windows systems, select Start > Programs > DCFM 10.X.
Smart Card driver installation 12. Click Login. 13. Click OK on the Login Banner. Smart Card driver installation The Smart Card driver (Linux and Solaris only) is installed automatically on Windows systems. You must install the special USB Chip/Smart Card Interface Device (USB CCID) and the PC/SC IFD driver. You can download the source code and compile it from one of the following websites: • USB CCID (ccid-1.3.7.tar.bz2) Open Source URL: http://pcsclite.alioth.debian.org/ccid.html.
Smart Card driver installation 5. Create a soft link into the system directory. This is to support the automatic restart of the pcscd daemon upon system restart. If you installed the pcsc directory into the /opt directory, just create the soft link. Otherwise, use the name of the new directory in place of /opt. solaris> ln –s /opt/pcsc/pcscctl /etc/rc2.d/S94pcsc or S.u.s.e> ln –s /opt/pcsc/pcscctl /etc/init.d/pcscd S.u.s.e> chkconfig --add pcscd or redhat> ln –s /opt/pcsc/pcscctl /etc/init.
Smart Card driver installation > mv libpcsclite.so.1.0.0 libpcsclite.so.1.0.0.org > ln -s /opt/pcsc/lib/libpcsclite.so.1.0.0 libpcsclite.so.1.0.0 > ls –l libpcsc* lrwxrwxrwx 1 root root 20 Aug 4 libpcsclite.so.1.0.0 lrwxrwxrwx 1 root root 20 Jun 4 libpcsclite.so.1.0.0 lrwxrwxrwx 1 root root 34 Aug 5 /opt/pcsc/lib/libpcsclite.so.1.0.0 -rwxr-xr-x 1 root root 35428 Aug 4 16:16 libpcsclite.so -> 12:30 libpcsclite.so.1 -> 14:36 libpcsclite.so.1.0.0 -> 16:17 libpcsclite.so.1.0.0.
Uninstallation 5. Remove the existing pcscd start priority file by deleting the file as SNNpcscd, where NN is the start priority. For example, from the preceding step, the file name is S25pcscd. > find /etc/. –name “S25pcscd” –exec rm {} \; -print > sync;sync;sync > reboot After the reboot, the new configuration from the /opt/pcsc/pcscctl file should be under the /etc/rc2.d, /etc/rc3.d, /etc/rc4.d, and /etc/rc5.d directories. lrwxrwxrwx 1 root root 15 Jul 28 01:50 S94pcscd -> ../init.d/pcscd 6.
Uninstallation Uninstalling from UNIX systems Follow these instructions to uninstall the application from your UNIX system. 1. Go to Install_Home/Uninstall_DCFM10.X.X. 2. Execute ./Uninstall_DCFM10.X.X. 3. Select one of the following options on the Uninstall Option screen: • Partial Uninstall—Configuration and performance data is retained to be re-used by the new installation. • Full Uninstall—All data is removed. 4. Click Uninstall. 5. Click Done on the Uninstall Complete screen.