
Brocade Network Advisor SAN User Manual v12.0.0 (53-1002696-01, April 2013)
740 Brocade Network Advisor SAN User Manual
53-1002696-01
LSAN zones
21
Creating an LSAN zone
1. Select a backbone fabric from the Connectivity Map or Product List.
2. Select Configure > Zoning > LSAN Zoning (Device Sharing).
The Zoning dialog box displays.
3. Click the Zone DB tab if that tab is not automatically displayed.
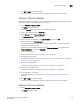
4. Click New Zone.
The prefix LSAN_ is automatically added in the text field.
5. Enter a name for the zone.
For zone name requirements and limitations, refer to “Zone naming conventions” on page 716.
6. Press Enter.
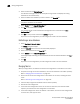
7. Cl ic k Activate.
8. Review the information in the Activate LSAN Zones dialog box.
9. Click OK to activate the LSAN zones.
A message displays informing you that the zones you change will be saved in the zone
database and asking whether you want to proceed. Click Yes to confirm the activation, or click
No to cancel the activation.
10. Click OK to continue.
All LSAN zones are activated on the selected fabrics and saved to the zone database.
11. Click OK to close the Zoning dialog box.
Adding members to the LSAN zone
Use this procedure to add a member to an LSAN zone when the member is listed in the Potential
Members list of the Zone DB tab.
1. Select a backbone fabric from the Connectivity Map or Product List.
2. Select Configure > Zoning > LSAN Zoning (Device Sharing).
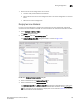
The Zone DB tab of the Zoning dialog box displays.
3. If you want to show all discovered fabrics in the Potential Members list, right-click anywhere in
the table and select Display All.
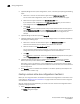
4. Select one or more LSAN zones to which you want to add members in the Zones list. (Press
SHIFT or CTRL and click each zone name to select more than one zone.)
5. Select one or more members to add to the zone in the Potential Members list. (Press SHIFT or
CTRL and click each member to select more than one member.)