
Brocade Network Advisor SAN User Manual v12.0.0 (53-1002696-01, April 2013)

Brocade Network Advisor SAN User Manual 597
53-1002696-01
Creating a new encryption group
20
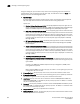
• Backup Certificate File: (Optional.) If a backup key vault is entered, the backup certificate
file must also be entered. Navigate to and select the secondary public key certificate from
your desktop, if applicable.
• Serial Number: (TKLM only.) Serial number of the switch, which is required for registering
the switch on the key vault.
• Device Group: (TKLM only.) The name of the device group of which the switch is a member.
This information is required for registering the switch on the key vault.
8. Select the Key Vault Type. Configuration options vary based on the key vault type you choose.
To complete the wizard steps, proceed to the section that describes your particular key vault
type.
- For DPM key vault setting instructions, see “Configuring key vault settings for RSA Data
Protection Manager (DPM)” on page 597.
- For LKM/SSKM key vault setting instructions, see “Configuring key vault settings for
NetApp Link Key Manager (LKM/SSKM)” on page 604.
- For ESKM/SKM key vault setting instructions, see “Configuring key vault settings for HP
Enterprise Secure Key Manager (ESKM/SKM)” on page 609.
- For TEKA key vault setting instructions, see “Configuring key vault settings for Thales
e_Security keyAuthority (TEKA)” on page 613.
- For TKLM key vault setting instructions, see “Configuring key vault settings for IBM Tivoli
Key Lifetime Manager (TKLM)” on page 619.
- For KMIP key vault setting instructions, see “Configuring key vault settings for Key
Management Interoperability Protocol (KMIP)” on page 623.
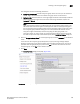
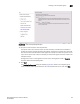
Configuring key vault settings for RSA Data Protection Manager (DPM)
The following procedure assumes you have already configured the initial steps in the Configure
Switch Encryption wizard. If you have not already done so, go to “Creating a new encryption group”
on page 592.
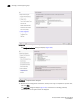
Figure 235 shows the key vault selection dialog box for DPM.