
Brocade Network Advisor SAN User Manual v12.0.0 (53-1002696-01, April 2013)

Brocade Network Advisor SAN User Manual 191
53-1002696-01
Dashboard overview
8
Dashboard toolbar
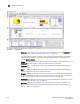
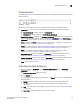
The toolbar (Figure 57) is located beneath the menu bar and provides icons and buttons to perform
various functions.
FIGURE 57 Toolbar
Depending on which dashboard you are using the toolbar contains the following buttons:
1. Dashboard list — Select one of the following to choose the dashboard you want to view.
• Main Dashboard — Select to display the Dashboard tab.
• Dashboard 1 — Select to display the Performance Dashboard.
2. Customize Dashboard — Displays the Customize Dashboard dialog box. Use to configure which
status widgets and performance monitors display on the Dashboard tab and Performance
Dashboard. For more information, refer to “Customizing the dashboard displays” on page 191.
3. Users — Displays the Users dialog box. Use to configure users, user groups, and permissions.
For more information, refer to “User accounts” on page 141.
4. Export list — Saves the current dashboard display (all widgets) or a selected widget in a .png
format. For more information, refer to “Exporting the dashboard display” on page 193.
5. Print list — Prints the dashboard display (all widgets) or a selected widget. For more
information, refer to “Printing the dashboard display” on page 194.
6. Attach (Dashboard tab only) — Returns the Dashboard tab to the main window. For more
information, refer to “Attaching and detaching the Dashboard tab” on page 194.
7. Detach (Dashboard tab only) — Detaches the Dashboard tab to a separate window. For more
information, refer to “Attaching and detaching the Dashboard tab” on page 194.
8. Help — Displays the online help.
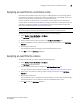
Customizing the dashboard displays
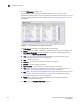
1. From the dashboard (Dashboard tab or Performance Dashboard), click the Customize
Dashboard icon.
The Customize Dashboard dialog box displays.
2. Click the Status tab.
The preconfigured general status widgets display. The Status tab contains the following fields
and components:
• Display check box — Select a check box to add the associated status widget to the
dashboard. Clear the check box to remove the associated status widget from the
dashboard.
• Title — The name of the status widget. For more information, refer to “Dashboard widgets”
on page 194.
• Description — A general description of the status widget.