
Brocade Network Advisor SAN User Manual v12.0.0 (53-1002696-01, April 2013)


1030 Brocade Network Advisor SAN User Manual
53-1002696-01
Event custom report schedules
32
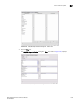
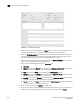
FIGURE 453 Add Schedule dialog box
4. Enter the name of the new schedule in the Name field. You must enter a unique name for the
schedule. The name can be up to 64 characters in length and it is case-sensitive.
5. Select the Suspend schedule check box if you want to disable the schedule. For example, you
may want to temporarily prevent a report from being generated until further notice. You can
clear the check mark to resume the automatic generation of the report.
6. Select the report definition you want to schedule from the Report Definition list. If a report is
deleted, the corresponding schedule will be deleted.
7. Select one of the following periods from the Frequency list:
• One Time
• Hourly—If you selected Hourly as the schedule type, Minutes past the hour appears. Select
the minutes after the hour when the report will be generated.
• Daily—If you selected Daily as the schedule type,Time (hh:mm) appears.
• Weekly—If you selected Weekly as the schedule type, Day of the week appears. Select the
day of the week when the report will be generated.
• Monthly—If you selected Monthly as the schedule type, Day of the month appears. Select
the day of the month when the report will be generated.
• Yearly—If you selected Yearly as the schedule type, Day of the year appears. Select the day
of the year when the report will be generated.
8. Select a report format from the Format list: HTML or CSV.
9. Select the time when the report will be generated. Indicate the hour, minute, and whether it is
AM or PM. This parameter appears if you selected any schedule type except Hourly.