
Brocade Network Advisor SAN User Manual v12.0.0 (53-1002696-01, April 2013)


Brocade Network Advisor SAN User Manual 1027
53-1002696-01
Event custom reports
32
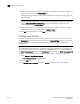
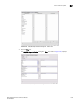
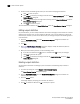
4. Click the Time Settings tab.
The Add/Edit Report Definition dialog box - Time Settings tab, as shown in Figure 451, displays.
FIGURE 451 Add/Edit Report Definition dialog box - Time Settings tab
5. Choose between relative time (the default) and absolute time.
• Click Relative Time if you want to filter traffic based on when the report is generated, and
then select a relative time from the Range list. Relative time is calculated based on the
date and time the report is generated.
• Click Absolute Time if you want to filter traffic sent at a specific date and time.
a. Select the specific start date from the Start Date list.
b. Select the specific hour time for the start time from the Start Time list, and select AM
or PM.
c. Select the specific end date from the End Date list.
d. Select the specific hour for the end time from the End Time list, and select AM or PM.
6. Click OK to save the definition, or click Run to launch the report.
Creating a new definition by copying an existing definition
Perform the following steps to copy an existing definition.
1. Select the definition you want to copy from the Report Definitions tab of the Event Custom
Reports dialog box.
2. Click Duplicate.
The name of the definition is the name of the selected definition with the word “copy”
appended. For example, SelectedPortName becomes SelectedPortName copy.
3. Click the Identification tab to enter a new name and description for the new definition.
4. Make changes to the report as required.