
Brocade Network Advisor SAN User Manual v12.0.0 (53-1002696-01, April 2013)

982 Brocade Network Advisor SAN User Manual
53-1002696-01
SNMP traps
32
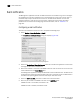
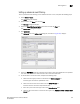
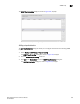
FIGURE 423 Add Trap Destination dialog box
4. Enter a general description of the trap destination in the Description field.
5. Enter the IP address of the trap destination in the IP Address field. This is a mandatory field.
IPv4 and IPv6 addresses are accepted, but a DNS name is not accepted.
6. Enter the SNMP trap listening port of the recipient in the Port # field. This is a mandatory field.
Valid numeric values range from 1 through 65535.
The Enable check box, Add Source Address check box, and SNMP Trap Repeater check box are
enabled by default. When enabled, all traps, whether the source is managed or unmanaged,
are forwarded. When disabled, only traps from the selected products are forwarded. When
enabled, the Open View Source Name is added to the variable binding (varbind) value to the
trap before forwarding.
7. Select a supported SNMP type from the Trap Forwarding Type list. Supported SNMP types are
v1, v2c, and v3. The default SNMP type is v1.
8. You can choose not to select a filter (zero), or you can select up to five filters from the Available
Filters list. Click the right arrow button to move them to the Selected Filters list.
9. Click OK.
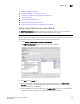
Adding a new trap filter
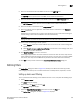
The Add Trap Filter dialog box allows you to configure trap filters for forwarding SNMP traps. You
can add trap filters on SAN products, IP products, or hosts.
1. Select Monitor > SNMP Setup > Trap Forwarding.
The SNMP Trap Forwarding dialog box displays.
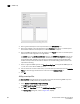
2. Click Add in the Trap Filters area of the SNMP Trap Forwarding dialog box.
The Add Trap Filter dialog box, shown in Figure 424, displays.