
Installation and Reference Guide (J3210A, J3212A, J3200A, J3202A, J3204A) 1996-08


E-5
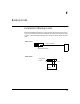
Backup Links
Identifying the Backup Link
Backup Links
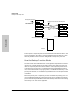
Configuration/Installation Sequence
If a hub is installed in a network that includes two connections to another hub,
and the backup link has not yet been configured, a loop in the network now
exists that will cause some network performance degradation. For this reason,
it is better to configure the backup link on the hub before the hub is installed
in the network. It is best to follow these steps:
1. Attach a PC running an ASCII terminal emulator to the hub with an active
Management module, and start the ASCII terminal emulator.
2. Verify the Extender Cable is attached between all of the hubs so that you
can configure a backup link on any port in the stack.
3. Use the Backup function to configure the backup link.
4. Complete the network cable connections between the monitoring hub
and the remote device. For cabling instructions, see the HP Switching
Hubs Installation Guide.
5. On the remote device, make sure that the ports connected to both the
primary and backup links are enabled. On the monitoring hub, the status
of the primary and backup ports is controlled by the hub’s firmware; you
do not need to explicitly enable the monitoring hub’s ports.
6. Enable the primary port in software. This step is necessary because until
you have completed step 4 (connecting the cables), the test packets
cannot be successfully sent through the primary port. The primary port
will therefore be disabled and the backup port will be activated. Once
you enable the primary port, it assumes the active role.
Identifying the Backup Link
The ports designated as the primary and backup ports are identified in:
■ the HP AdvanceStack Assistant Backup function window.
■ ASCII console interface by using the Backup command
The primary port is identified by (pri), the backup port by (bkup).