HP J2603B Ethernet SNMP Module Installation and Reference Guide
© Copyright Hewlett-Packard Company 1995. All Rights Reserved. Reproduction, adaptation, or translation without prior written permission is prohibited, except as allowed under the copyright laws. Publication Number J2603-90012 Edition 3 October 1995 Printed in Singapore. Applicable Product HP J2603B Trademark Credits MS-DOS® and Microsoft® are U.S. registered trademarks of Microsoft Corporation. Ethernet is a registered trademark of Xerox Corporation.
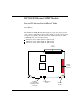
HP J2603B Ethernet SNMP Module For the HP AdvanceStack 10Base-T Hubs At A Glance The HP Ethernet SNMP Module (HP J2603B) is an optional component that can be added to an HP AdvanceStack 10Base-T Hub to provide extended hub management capabilities.
Features If the optional HP Ethernet SNMP Module is installed in your hub, the hub functionality is enhanced with these additional features: Advanced embedded SNMP agent code enabling the hub to be managed remotely from a network management station that supports Simple Network Management Protocol (SNMP) over IP (using the configured IP address) or Novell NetWare (IPX).
Contents 1 Installation Installing the Module . . . . . . . . . . . . . . . . . . . . . . . . . . . Firmware Enhancements 2 1-2 . . . . . . . . . . . . . . . . . . . . . . 1-5 Removing the Module . . . . . . . . . . . . . . . . . . . . . . . . . . 1-6 Clearing a Password . . . . . . . . . . . . . . . . . . . . . . . . . . . 1-7 Extended Hub Capabilities From HP Stack Manager . . . . . . . . . . . . . . . . . . . . . . . . . 2-2 IP Configuration . . . . . . . . . . . . . . . . . . . . . . . . . .
3 Troubleshooting Diagnosing With the LEDs . . . . . . . . . . . . . . . . . . . . . . 3-2 LED Location . . . . . . . . . . . . . . . . . . . . . . . . . . . . . 3-3 Customer Support Services . . . . . . . . . . . . . . . . . . . . . . . 3-4 Hewlett-Packard FTP Library Service . . . . . . . . . . . . . . . 3-5 HP Network Phone-In Support (NPS) . . . . . . . . . . . . . . . 3-6 HP FIRST Fax Retrieval Service . . . . . . . . . . . . . . . . . . . 3-6 CompuServe . . . . . . . . . . . . . . . .
1 Installing the Module Firmware Enhancements Removing the Module Clearing a Password Installation
Installation Installation Installing the Module The HP Ethernet SNMP Module is installed in the Expansion Slot on the back of the HP AdvanceStack 10Base-T Hub. Warning Before installing the HP Ethernet SNMP Module, unplug the HP AdvanceStack Hub from the power source. Electrical shock could result if you attempt to install the module without unplugging the hub. Caution Static electricity can severely damage the sensitive electronic components on the HP Ethernet SNMP Module.
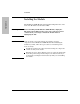
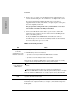
Installation Installation 1. Unscrew the two captured screws holding the cover plate to the hub’s Expansion Slot and remove the cover. Note that the screws are spring loaded and will release outward when unscrewed far enough. Do not unscrew them completely from the cover plate. loosen these two screws Expansion Slot hub expansion slot 2. (Optional step). Install an auxiliary module on the HP Ethernet SNMP Module. See the instructions in the installation guide that came with the auxiliary module. 3.
Installation 4. Replace the cover plate over the Expansion Slot, tightening the two screws that hold it in place. Be careful not to overtighten the screws. Installation If you have installed an auxiliary module and a cover plate is supplied with the module, install that cover plate in place of the plate that was originally on the hub. For proper hub cooling, make sure you install the cover after the module or module assembly is installed! 5.
Installation See your hub manual for other procedures to complete the hub installation. Firmware Enhancements In the future, Hewlett-Packard may provide improvements to this product through firmware upgrades. The upgrade code can be downloaded from a PC attached to the hub’s RS-232 port or over the network. The update procedures are described in documents that come with the firmware enhancements.
Installation Removing the Module The HP Ethernet SNMP Module is removed from the hub by reversing the installation procedure described earlier in this document. Extractor handles are provided on the module to help you remove it from the hub’s slot. If an auxiliary module is attached to the HP Ethernet SNMP Module, the extractor handles may not be accessible. See the auxiliary module documentation for removal procedures.
Installation Clearing a Password You can use this button to clear a forgotten password that was previously configured on the hub. The password is configured from either HP Stack Manager or HP Interconnect Manager. Expansion Slot Press the Password Clear button with a pen or other pointed object. To clear the password, press and hold the button for approximately five seconds.
2 SNMP Features: From HP Stack Manager From HP Interconnect Manager From the Console Using the Console Extended Hub Capabilities
Extended Hub Capabilities When you install an HP Ethernet SNMP Module in your AdvanceStack 10Base-T Hub, the functionality from both out-of-band management (HP Stack Manager) and in-band management (from an SNMP network management station) is extended. Without the HP Ethernet SNMP Module installed, the hub cannot be directly managed in band. See your hub manual if you want a description of the basic functionality that is possible without the HP Ethernet SNMP module installed.
Extended Hub Capabilities IP Configuration The IP Configuration window is used to define the parameters necessary for the hub to communicate with a network management station using SNMP in a TCP/IP network. Basic Security Features The following security features are configurable from HP Stack Manager. See the HP AdvanceStack 10Base-T Hubs Installation and Reference Guide for more information.
Extended Hub Capabilities See the HP Stack Manager online help and HP AdvanceStack 10Base-T Hubs Installation and Reference Guide for more information. Network Test The Network Test window enables you to perform Ping, IPX, and Link network tests. These tests are used to verify the connection between the hub and a specified network device. The devices tested must support the test(s) by being able to send appropriate response packets.
Extended Hub Capabilities From HP Interconnect Manager The HP Ethernet SNMP Module has embedded SNMP agent code allowing an HP AdvanceStack 10Base-T Hub, with the module installed, to be managed by HP Interconnect Manager and any other SNMP-compliant network management product. Features Provided Port Security. HP Interconnect Manager provides network management authorization, and hub access password protection features similar to those provided by HP Stack Manager.
Extended Hub Capabilities Network Addressing Notes The communication between an SNMP network management station and the agent code on the HP Ethernet SNMP Module takes place at the network layer. To communicate with an SNMP network management station, the hub with the HP Ethernet SNMP Module installed therefore needs a network address. If the communication is over a TCP/IP network, an IP address must be assigned.
Extended Hub Capabilities From the Console You can connect a terminal to the hub’s console port in the following ways: directly, using a serial cable and a terminal (or a PC using a terminal emulator) remotely, using Telnet remotely, using a modem and a terminal Extended Hub Capabilities The HP AdvanceStack hubs support a single console session only. If a console session is already running, a second console session can override the console session.
Extended Hub Capabilities Remotely, Using Telnet The HP AdvanceStack hubs support a Telnet console session. Your Telnet syntax depends on your TCP/IP software or your terminal server. By default, Telnet is enabled. You can disable Telnet by using the IPconfig console command described on page 2-15. To establish a Telnet session, follow these steps: 1.
Extended Hub Capabilities 3. Configure the modem as described in appendix B, “Modem Configuration”. 4. At the remote site, connect the terminal (or PC emulating a terminal) to the remote modem. Make sure the terminal and modems are functioning properly, then establish the link between the terminal’s modem and the hub’s modem according to the modem instructions. 5. Press [Return] several times for the => or Password prompt.
Extended Hub Capabilities Console Commands Extended Hub Capabilities Enter at least the first two letters of a command to execute it, such as HE for the Help command. The Help command displays the following screen like, listing all commands. Syntax Conventions on Help Screen: < > – Indicates a required parameter. [ ] – Indicates an optional parameter. | – Used as a separator between acceptable variable values.
Extended Hub Capabilities AUxiliary If an auxiliary module is attached to the HP Ethernet SNMP Module in the hub you have accessed, this command starts a console session for the auxiliary module. For example, you can communicate with an HP Dial-A-LAN Module or an HP Router 210 Module. BAckup To configure one of the hub’s ports for dedicated use in a backup (redundant) link to another hub.
Extended Hub Capabilities CHainlist To display a list of all HP AdvanceStack hubs that are connected in the same distributed management chain as the hub you are accessing. The display includes the following fields: Entry – an index number for the other HP AdvanceStack 10Base-T hubs in the chain that do not have an HP Ethernet SNMP Module installed. These hubs can be accessed and controlled from your current console session by using the HUbselect command.
Extended Hub Capabilities COunters [A/B/C/D] To display network activity counters for each network port, the hub’s SNMP agent, and the global count for all ports. The total number of packets and fragments received. Collisions The number of times the port was involved in a collision. A single collision will be counted by all ports involved, so the total collision count may be less than the sum of the port counts. CRC Errors The number of packets with invalid Cyclic Redundancy Checksums (CRCs).
Extended Hub Capabilities HUbselect To access an attached chained hub. If no hub number is specified, the hub directly connected to the console is selected. The number is from the Entry column displayed when you use the CHainlist command. First enter the command CH to list the chain. Example: CH (This displays the following example table.
Extended Hub Capabilities IPconfig To set IP (Internet Protocol) configuration parameters on the hub. By default, the hub is configured to use BOOTP (Internet Boot Protocol) to automatically retrieve the IP parameters from a BOOTP server, or to use the Novell NetWare IPX protocol, and to enable Telnet access to the hub’s console interface. Use this command if you want to manually configure the IP address or disable Telnet.
Extended Hub Capabilities Configuring for Network Management If the hub is to be managed from a network management station, it must use the same networking protocol as the network management station. You have these choices: Novell NetWare IPX IP Extended Hub Capabilities Using Novell NetWare IPX The HP AdvanceStack hubs are designed to automatically use Novell NetWare’s IPX protocol.
Extended Hub Capabilities To use the console interface to configure the IP parameters, enter IP and the following text appears: =>IP Active IP parameters: BOOTP protocol enabled: YES Telnet access enabled: YES IP address: 0.0.0.0 Subnet mask: 0.0.0.0 Default router: 0.0.0.0 Time to live: 64 Change IP configuration? (Y/[N]): The following table explains the IP parameters.
Extended Hub Capabilities MAnagers [SHow] To configure the list of network management stations that are authorized to access and manage this hub, and to specify which of those stations should receive alarms. Use the SHow option to display the current list of authorized management stations without being prompted to edit the list.
Extended Hub Capabilities Example: To add the network management station with IP address 190.40.101.10 to the list and to send alarms to that station, the process would appear as follows: Add entry (A), Delete entry (D), or End changes (E): A Enter Manager Address, or (A) to allow all managers access: 192.1.1.
Extended Hub Capabilities PIng To test the path between the hub and another device that responds to IP packets. The hub sends Internet Control Message Protocol (ICMP) Echo Request (Ping) packets to another node with the specified IP address and waits for Echo Response packets in return. When you run the Ping command, you will be prompted for: the IP address of the destination device (in the format X.X.X.
Extended Hub Capabilities REset To run a hub self-test and reset the hub. This command also resets all the network statistic counters, and the time since the last reset to 0. The current configuration is unchanged. The hub is not accessible from network management software while it is being tested, but it continues to repeat data. For hubs in the distributed management chain, LEDs will not flash during a reset, and counters and time will not be reset.
Extended Hub Capabilities Security Configuration Parameter Definitions The following security parameters are configurable on each of the hub’s network ports. These parameters are defined on the next two pages: Address selection method, or authorized station address Send alarm when intruder detected Eavesdrop prevention An additional parameter, “Disable port when intruder detected”, is set automatically by your selection of the address selection method.
Extended Hub Capabilities flash. An alarm is also sent to the authorized network management station(s) if the Send Alarm parameter is set to YES. Port Security Off—disables port security. This is a convenient way to remove the port security. It automatically sets the Send Alarm and Eavesdrop Prevention parameters to OFF (and therefore, the Disable Port parameter will also be OFF).
Extended Hub Capabilities Note To enable security on a port, at least one of the parameters, Send Alarm or Eavesdrop Prevention, must be set to ON. Configuring Security on All Twisted-Pair Ports Extended Hub Capabilities To set or change the security configuration for all the twisted-pair ports together, enter SE ALL.
Extended Hub Capabilities Send Alarm when intruder detected? and Eavesdrop prevention?: These parameters are defined earlier in the chapter under “Security Configuration Parameter Definitions”. The values you select for these parameters will be applied to all the twisted-pair ports for which you have selected (or retained) the address selection method.
Extended Hub Capabilities For Port Security: The security violations are indicated by the Security LED and the LED for the affected port blinking simultaneously, and the intruder’s station address being added to the Status command screen for the affected port. Security violations occur when a non-authorized address is detected on a port and at least one of the intruder prevention parameters (Send Alarm or Disable Port) is set to YES.
Extended Hub Capabilities SPeed To change the console port baud rate. Normally, the baud rate is automatically sensed. Use this command if you want to set the baud rate explicitly to 1200, 2400, 4800, 9600, 19200, or 38400. You will be prompted to set the terminal’s baud rate to the same speed and to press [Return] for the prompt. Example SP 9600. (Sets the baud rate to 9600.) Note that Windows supports up to 19200 baud only.
Extended Hub Capabilities TEstlink To run a test of the link between the hub and another IEEE 802.3 device. Note The destination device must be able to send an IEEE 802.2 Test Response packet upon receipt of an IEEE 802.2 Test command packet. Any HP AdvanceStack Hub, HP SNMP-managed bridge, or HP router will respond with the correct packet. HP LAN adapters can be setup up easily to respond to these standard Test command packets.
3 Diagnosing with the LEDs LED Location Customer Support Services Troubleshooting
Troubleshooting The primary tools for troubleshooting the SNMP Module are the LEDs on the front of the hub and, in some cases, the single LED on the SNMP Module in combination with the LEDs on an auxiliary module. The location of these LEDs are described on the next page. Diagnosing With the LEDs 1. When the hub is first powered on or when it is reset, it executes its self test and also causes the SNMP Module and any auxiliary module to execute their self tests.
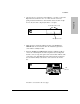
Troubleshooting LED Location The Hub LEDs The LEDs on the front of the HP AdvanceStack 10Base-T Hub are shown in the illustration above. Pay particular attention to the LED labeled Exp Slot (AdvSlot on some HP AdvanceStack hubs). It describes the self test status of all the modules installed in the Expansion Slot. The module LEDs define the status of each individual module.
Troubleshooting Customer Support Services Hewlett-Packard offers support 24 hours a day, seven days a week through the use of automated electronic services including: Hewlett-Packard BBS and World Wide Web Hewlett-Packard FTP Library Service on the Internet HP FIRST FAX Retrieval Service CompuServe HP Interconnect Manager (icmupdt.exe), HP Stack Manager (stkmgr.exe) and SNMP firmware for your AdvanceStack hubs (asfw.
Troubleshooting Hewlett-Packard FTP Library Service To access the HP FTP Library, follow these steps: 1. Enter the command: ftp ftp-boi.external.hp.com The ftp> prompt appears. 2. At the ftp > prompt, enter: anonymous 3. At the password prompt, enter your internet e-mail address. 4. At the ftp > prompt, set the transfer type to binary: bin 5. Change directories: cd pub/networking/software 6. Retrieve the file by entering: get filename (e.g., get asfw.exe) Troubleshooting 7.
Troubleshooting HP Network Phone-In Support (NPS) You can usually receive the support assistant you need by calling your HP Authorized Dealer or the nearest HP Sales and Support Office. In addition, the HP Network Phone-In Support (NPS) service provides expert technical assistance for U.S.A. customers through an NPS contract or at an hourly rate (1-800-790-5544) Monday through Friday, 5 am to 6 pm.
Troubleshooting CompuServe CompuServe is an electronic information and communication service run by an independent company. The service is typically accessed with a computer and modem and uses standard voice telephone lines for transmitting and receiving data. CompuServe is available 24 hours-a-day, seven days per week. The participants pay a monthly fee as well as an hourly connect charge for this service. To get the latest agent firmware from CompuServe, follow these steps: 1. Login to CompuServe. 2.
A Specifications
Specifications Physical Dimensions Weight 17.8 cm by 13.5 cm (7 in by 5.25 in) 170 g (6.0 oz) Environmental Operating temperature:0°C to 55°C (32°F to 131°F) Nonoperating temperature: -40°C to 70°C (-40°F to 158°F) Relative humidity: 15% to 95% at 40°C (104°F) non-condensing Maximum altitude: 4.6 km(15,000 feet) Electromagnetic Emissions FCC part 15 Class A EN55022 / CISPR-22 Class A VCCI Level 1 Complies with Canadian EMC Class A requirements.
B Modem Configuration
Modem Configuration Modem Configuration Before installing the modems (one attached to the hub and one attached to the terminal/PC), configure them by either issuing the appropriate AT command or by setting the modem’s switches, as described in the tables in the rest of this appendix.
Modem Configuration US Robotics Courier HST Dual Standard with ASL Switch 1 UP—DTR normal Switch 5 UP—Auto Answer on ring Switch 6 UP—carrier detect when modem is online Switch 8 DOWN—AT command set recognized Switch 9 UP—modem disconnects when session ended Switch 10 UP—load software from NVRAM at power on At the user end: Switch 1 UP—DTR normal Switch 4 UP—modem echoes (displays) commands Switch 5 DOWN—Auto Answer suppressed Switch 6 UP—carrier detect when modem is online Switch 8 DOWN—AT command set r
C Security Information
Security Information In addition to password protection and network management access protection described in chapter 2, the HP AdvanceStack hub with an HP Ethernet SNMP Module installed provides two major types of per-port security: Intruder Prevention for inbound data (from the end user to the hub). Eavesdrop Prevention for outbound data (from the hub to the end user).
Security Information Authorized Station Address To provide data security on a hub port, a single, unique station address must be configured as the authorized station address for each port. You can configure the authorized station address either by assigning it or by designating the port to learn it automatically. This configuration is performed with the Secure command from the hub’s console. See the Secure command description in chapter 2.
Security Information Setting Inbound Security with Intruder Prevention The picture below illustrates the use of inbound security using Intruder Prevention. This type of data security allows only one authorized user per port to access the network. The authorized user is identified by the authorized station address of the end node attached to the port. Security Information Intruder prevention includes an “auto port disable” data security feature and a “send alarm” security violation notification feature.
Security Information Auto Port Disable Any port may be configured to be disabled automatically when an intruder’s station address is detected. This feature is automatically controlled by your selection of the Authorized Address Selection Method for the port: If the address used is the “first heard” or an “assigned” address, the port will be disabled automatically when an intruder is detected. If the address is “learned continuously”, the port will not be automatically disabled.
Security Information Setting Outbound Security with Eavesdrop Prevention Security Information Eavesdrop Prevention allows a port to receive a packet transmitted on the network as valid data only if the port’s station address matches the packet’s destination address. If the port’s station address does not match the packet destination address, the port will receive a packet containing a meaningless data field of alternating 1’s and 0’s.
Security Information In the illustration below, Server 104 is transmitting a packet destined for PC 101. (For illustration purposes, the numbers 101, 102, 103, and 104 are used to represent 12-digit hexadecimal station addresses.) The ports for PC 101 and PC 102 have Eavesdrop Prevention enabled or configured ON. Because PC 101’s station address matches the packet destination address, it receives the packet unaltered.
Index
A AdvanceStack hub installing an SNMP Module into ... 1-2 Alignment errors, counter ... 2-13 Assigning an address for port security ... C-3 Authorized station address ... C-3 assigning an address ... 2-22, C-3 methods for selecting ... 2-22 Auto port disable, security feature ... 2-22, 2-25, C-5 Auxiliary command ... 2-11 auxiliary module connecting to using the AUxiliary command ... 2-11 Index B Backup command ... 2-11 – 2-12 Backup Link Configuration from HP Stack Manager ... 2-3 Backup port ...
G M Giant packets, counter ... 2-13 MAC address See station address Managers command ... 2-18 Modem Configuration from HP Stack Manager ... 2-4 Modems configuration ... B-2 H I ICMP Echo Request packets (Ping test) ... 2-20 installing the SNMP Module ... 1-2 Internet obtaining latest drivers from ... 3-5 obtaining software from ... 3-4 Intruder prevention ... C-2 auto port disable ... C-5 send alarm ... C-5 setting inbound security ... C-4 IP address ... 2-17 IP addressing ...
Index S T Secure command ... 2-21 Security authorized station address ... C-3 auto port disable ... 2-22, C-5 clearing the violation indicators ... 2-25 configuring a single port ... 2-23 configuring all twisted-pair ports ... 2-24 detailed description ... C-2 eavesdrop prevention ... 2-23, C-2, C-6 from HP Stack Manager ... 2-3 intruder prevention ... C-2 network management security violations ... 2-26 send alarm ... 2-23, C-5 showing the current configuration ... 2-25 Security command ...
© Copyright 1995 Hewlett-Packard Company Printed in Singapore 10/95 Manual Part Number J2603-90012, Edition 3 *J2603-90012*