
HP StorageWorks Fibre Channel Disk Drive Replacement Instructions (5697-6791, June 2007)


disk drive firmwa
re read me first for installation instructions. You
can download the
sedocumentsfromthefollowingwebsite:
h
ttp://www.hp.com/support/manuals
Click Disk Storage Systems underStorage,andthenselectthe
appropriate product under EVA Disk Arrays.
If the disk is running an unsupported version of firmware,
download the c
orrect firmware from the following website and
install it using th e instructions included with the firmware file. Do
not add the dis
k to a disk group if it is running an unsupported
firmware version.
h
ttp://www.hp.com/support/evadiskfirmware
NOTE:
When downloading the firmware, use the disk model number
to locate the correct firmware file. If you have difficulty
locating the correct firmware, contact your HP-authorized
service represent ative for assistance.
If you are running XCS 6.000, verify that leveling is not in
progress b
eforeupgradingthediskdrivefirmware. In HP
CommandViewEVA,gototheGeneraltaboftheDiskGroup
Properti
es window and verify that the Leveling field displays
Inactive. If it displays Active, wait for leveling to complete
before p
erforming the upgrade. This does not apply if you are
running
XCS 6.1 00 or later .
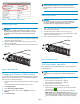
Figu
re 9 Checking model number and firmware version
Adding the disk to a disk group
After replacing the disk, add it to a disk group. The disk is typically
added back into its original disk group.
1. In the Navigation pane, select Storage system > Hardware > Rack
> Disk enclosure > Bay.
2. In the Content pane, select the Disk Drive tab.
3. Click Group to initiate the process for adding the disk to a disk
group.
Operation Successful is displayed indicating the disk is
now grouped and leveling has been initiated. The storage system
begins immediately using the disk.
NOTE:
If
the Device Addition Policy is set to automatic, the disk is
au
tomatically added to a disk group. In this case the Group
o
ption will not be available.
Returning the failed component
Follow t he return instructions provided with the new component.
Page 5