
HP StorageWorks Fibre Channel Disk Drive Replacement Instructions (5697-6791, June 2007)

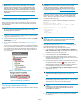
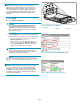
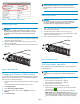
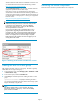

Figure 6 Checking disk group status
Removing a disk
CAUTION:
Rotating media can make the disk difficult to handle. To avoid
dropping and damaging the disk, wait approximately 30 seconds
for the media to stop rotating before removing the disk from the
enclosure.
1. Push in the wine-colored ejector button (1) and pull the release lever
(2) d own to the full open position.
2. Pull the disk part way out of the enclosure (3) and wait for the
mediatostopspinning.
3. When the m
edia has stopped spinning, remove the disk from the
enclosu
re.
1
1
0115a
2
3
Figure 7 Removing a disk
Chang
ing the Device Addition Policy
To prev
ent the storage system from automatically grouping a new disk
that may have the incorrect firmware on it, check the Device Addition
Policy and set it to manual if necessary:
1. In the HP Command View EVA Navigation pane, select the storage
system.
The Initialized Storage System Properties window opens.
2. Click System Options.
3. Select Se t system operational polic i es.
4. If the Device Addition Policy is set to Automatic, change it to
Manual.
5. Click Save changes.
NOTE:
To return the Device Addition Policy to automatic, repeat this
procedure after you verify that the disk has the correct firmware
version.
Installing a disk
CAUTION:
You should onl
y replace one disk at a time. After installing the
new disk, comp
lete the remaining procedures in this document
for this disk before you attempt to rep lace another disk.
1. Push in the ejector button on the disk and pull the release lever
down to the full open position.
2. Insertthediskintotheenclosureasfarasitwillgo(1).
3. Close the release lever until it engages th e ejector but ton, and the
disk seats in the backplane (2).
4. Press in firmly on the disk to ensure it is seated properly.
1
1
2
0116a
Figure 8 Installing a disk
V erifying proper operation
After replacing the disk, check the following to verify that the d isk is
operating normally:
NOTE:
It may take up to 10 minutes for the component to display good
status.
• Check the disk status indicators (Figure 3).
• Activity indicator (1) should be on or flashing
• Online indicator (2) s hould be on or flashing
• Fault indicator (3) should be off
• Check the following using HP Command View EVA:
• Navigate back to the component and check the operational
sta
te. It should be
.
•En
sure the disk is running the correct firmware. Record the
Model number and the Firmware version of the disk (Figure 9).
C
heck the firmware version against the supported disk firmware
i
ntheHP StorageWorks Enterprise Virtual Array release notes.
S
ee the HP StorageWorks Enterprise Virtual Array upgrading
Page 4