
HP StorageWorks disk enclosure front UID interconnect board (with cable) replacement instructions (533478-001, March 2009)

Removing the interconnect board
1. Power down the disk enclosure.
a. For the MSA6X/7X and DL320S, power down any attached
servers (see your server documentation). Press the Power
On/Standby button on the disk enclosure, and wait for the
system power LED to go from green to amber. Disconnect the
power cords.
b. For EVA products, power down the array (controller enclosure
and disk enclosures) with HP Command View EVA or, on the
EVA4400 only, the Web-based operator control panel
(WOCP). Powering down the controller enclosure also removes
power from the disk enclosures.
2. Remove all cabling from the external enclosure components. Ensure
all cabling is marked so as to facilitate recabling later.
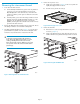
3. Pull off the left and right bezel ears (1, Figure 1), loosen the front
panel thumbscrews (2) that secure the enclosure faceplate to the
front of the rack, and remove the enclosure from the rack.
WARNING!
A disk enclosure fully populated with disk drives is
heavy. Remove the disks and place them on a clean
surface, preferably stacked in the order removed,
before removing the enclosure. Otherwise, two people
are required to remove the enclosure from the rack to
prevent injury.
1
2
Figure 1 Removing bezel ears and thumbscrews
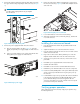
4. Remove the top access cover.
a. Lift the access panel latch (1, Figure 2). The access panel will
slightly disengage from the enclosure.
b. Slide the access panel to the rear (2).
15818
1
2
Figure 2 Removing top access cover
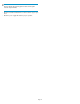
5. Remove the front UID.
a. Remove the T-10 screw securing the black housing to the
enclosure (1, Figure 3).
b. Lift up on the black housing to clear it from the enclosure (2),
and then lift the housing and board away from the enclosure.
1
2
Figure 3 Removing the USB UID module
Page 2