
HP StorageWorks disk enclosure fan module replacement instructions

Verifying component failure
Use the following methods to verify component failure:
• Analyze any failure messages received. HP fault
monitoring software provides a recommended
action.
• Check the status using HP P6000 Command View:
1. In the Navigation pane, select Storage system
> Hardware > Disk Enclosure.
2. In the Disk Enclosure Properties pane, select the
Cooling tab.
3. The Operational state of Fan 1 or Fan 2 should
be Failed.
• Check the system fan status LEDs:
Green = Normal operation.◦
◦ Amber = Fault condition.
◦ Off = Fan unseated from connector or failed.
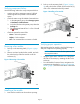
Removing a fan module
1. Push up on the mounting latch (1, Figure 2 (page
2)).
2. Position one hand under the fan module, and with
the other hand, pull the fan module out of the
enclosure (2).
Figure 2 Removing a fan module
Installing a fan module
1. Insert the fan module into the enclosure opening.
2. Push up on the mounting latch (1, Figure 3 (page
2)) and push the fan module into the enclosure (2)
until a click is detected when fully seated.
Figure 3 Installing a fan module
Verifying proper operation
After replacing the fan module, check the following to
verify the component is operating properly:
NOTE: Wait one minute for the system to check
the component status.
• Verify the green status indicator is lit. If the green
LED fails to illuminate, try reseating the fan in the
enclosure.
• From HP P6000 Command View, navigate to the
component as described in “Verifying component
failure” (page 2) and check the status. It should be
.
Page 2