
HP 4400 Enterprise Virtual Array Expansion Rack Reference Guide (5697-2285, January 2013)


Consider the following when installing the rail assembly:
• Installing the rails does not require any tools for assembly.
• HP recommends you install all the rail kits before installing any other components.
• Ensure that the rails are level, particularly front to rear in their corresponding front and rear
rail hole (U) locations, before installing any other components.
WARNING! Before you begin, ensure that the rack is sufficiently stable. If provided, lower the
rack leveler feet and make sure any required stabilizers are installed. If provided, extend the anti-tip
device. Failure to extend the anti-tip device could cause personal injury or damage if the rack tips
over.
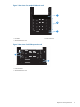
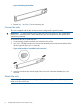
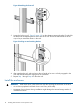
1. On the rear of the rail, squeeze the scissors latch (1, Figure 7 (page 9)) together to insert
the rail and pins through the rack holes (2) until the latch engages.
Figure 7 Attaching the rear rail
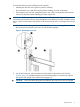
2. On the front of the rail, pull and rotate the locking latch to release the scissors latch (1,
Figure 8 (page 10)) and then squeeze the scissors latch together to insert the rail and pins
through the rack upright holes until the latch engages (3).
CAUTION: Ensure that the locking latch lever between the scissors lock arms is engaged.
Attach the rails 9