
HP 4400 Enterprise Virtual Array Expansion Rack Reference Guide (5697-2285, January 2013)

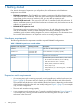
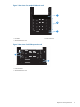
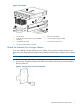
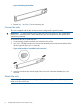
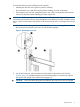
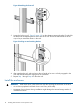

Figure 8 Attaching the front rail
3. Loosen the locking nut (1, Figure 9 (page 10)) on the shipping retaining bracket (2) and slide
the bracket to the farthest position on the rear of the rail. This moves the bracket out of the
way to let you install the chassis in the rails.
Figure 9 Locking nut and retaining bracket
4. After attaching the rail, grab and move the rail gently to be sure it is firmly engaged in the
rack and that all latches are engaged in the rack holes.
5. Repeat Step 1 through Step 4 for the other rail.
Install the enclosures
WARNING! Install hard drives in the enclosures only after securing the enclosures in the rack:
• An enclosure populated with hard drives is too heavy to lift safely.
• Movement of an enclosure during installation might damage the internal storage media of
installed hard drives.
10 Installing disk enclosures in the expansion rack