EZPilot™ EVA Version 2.
Copyright© 2007 Emulex Corporation. All rights reserved worldwide. No part of this document may be reproduced by any means nor translated to any electronic medium without the written consent of Emulex Corporation. Information furnished by Emulex Corporation is believed to be accurate and reliable. However, no responsibility is assumed by Emulex Corporation for its use; or for any infringements of patents or other rights of third parties which may result from its use.
Installing EZPilot .....................................................................................1 Introduction.............................................................................................................. 1 Prerequisites ..................................................................................................... 1 Operating System Requirements ................................................................ 1 Hardware Requirements ............................................
Using the Switch Mgmt. Tab ............................................................................ 35 Changing the Switch’s IP Address................................................................... 35 Managing Storage Devices .................................................................................... 37 The Storage Management tabs ................................................................. 37 Viewing General Storage Information ........................................................
Installing EZPilot Introduction EZPilot™ from Emulex enables you to configure your Storage Area Network (SAN). This section describes how to: • Install EZPilot for a Windows EVA management server. • Install EZPilot for a Windows non-management server. • Install the Emulex Linux driver and utilities for a Linux non-management server.
High Availability (HA) configuration (Dual-switch) The following configuration requires the purchase of an additional switch. It allows the SAN to continue to function fully even if an HBA, switch, or storage controller fails.
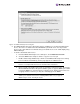
Installing EZPilot to Create a Windows Management Server Note: You must install one and only one management server. Prerequisites • If older versions of Emulex, Brocade or HP StorageWorks software were previously installed on the system you must remove them. Use the Windows Add/Remove Programs feature to remove the software. If you are prompted to reinstall the Emulex HBA driver during EZPilot installation, click Yes.
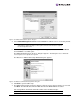
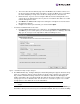
Figure 2: The EZPilot EVA Installation Options dialog box 4. Check HP EVA Management Server and click Install. The SAN Host box is checked by default. Note: If a recent version of the Java Runtime Environment is not already installed, EZPilot will install it as depicted in Figure 2. This option cannot be unchecked; it is required for the management server. 5. The License Agreement dialog boxes appear. Check I agree to these terms and conditions and click Next for each dialog box.
Figure 4: The EZPilot EVA Setup License dialog box 8. The EZPilot EVA Setup License dialog box appears enabling you to install a Command View license. The license is obtained from the HP Webware password center. You may install a license now or later. Emulex recommends that you install the license now. It will simplify using EZPilot Manager. • To obtain a Command View License: a. From the EZPilot EVA Setup License dialog box, check Install a license now. b.
e. The License/Password certificate page of the HP Webware site includes a link to save the license key/password file. Click on the link to save the file. Make sure you remember the name and path you assign to the file. Do not change the file’s .dat extension. f. Exit the browser. If you are not accessing the Web site from the management server, copy the file to the management server or place it on a network share that is accessible from the management server. g.
to use EZPilot Manager. See the Command View EVA documentation for the steps necessary to grant permission to another account. Note: The check box label in Figure 5 displays your account name. In the example, the standard Windows Administrator account is being used to install EZPilot. The Command View password will be the same password as the Windows Administrator account. After making your selections, click Next. The EVA is initialized and the VDS provider is installed.
Installing EZPilot to Create a Windows Non-Management Server Note: You must install EZPilot on all Windows non-management servers in the SAN. Prerequisites • If older versions of Emulex, Brocade or HP StorageWorks software were previously installed on the system you must remove them. Use the Windows Add/Remove Programs feature to remove the software. If you are prompted to reinstall the Emulex HBA driver during EZPilot installation, click Yes. Procedure To create a non-management server: 1.
3. Click Next. Figure 8: The EZPilot EVA Installation Options dialog box 4. The EZPilot EVA Installation Options dialog box appears. Click Install. Note: Do not check the HP EVA Management Server check box. You are creating a Non-Management server. 5. The License Agreement dialog boxes appear. Check I agree to these terms and conditions and click Next for each dialog box. The EZPilot EVA Operation in Progress dialog box appears. The dialog box closes when the necessary files are copied to the system.
8. When the installation is complete, EZPilot prompts you to restart Windows. Click OK. After Windows is restarted, you will be notified that the installation is complete. Repeat steps 1-8 to install EZPilot on all Windows non-management servers in the SAN. Installing the Emulex Driver and Utilities for Linux Please refer to the manuals on the Emulex Linux Installation CD for instructions on installing the Emulex drivers and utilities for Linux. As an overview, to create a Linux non-management server: 1.
Using EZPilot Manager Introduction Emulex’s EZPilot Manager provides a simple configuration and management tool for managing a Storage Area Network (SAN). The EZPilot Manager utility enables you to discover and check the status of local and remote Emulex HBAs, hosts, switches, storage devices and logical drives (LUNS) contained in the SAN. EZPilot Manager enables you to: • Add, expand, rename or delete a logical drive. • Assign a logical drive to a host.
Starting EZPilot Manager To start EZPilot Manager: 1. On your Management Server’s desktop, click Start. 2. Select Programs>Emulex>EZPilot Manager. EZPilot Manager starts and the Discovery Information screen is displayed. Storage View is the default setting the first time you run EZPilot Manager. If there are no logical drives configured, you will be prompted to configure them. If you want to configure logical drives now, see “Adding a Logical Drive” on page 45 and begin at step 4.
The EZPilot Manager Window The EZPilot Manager window contains five basic components: the menu bar, the toolbar, the discoverytree, the property tabs and the status bar. Figure 11: The EZPilot Window with Element Call Outs (Storage View with storage device selected.) Note: The element you select in the discovery-tree determines whether a menu item or Toolbar icon is active. For example, if you select the local host or other system host, the Reset Adapter item on the Adapter menu is unavailable.
• The Help menu displays the EZPilot Manager version as well as tech support and system information. The Toolbar The Toolbar contains buttons that enable you to refresh the discovery-tree view, reset the selected HBA and sort the discovery-tree view. Many of the Toolbar functions are also available from the Menu bar. Figure 12: The EZPilot Toolbar (Host View with an adapter selected) Note: If a Toolbar button does not apply to a selected discovery-tree element, it is disabled.
The Discovery-Tree The discovery-tree (left pane) has icons representing discovered network (SAN) elements such as arrays, switches, hosts, logical drives and HBAs. Figure 13: The EZPilot Discovery-Tree (Host View) Discovery-Tree Icons Discovery-tree icons represent the following: The root of the discovery-tree in Storage View. The root of the discovery-tree in Host View. The root of the discovery-tree in Switch View. The local host. Other hosts connected to the fabric.
• The HBA on a local host is malfunctioning and is inaccessible to the local host as well as to the SAN. • The HBA on a local host is busy performing a local firmware download and is temporarily inaccessible to the local host as well as to the SAN. • The HBA is being reset or its firmware is being updated. A grey HBA icon represents an HBA that was removed from the fabric. It will remain in the discovery-tree for thirty minutes after it is removed, unless you change the discovery properties.
Modifying Discovery Properties You can modify the way discovery is performed using the HBA Discovery Properties dialog box. You can define when discovery is performed, how often the information is refreshed and when to remove expired HBAs.
To modify discovery properties: 1. From the Discovery menu, select Modify Settings. The HBA Discovery Properties dialog box appears. 2. Change the desired discovery settings. 3. Click OK. To return discovery properties to their default settings: 1. From the Discovery menu, select Modify Settings. The HBA Discovery Properties dialog box appears. 2. Click Defaults. 3. Click OK.
The Managed Storage area of the Discovery Summary page displays the following information: • Number of Storage Devices - The number of manageable storage devices that were discovered. • Number of Logical Drives - The total number of logical drives on all manageable storage devices. To view the HBAs, storage devices and the logical drives that are available to each storage device: 1. Do one of the following: • From the Menu bar, click View, then click Storage Devices.
The Managed Storage area of the Discovery Information page displays the following information: • Number of Storage Devices - The number of manageable storage devices that were discovered. • Number of Logical Drives - The total number of logical drives on all the manageable storage devices. To view the HBAs, storage devices and the logical drives that are available to each host: 1. Do one of the following: • From the Menu bar, click View, then click Hosts.
The Managed Storage area of the Discovery Information page displays the following information: • Number of Storage Devices - The number of manageable storage devices that were discovered. • Number of Logical Drives - The total number of logical drives on all the manageable storage devices. To view the HBAs, storage devices and the logical drives that are available to each host: 1. Do one of the following: • From the Menu bar, click View, then click Switches.
• Operating System - The version of the operating system running on this host. The Managed Storage area of the Host Information page displays the following information: • Number of Storage Devices - The number of manageable storage devices visible to the selected host. • Number of Logical Drives - The total number of logical drives assigned to the host on the manageable storage devices. To view host information: 1. Do one of the following: • From the Menu bar, click View, then click Hosts.
• Size - The total storage size of the selected logical drive. • Status - The operational status of the selected logical drive. The status can be online, not ready or failed. • Health - The health of the selected logical drive. States are healthy, rebuilding or failing. • Flags - The capabilities of the selected logical drive. Capabilities are checksum and writethrough. • Transition State - The transition state of the selected logical drive. Possible states are stable, extending and reconfiguring.
3. In the Name field, enter the new name you wish to assign to the logical drive. The name can be up to 32 alpha-numeric characters and the underscore, dash, period and space characters. 4. Click Apply. Viewing a Logical Drive’s Disk Details Using the Logical Drive Summary page you can view the information about the logical drive’s disk. You can view disk details such as the disk’s name, bus slot, status, health, size and so on. To view a logical drive’s disk details: 1.
Or Right-click on the selected logical drive in the discovery-tree and select Expand. The Expand Logical Drive dialog box appears. Figure 21: The Expand Logical Drive dialog box 3. Enter the amount to increase the storage capacity on the drive. The maximum expansion amount is displayed on the dialog box. The units drop down box next to the Enter Expansion Amount field can be used to change the size units. The size can be displayed in gigabytes or terabytes (if more than 1 terabyte is available). Click OK.
Viewing Target Information Selecting an unmanaged target (for example, a tape device) or selecting a controller port under a storage device in Host or Switch views displays the Target Information page. Figure 22: The Target Information page The Target Information page displays the following information: • FC ID - The FC identifier for the target which is assigned automatically in the firmware. • SCSI Bus Number - The SCSI bus to which the target is connected.
Managing Host Bus Adapters EZPilot Manager enables you to manage many aspects of a selected HBA. Using EZPilot Manager you can: • View an HBA’s general information. • Reset an HBA. • Edit an HBA’s name or use its default name. • Upgrade an HBA’s firmware and BootBIOS and enable or disable the BootBIOS. Viewing an HBA’s General Information The HBA General tab displays relevant information about the selected HBA, such as the model number, firmware version, driver version, link status and so on.
The Adapter Status area of the General tab displays the following information: • State - The current operational state of the HBA: “Up” or “Down”. • Link Status - The current link status between the HBA and the fabric. There are several possible states: • The “Operational” state indicates that the HBA is connected to the network and operating normally. • All other states indicate that the HBA is not connected to the network.
Editing an HBA’s Name EZPilot Manager enables you to rename a selected HBA. The name is stored on the host on which EZPilot Manager is running. Note: If EZPilot Manager is run on a different host, it will not display the new name. To edit an HBA’s name: 1. In the discovery-tree, select the HBA whose name you wish to change. 2. From the Menu bar, select Adapter, and then select Edit Name. or Right-click on the selected HBA and choose Edit Name. 3. Enter the new name.
Viewing an HBA’s Firmware Information Use the Maintenance tab to view a selected HBA’s firmware information, update its firmware and enable or disable its BootBIOS. Note: You must select Advanced Mode from the View menu to see the Maintenance tab for a selected HBA. Figure 24: The EZPilot HBA Maintenance tab (Host View) in Advanced Mode The Firmware area of the Maintenance tab displays the following information: • Current Firmware Version - The Emulex firmware version number for the selected HBA.
• Enable/Disable - Click this button to enable or disable the system BIOS for the HBA. This button controls whether the system BIOS can read Emulex boot code off of the HBA. If this field is “Enabled”, the system BIOS can see boot code on the HBA and you can enable BIOS on the HBA using the BIOS utility. See “Enabling or Disabling BootBIOS on an HBA” on page 32 for instructions. Note: If there is no BootBIOS present, this button is not available. To view the Maintenance tab: 1.
Figure 26: The EZPilot Firmware Download dialog box 4. Navigate to the extracted firmware/BIOS file you wish to download to the HBA. Select the firmware/BIOS file and click Start Download. A status bar displays the progress of the download and indicates when the download is complete. After the firmware/BIOS is downloaded, the HBA is automatically reset. 5. Click Close. The Maintenance tab displays the updated firmware/BIOS information for the selected HBA.
Managing a Switch Introduction When you select a switch from the discovery-tree in Switch View mode, the Fabric Information tab and Switch Mgmt. tab appear. The Fabric Information tab displays relevant information about the switch. The Switch Mgmt. tab enables you to configure a switch on the network. Prerequisites • EZPilot is operating in Advanced Mode. • The EZPilot host system is connected to a local area network to manage the switch.
The Managed Storage area of the Fabric Information tab displays the following information: • Number of Storage Devices - The number of storage devices discovered by this host on the selected fabric. • Number of Logical Drives - The total number of logical drives discovered on all manageable storage devices connected to the switch. To view fabric information for a switch: 1. Do one of the following: • From the Menu bar, select View, then click Switches.
Using the Switch Mgmt. Tab The Switch Mgmt. tab enables you to configure the selected switch. Note: If you change the fabric zoning configuration, EZPilot Manager may no longer be able to discover and manage remote hosts. To configure a switch: 1. Do one of the following: • From the Menu bar, select View, then click Switches. • From the Toolbar, click the Switch View button. 2. In the discovery-tree, select the switch you wish to manage. 3. Select the Switch Mgmt. tab.
3. Select the Switch Mgmt. tab and click the Network icon. 4. The EZPilot Manager Switch Settings dialog box appears. You may change the switch’s name, IP Address, Subnet Mask and Gateway Address from the values entered in the EZPilot SAN Setup Wizard. If DHCP is supported and enabled, you can check Obtain network settings automatically. Click OK.
Managing Storage Devices EZPilot Manager enables you to manage storage devices on the SAN. Using EZPilot Manager you can: • Add logical drives. • Rename logical drives. • Remove logical drives. • Expand logical drives. • Assign or un-assign a logical drive to an HBA or group of HBAs.
The Storage Management Interface area of the General tab displays the following information: • Name - The name of the storage management interface being used to manage the selected storage device. • Version - The version of the of the storage management interface being used. The Storage Device Summary area of the General tab displays the following information: • Device Name - The name of the storage device. • Device Identifier - The storage vendor’s unique device identifier.
2. From the General tab, select a controller from the Storage Device Controllers list and click Controller Ports (see Figure 30). The Storage Device Controller Ports dialog box appears displaying available controller ports. Figure 31: The EZPilot Manager Storage Device Controller Ports dialog box (The Show Target Information button does not appear if you are accessing the menu from Storage View.) Viewing a Port’s Attached Logical Drive Information To view a controller port’s attached logical drives: 1.
To view the Logical Drive tab: 1. From the discovery-tree, select the storage device whose information you wish to view and select the Logical Drives tab. Figure 33: The EZPilot Manager Logical Drives tab The Storage Usage area of the Logical Drive tab displays the following information: • Total Capacity - The total storage space available in the storage device. • Allocated Space - The amount of storage space already allocated to existing logical drives.
3. Click Details. The Logical Drive Details dialog box appears. Information about the logical drive is displayed in this dialog box. The Assigned Adapters list shows the worldwide port names of the adapters assigned to the logical drive. Click Disk Details to view information about the logical disk drive, including its name, bus, slot, status and so on.
Right click on the selected logical drive, select Rename and type the logical drive’s new name in the discovery-tree. Figure 35: The EZPilot Manager Rename Logical Drive dialog box 3. Enter the new name into the New Name field and click OK. Expanding a Logical Drive The Logical Drives tab (see Figure 33) also enables you to increase the storage space allocated to the selected logical drive. To expand a logical drive: 1.
Deleting a Logical Drive The Delete Logical Drive button on the Logical Drives tab (see Figure 33) enables you to delete a logical drive. WARNING: Deleting a logical drive should be done with extreme caution. The data on the logical drive cannot be recovered after it is deleted. Stop all I/O to the logical drive before it is deleted or system instability may occur. To delete a logical drive: 1. From the discovery-tree, select the storage device containing the logical drive you wish to delete. 2.
2. Select the Logical Drives tab and select the logical drive whose host assignment you wish to change from the Logical Drive list. Click Host Assignment. Or Right-click on the selected storage device and select Host Assignment. The following Warning dialog box appears. Figure 38: EZPilot Manager Logical Host Assignment Warning dialog box 3. Click Yes. The Assign Logical Drive dialog box appears. Figure 39: The EZPilot Manager Assign Logical Drive dialog box 4.
Adding a Logical Drive EZPilot Manager enables you to create a new logical drive. Click New Logical Drive on the Logical Drive tab to create and assign a logical drive to the selected storage device. The New Logical Drive button is enabled when there is unallocated space left on the drive. Note: If you did not obtain a Command View license when you installed EZPilot Manager you will be prompted to obtain one when you attempt to create logical drives.
5. Click Next. The EZPilot Add Logical Drive Wizard-- Logical Drive Properties dialog box appears. Figure 41: The EZPilot Manager Add Logical Drive wizard - Logical Drive Properties dialog box 6. Choose the Logical Drive Type you wish to create and assign a size to the new logical drive. The units drop down box next to the Size field can be used to change the size units. The size can be displayed in gigabytes or terabytes (if more than 1 terabyte is available).
7. The EZPilot Logical Drive Wizard-- Logical Drive Host Assignment dialog box appears. Select the host (and its adapters) to which you want to assign the logical drive. If Assign to this host only is checked, only the local host and its adapters are displayed in the tree. Checking or unchecking the root node of the tree selects or deselects all hosts and adapters. Checking or unchecking a host node in the tree selects or deselects all adapters for that host.
9. Assign the parameters you want and click Next. The Logical Drive Creation dialog box appears. Figure 44: The EZPilot Manager Logical Drive Creation dialog box 10. Verify that the information you specified previously is correct and click Create Logical Drive. The list box displays the status of the logical drive creation and assignment. Note: To change information click the Back button. Note: Creating a logical drive may take several moments. You are notified when the creation process is complete. 11.
Viewing Physical Disk Information The EZPilot Manager Physical Disks tab displays all of the physical drives for a particular storage device. The tab enables you to view the physical drive properties. Figure 45: The EZPilot Manager Physical Disks tab The Physical Disks tab displays the following information: • Name - Identifies the disk’s manufacturer. • Bus, Slot - The bus and slot number in which the disk is installed. • Status - The online or offline status of the disk.
Troubleshooting Introduction There are several circumstances in which your system may operate in an unexpected manner. This chapter provides information regarding these situations. If you have problems during or after installation, contact your supplier. EZPilot Manager Cannot See Other HBAs or Hosts Situation: Although EZPilot Manager is installed, only local HBAs are visible. The other HBAs and hosts in the SAN cannot be seen.
Cannot See New LUNs or Targets (Linux) Situation: The HBAnyware utility does not see the targets or LUNs on the storage array. Resolution: • Exit HBAnyware and restart the application. • Ensure the lpfc driver module is loaded by running lsmod from a terminal window. If the driver module is not loaded, type: #> insmod lpfc to load the driver. • If the lpfc driver is loaded and HBAnyware still does not see any targets, exit HBAnyware and type: #> killall elxdiscoveryd Restart HBAnyware.
Appendix Introduction The following procedures describe how to: • Add a second switch to the EZPilot SAN • Add a second disk shelf to the EVA4100 array Adding a Second Switch To add a second switch: 1. Cable the new switch in an HA configuration and add it to the EZPilot SAN. 2. Open EZPilot Manager on the management host. 3. The discovery cycle will recognize the new switch and add it to the discovery tree. 4. Click on the new switch.
9. Click again on Ungrouped Disks. Click on each disk and then click Group in the right pane. Select the new disk group that was just created to add that disk into it. Click Save after you have done this for each disk. 10. Close Command View and open EZPilot Manager. Click on the storage array in the discovery tree and click Physical Disks in the right pane. All drives on both the first and second disk shelves will now be listed and available for LUN allocation.