
HP PCIe IO Accelerator for ProLiant Servers


Software Installation 20
PCIe IO Accelerator Naming
The PCIe IO Accelerator receives a name and
number as part of the install process for
identification. The syntax is fctx, where x is the
number of the PCIe bus where you installed the
PCIe IO Accelerator. Use PCIe IO Accelerator
Management Tool to view this bus number, or
follow these steps:
1. Select Start > Control Panel.
2. Click Administrative Tools.
3. Click Computer Management.
4. Device Manager.
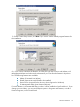
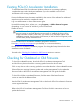
5. Expand HP StorageWorks IO Accelerators
and then double-click the HP
StorageWorks IO Accelerator entry.
The Properties dialog appears. The
Location field shows the PCIe bus number for your device (fct8 in this case):
NOTE: HP assigns bus numbers, which can range from 0 on up. These numbers may
or may not reflect the physical location of the bus. (For example, the second slot from
the edge of the motherboard may be Bus 2, but it could also be Bus 16 or another
arbitrary number. Checking Device Manager is one way to confirm the specific bus
number for your installation. You can also use the PCIe IO Accelerator Management
Tool to view this number.)
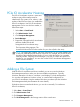
Adding a File System
With the PCIe IO Accelerator and driver installed, you can now use the Windows
Disk Management utility to make your device available to applications. Typically,
Windows detects the new device, initializes it, and displays it in Disk Management.
You can then add partitions, format a volume, or create a RAID configuration on
your PCIe IO Accelerator using the standard Windows procedures (see the Windows
Disk Management Utility documentation for more details).
If Windows does not initialize the device, you can do so manually. To initialize an
PCIe IO Accelerator,
1. Select Start > Control Panel.
2. Click Administrative Tools.
3. Click Computer Management.
4. Click Disk Management in the Storage section of the console tree.