
HP 3PAR T-Class Installation and Deinstallation Guide


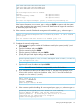

7. Verify the number of drive magazines and physical disks in the storage system.
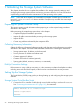
Examining the port states...
All ports are in acceptable states.
Examining state of new disks...
Found < 4 > HUA722020ALA330 disks
Found < 8 > HVIPC0300GBFC15K disks
Found < 8 > HVIPC0600GBFC15K disks
Found < 8 > SEGLE0300GBFC15K disks
Found < 8 > SEGLE0600GBFC15K disks
Cluster has < 36 > total disks in < 9 > magazines.
< 36 > are new.
Now would be the time to fix any disk problems.
Enter < C > to continue or < Q > to quit ==> c
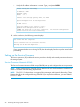
• To continue, typec and press ENTER.
• If the number of disks is not correct, or if there are any failed, invlabel, or notready
disks, type q and press ENTER to quit the setup script. To remedy any disk problems, refer
to the HP 3PAR T-Class Storage System Maintenance Manual.
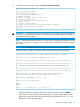
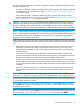
8. As the system checks cage connections and firmware, verify the status is OK for all drive cages,
as indicated in the far right column in the following example.
Ensuring all ports are properly connected before continuing... Please Wait...
Cages appear to be connected correctly, continuing.
Examining drive cage firmware... Please wait a moment...
Issuing admitpd... Please wait a moment...
admitpd completed with the following results...
Found < 4 > HUA722020ALA330 disks
Found < 8 > HVIPC0300GBFC15K disks
Found < 8 > HVIPC0600GBFC15K disks
Found < 8 > SEGLE0300GBFC15K disks
Found < 8 > SEGLE0600GBFC15K disks
Cluster has < 36 > total disks in < 9 > magazines.
< 36 > are valid.
All disks have current firmware.
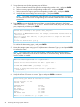
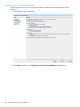
If there are any missing, or nonstandard connections, an error message appears on the screen.
Verify all non-standard connections are correct or complete any missing connections, then
type r and press ENTER to recheck the connections. If it is necessary to quit the setup procedure
to resolve an issue, type q and press ENTER. When all connections are correct, type c and
press ENTER to continue.
Setting Up the Storage System 95