
HP 3PAR T-Class Installation and Deinstallation Guide

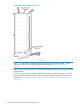
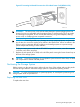
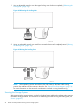
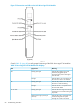

2. Engage the hinges by squeezing the two release pins on the hinges and pushing the hinges
to the left, as shown in “Engaging the Hinges on the Rear Door” (page 75).
Figure 67 Engaging the Hinges on the Rear Door
Replacing the Side Panels and Filler Panels
Replace any side panels or filler panels removed during cabling and positioning of the storage
system.
CAUTION: To prevent overheating of the system, do not operate a system unless all chassis bays
are filled with components or sealed with filler panels. Do not operate the storage system with the
side panels removed.
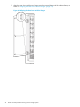
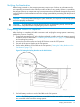
• To replace a side panel, use the handle located in the center of the panel to position it, then
secure the panel by tightening all screws with a #2 Phillips screwdriver.
• To replace a filler panel, tighten the four screws securing the panel by using a #2 Phillips
screwdriver.
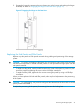
When you have replaced all side and filler panels, make any final adjustments to the positioning
of the system.
CAUTION: To avoid tipping, one person should guide the cabinet from the front while a second
person pushes from behind.
To adjust the positioning of the system (if necessary), first raise the leveling feet:
Positioning the Storage System 75