
HP 3PAR T-Class Installation and Deinstallation Guide


Password: <
password>
4. From the console menu, type 9 to select the Perform a deinstallation menu option.
5. When prompted, proceed with either shutting down the system or initializing the system
chunklets.
NOTE: Depending on the size of the system disks, initializing the chunklets may take several
hours.
NOTE: If you do not wait for the chunklets to be initialized, data still resides on the disks,
but cannot be accessed easily. While the chunklets are initialized, zeros are written over the
existing data. Contact your HP Technical Support Representative for additional information.
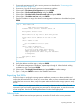
6. In the Service Processor menu, type 1, to select the SP Control/Status option.
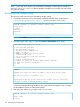
1 SP Main
3PAR Service Processor Menu
Transfer media: ethernet Transfer status: Ok
Enter Control-C at any time to abort this process
1 ==> SP Control/Status
2 ==> Network Configuration
3 ==> InServ Configuration Management
4 ==> InServ Product Maintenance
5 ==> Local Notification Configuration
6 ==> Site Authentication Key Manipulation
7 ==> Interactive CLI for an InServ
8 ==> Execute a command on a node
X Exit
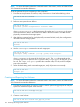
7. In the SP Control Functions menu, type 18 to select the deinstall SP (Back-in-the-box) option.
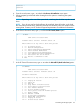
1 SP CONTROL
3PAR Service Processor Menu
Transfer media: ethernet Transfer status: Ok
SP Control Functions
Enter Control-C at any time to abort this process
1 ==> Display SP Version
2 ==> Reboot SP
3 ==> Halt SP
4 ==> Stop InServ related Processes
5 ==> Start InServ related Processes
6 ==> File Transfer Monitor
7 ==> SP File Transfer Trigger
8 ==> Reset Quiesce state in Transfer process
9 ==> Mount a CDROM
10 ==> Unmount a CDROM
11 ==> SP Date/Time maintenance
12 ==> Manage NTP configuration
13 ==> Display SP status
14 ==> SP User Access Control
Deinstalling the Storage System 157