
HP 3PAR T-Class Installation and Deinstallation Guide


39. Verify the time zone setting is correct, then type 1 and press ENTER. Choosing option 2 restarts
the time zone configuration.
NOTE: The system automatically makes the time zone change permanent. Disregard the
instructions on the screen for appending the command to make the time zone change
permanent.
40. Press ENTER to accept the default date in brackets, or type the current date in MM/DD/YYYY
format and press ENTER.
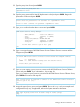
Basic Date and Time
Enter Control-C at any time to abort this process
Please enter the current date in MM/DD/YYYY format [<current date>] :
41. Type the current time in HH:MM format or press ENTER to accept the default time indicated by
the installation script.
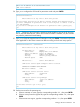
Basic Date and Time
Enter Control-C at any time to abort this process
Please enter the time in HH:MM format [<Time>]:
[enter]
42. Type yes to verify the date and time indicated from step 40 and 41 and press ENTER.
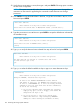
Basic Date and Time
Enter Control-C at any time to abort this process
The date and time you entered is <current date> and <time>
Is this Correct? (yes or no)
yes
43. Type yes to select the default installed site keys or type no to enter alternate site keys.
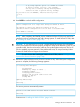
Confirmation
Enter Control-C at any time to abort this process
Using the DEFAULT, installed Site key files:
If this is the INITIAL INSTALLATION of this 3PAR SP
and InServ at this site, the DEFAULT keys should be used.
If this is a REPLACEMENT SP, or there is already an InServ
running at this site with which this SP must communicate,
do one of the following:
1) If you have external media containing the currently
deployed key pair (on CD or floppy), then answer NO
and provide the Keys to use.
2) If you do not have a copy of the current keys,
answer YES and force a key-exchange by MANUALLY
adding the cluster during the SP Moment of Birth,
124 Initializing the Storage System Software