
HP 3PAR T-Class Installation and Deinstallation Guide


NOTE: The customer must have the minimum network configuration to allow a Secure Network
Mode enabled SP to communicate with the collector server.
1. Connect the maintenance PC to the service processor through a serial connection, as described
in “Connecting to the Service Processor” (page 193), then power on the service processor and
log in as the root user.
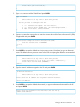
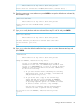
2. Type yes to begin the service processor setup script (SPMOB) and press ENTER.
Welcome to the 3PAR Service Processor Moment of Birth
Enter Control-C at any time to abort this process
Are you ready to configure the SP at this time? (yes or no) [yes]:
[enter]
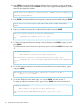
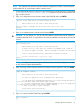
3. Type no to indicate the site is not secured and press ENTER
CAUTION: If you answer yes , the SP will not be able to communicate with HP Central. A
complete rebuild of the SP is required if the SP needs to establish communication link with HP
Central.
Site Security Level
Enter Control-C at any time to abort this process
A Secure Site is a site where the customer will NEVER allow a 3PAR SP
to access the public internet. Thus the SP public interface will be used
only to access and monitor the 3PAR InServ attached to this SP.
Is this a Secure Site? ( yes or no ) [no]
[enter]
NOTE: For additional technical support with Secure Network Mode configuration, contact
an HP Technical Support Representative.
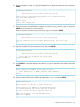
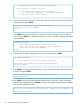
4. Type 2 to assign Secure Network Mode for file transfer/remote operations and press ENTER.
Type of transport control
Enter Control-C at any time to abort this process
You have two options for file transfer/remote operations:
1 ==> SP Mode where inbound/outbound access is via ssh session and control
is via the Customer Controlled Access (CCA) setting.
2 ==> Secure Network Mode where inbound/outbound access is via https and
is controlled by the 3PAR Secure Service Agent (SSAgent).
X None of the above. Cancel and Exit
Please enter your selection [X]:
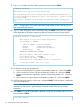
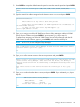
5. Type 1 to continue with the SPMOB and press ENTER.
Type of install
Setting up the Service Processor 117