
HP 3PAR T-Class Installation and Deinstallation Guide
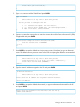
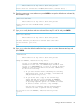


21. Type yes to configure the SP firewall in permissive mode and press ENTER.
SP Network Parameters
Enter Control-C at any time to abort this process
The SP firewall protects the SP and the customer network from unauthorized use.
It can be configured in ‘permissive’ mode to allow any host to connect to the SP
via SSH and HTTP.
Do you wish to configure the SP firewall in ‘permissive’ mode? [yes/no][yes]
yes
NOTE: Configuring the SP firewall in permissive mode enables access to the SP from any
host on the local area network.
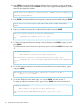
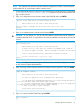
22. Type yes after verifying the network information and press ENTER. Some items only appear
when applicable so the screen content may differ according to the chosen setup options.
SP Network Parameters - Confirmation
Enter Control-C at any time to abort this process
The Host Name is: SPXXXXX
- Public IP address: <static.IP.address>
- Netmask: <subnet.mask.address>
- Gateway: <default.gateway.address>
- Network Speed: AUTO
PERMISSIVE FIREWALL MODE SELECTED
NTP Server address: <NTP.server.address> or none
Data Transfer media: ETHERNET
Remote Operations media: ETHERNET
Connection Portal: <3PAR default portal> or <server_name>
Is this data correct? (yes or no)? [yes]
yes
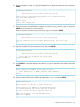
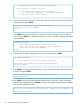
23. Set the time zone for the operating site:
a. Select a country from the list, type the corresponding number <X> , then press ENTER.
b. Select a continent or ocean, type the corresponding number <X> , then press ENTER.
c. Select a country from the regional list, type the corresponding number <X> , then press
ENTER
d. Select a time zone region, type the corresponding number < X >, then press ENTER.
24. Verify the time zone setting is correct, type 1 and press ENTER. Choosing option 2 restarts the
time zone configuration.
NOTE: The system automatically makes the time zone change permanent. Disregard the
instructions on the screen for appending the command to make the time zone change
permanent.
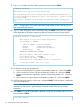
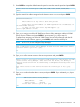
25. Press ENTER to accept the default date in brackets, or type the current date in MM/DD/YYYY
format and press ENTER.
Basic Date and Time
114 Initializing the Storage System Software