
HP 3PAR Peer Motion Guide


The following are migration procedures when using the HP 3PAR Management Console. For
migration procedures using the HP 3PAR Peer Motion Utility, see “Using the HP 3PAR Peer Motion
Utility Commands” (page 68)
Online Migration Procedure
To begin online migration:
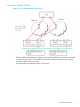
1. Launch the Create PM Configuration wizard in the HP 3PAR Management Console to configure
two ports on the destination system to be peer ports and update other port parameters to
complete the PM Configuration. (See the HP 3PAR Management Console Guide, ”Creating
a Peer Motion Configuration.")
2. Zone the source and destination systems together.
3. Launch the Copy Storage Settings and Configurations wizard to copy the settings and
configurations from the source system to the destination system, then create and edit the
domains, hosts, and CPGs, and so on, on the destination system.
4. Launch the Migrate Data wizard to select the volumes to migrate from the source system to
the destination system.
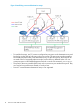
5. Once the volumes have been admitted and the Migrate Data Confirmation screen displays,
verify that the multi-pathing on the host(s) has picked up the new paths from the destination
system.
6. Unzone the migrating host(s) from the source system, if not using Single Volume Migration.
7. Click Verify and Continue to start importing the volumes.
8. After the data migration is successful, perform the Remove PM Configuration operation to
remove the PM Configuration.
Minimally Disruptive Migration Procedure
MDM is applicable to Windows 2003, Windows 2008, or Windows 2012 clusters when the
requirements for Windows online cluster migration are not met.
Refer to the Support Matrix on SPOCK (at http://www.hp.com/storage/spock) for the supported
releases for Online Migration of Windows clusters. See “Peer Motion General Requirements and
Restrictions” (page 14) for requirements for Online Migration of Windows clusters and cases where
MDM must be used for Windows clusters.
When migrating Windows Server 2012 clusters, set maintenance mode on the cluster disks to
clear SCSI reservations on these disks. Because the quorum disk cannot be set in maintenance
mode, it should be set offline to clear the SCSI reservations. Then, you should shut down all of the
cluster nodes.
When migrating Windows clusters other than Windows Server 2012 clusters, shut down all of the
cluster nodes. Doing this releases all of the SCSI reservations on the cluster disks, including quorum
disks. For Windows 2003 clusters, this must be done before the “Create Peer Volumes” step to
ensure that the volumes can be correctly seen by the destination array.
To begin MDM:
1. Launch the Create PM Configuration wizard in the HP 3PAR Management Console to configure
two ports on the destination system to be peer ports. (Refer to “Select Systems” in the HP 3PAR
Management Console Guide.)
2. Zone the source and destination systems together.
3. Launch the Copy Storage Settings and Configuration wizard to copy the settings and
configurations from the source system to the destination system, then create and edit the
domains, hosts, and CPGs, and so on, on the destination system.
4. Launch the Migrate Data wizard to select the volumes to migrate from the source system to
the destination system.
5. Once the volumes have been admitted and the Migrate Data Confirmation screen displays,
shut down the cluster fully.
Migration Types 7