
HP 3PAR Peer Motion Guide
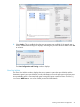


a. Select Suffix or Full Name.
b. Enter a suffix or name in the text box.
5. If not already selected, select the virtual volumes to be configured during import to the
<destination system>, then click Add. (You can also add the virtual volumes one at a time.)
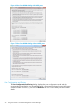
6. If you are using Offline migration, click Finish to create the peer volumes and begin the
migration. If you are using Online migration or MDM, click Finish to create the peer volumes.
To start the importing tasks for Online migration, refer to “Online Data Migration Confirmation”
(page 30).
To start the importing tasks for MDM, refer to “Minimally Disruptive Data Migration Confirmation”
(page 31).
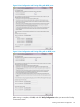
Online Data Migration Confirmation
1. Configure the switch to zone the destination system to the host paths listed.
2. Re-run a scan on the host systems to discover the new volume.
3. Verify that the host paths to the destination system are active.
4. If you are migrating a single volume or subset of volumes, you do not need to un-zone the
source system from the hosts.
If you are migrating all of the volumes (which is enforced if the requirements for Single Volume
migration are not met), then you must configure the switch to un-zone the source system from
the hosts. If you do not, the Verify step will inform you that un-zoning is required.
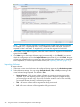
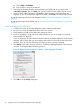
5. Click Verify. If the system zoning is correct, a confirmation message displays. If the zoning is
incorrect, a message displays describing the issue.
Figure 12 Migration Data Confirmation dialog — when migrating all volumes
6. Click OK to exit the Verify dialog box.
30 Using Peer Motion in HP 3PAR Management Console Manager