HP 3PAR Peer Motion Guide HP Part Number: QL226-97837 Published: June 2014
© Copyright 2014 Hewlett-Packard Development Company, L.P. Confidential computer software. Valid license from HP required for possession, use or copying. Consistent with FAR 12.211 and 12.212, Commercial Computer Software, Computer Software Documentation, and Technical Data for Commercial Items are licensed to the U.S. Government under vendor's standard commercial license. The information contained herein is subject to change without notice.
Contents 1 Overview of HP 3PAR Peer Motion................................................................6 Migration Types........................................................................................................................6 Online Migration Procedure..................................................................................................7 Minimally Disruptive Migration Procedure...............................................................................
Available/Imported Host Sets Screen....................................................................................48 Available/Imported Linked Hosts Screen...............................................................................48 Admitted/Importing Hosts Screen.........................................................................................49 Admitted/Importing Linked Hosts Screen...............................................................................
HP-UX 11i V2.........................................................................................................................89 Single-node Online Reconfiguration..........................................................................................89 C HP 3PAR Peer Motion Utility Commands......................................................92 addsource.............................................................................................................................92 showsource .....
1 Overview of HP 3PAR Peer Motion HP 3PAR Peer Motion provides the non-disruptive migration of a host and its data from a source storage system to a destination storage system, with I/O requests from all attached hosts continuing to be serviced throughout the migration process.
The following are migration procedures when using the HP 3PAR Management Console. For migration procedures using the HP 3PAR Peer Motion Utility, see “Using the HP 3PAR Peer Motion Utility Commands” (page 68) Online Migration Procedure To begin online migration: 1. Launch the Create PM Configuration wizard in the HP 3PAR Management Console to configure two ports on the destination system to be peer ports and update other port parameters to complete the PM Configuration.
6. 7. 8. 9. Unzone the cluster from the source system. Click Verify and Continue to start importing the volumes. Once data migration has begun, zone the cluster to the destination array and restart the cluster. After the data migration is successful, perform the Remove PM Configuration operation to remove the PM Configuration. Offline Migration Procedure To begin offline migration: 1.
How Peer Motion Works Figure 1 Host is connected to the source array • The figure shows a Host that owns volumes on the source HP 3PAR array. The Host is connected to the source array via FC and a SAN. The Host has two HBAs connected to two adjacent controller nodes on the source array. • The (potentially new) destination array is also online.
Figure 2 Interlinking source and destination arrays 10 • To interlink the arrays, two FC ports are configured as peer ports on the destination array and hooked up via the SAN to host ports on the source array. The peer ports must be created on horizontally adjacent nodes on the destination array. On the source array, the host ports do not need to be on horizontally adjacent nodes, but should be on different nodes.
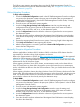
Figure 3 Admit stage • In the Admit stage, the volumes to be migrated are admitted to the destination array. These admitted volumes appear as volumes in the HP 3PAR Management Console for the destination array with ‘peer’ for their Provisioning type. In this stage, the volumes are defined and prepared on the destination array for export to the Host. No local storage is allocated for these volumes on the destination array at this point in time.
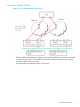
Figure 4 Import stage 12 • In this Import stage, migration can start. The host accesses the volumes on the source array via the destination array. Host issued Reads and Writes may see increased latency. • For Host Level Migration, the hosts are prevented from directly accessing the volumes on the source array by manually removing the zones for those paths.
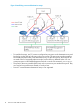
Figure 5 Migration complete • When all LUNs on the source array are migrated, the source array can be decommissioned or re-initialized. • After migration has completed, all the data that was in the source volumes has been copied to new destination volumes. At this point, all Host issued Reads and Writes are performed directly on the new destination volumes.
2 Data Migration Requirements IMPORTANT: Before beginning migration, consult SPOCK (at http://www.hp.com/storage/ spock) to verify that the HP 3PAR OS versions on the hosts to be migrated are supported. Ensure each host configuration that is to be migrated is supported with both the Source and Destination arrays. NOTE: If you are performing HP-UX migration, refer to “Additional Steps to Migrate HP-UX Hosts” (page 89).
• • ◦ The Fibre Channel fabric between the source and destination arrays is capable of and enabled for N_Port ID Virtualization (NPIV). ◦ If the destination array is running a release prior to HP 3PAR OS 3.1.3, is a T-Class or F-Class system, or the cluster size is larger than four hosts, or the Fiber Channel fabric is not capable of NPIV, then the MDM procedure must be followed. For single volume migration: ◦ Both the source and destination arrays must be running at least HP 3PAR OS 3.1.3.
• The ports should be zoned 1:1 across the fabric. If nodes 0 and 1 are used on the source system and nodes 0 and 1 are used on the destination system, the ports on source-0 and destination-0 should be zoned together. The ports source-1 and destination-1 should be zoned together in a separate zone. • The order of zoning is not important, but you should zone the source and destination systems together and make sure they are visible to each other before connecting hosts to the destination system.
Remote Copy groups and their synchronization tasks that exist on the source system are not created by Peer Motion on the destination system; this has to be done manually. Only point (also known as Fabric) connections between the destination and the source systems are supported. Direct Fibre Channel (FC) connections are not supported. The iSCSI is also not supported to interconnect the systems. The speeds of the FC ports do not need to be the same.
3 Using Peer Motion in HP 3PAR Management Console Manager The Peer Motion Manager within the HP 3PAR Management Console enables you to perform the following Peer Motion operations: • Display the source and destination configurations. • Display volumes that are to be migrated, admitted, and imported. • Display hosts, users, and domains that are to be migrated. • Display the LDAP configuration if it is available. • Create a Peer Motion configuration.
Creating a Peer Motion Configuration To use the Create PM Configuration wizard, the following conditions are required: • Storage systems must meet all the requirements as listed in “Peer Motion General Requirements and Restrictions” (page 14). • Super user role. • At least one available source system and destination system that are not in a Peer Motion configuration. Perform the following tasks before using the wizard: • Choose two host ports on the source system.
configuration, or click No to return to the Select Systems screen with the destination system reset. 3. Click Next to open the Set Up Connections page. Set Up Connections 1. Right-click to select a port on the destination system. 2. Select Pick a pair for , then select the port you want paired with the destination port. (Peer ports display as bold.) NOTE: If the host ports are not already configured, you can configure them in the Port Parameters area.
3. Select Apply. (This is enabled when the port parameters are modified.) If the paired port is online, a confirmation dialog box displays, indicating the port must be set to offline. Click Yes to continue. The Port Configuration and Zoning windows displays. Show Port WWNs The Show Port WWNs window displays the source system's system host port WWNs and the destination system’s peer port WWNs. Use this information to zone the peer ports to the host ports.
Figure 6 Show Port WWNs dialog with NPIV ports: Figure 7 Show Port WWNs dialog without NPIV ports: Port Configuration and Zoning The Port Configuration and Zoning dialog displays the port configuration results and the corresponding port WWNs. An expandable panel is associated with ports having NPIV ports created on them. Click the (+) icon next to NPIV Ports to view a list of NPIV ports and WWN details.
Figure 8 Port Configuration and Zoning dialog with NPIV ports: Figure 9 Port Configuration and Zoning dialog with no NPIV ports: After zoning is complete, click OK, and click Verify Configuration when you return to the Set Up Connections screen.
NOTE: If NPIV peer ports were created, the NPIV port WWNs associated with each peer port must be included in the same zone as the peer port WWN. If the configuration is successful, click OK in the Verify Configuration dialog.
If the simple copy operation does not meet your needs, you can modify settings and configurations on the destination system. You can use the following existing HP 3PAR Management Console commands: • Create/Edit domain • Create/Edit domain set • Create/Edit host • Create/Edit host set • Create/Edit user • Create/Edit LDAP configuration To copy storage settings and configurations: 1. Select Peer Motion in the Manager Pane. 2. Select Peer Motion Configuration in the Management Tree. 3.
Migrating Data To use the Migrate Data wizard, the following conditions are required: • Super user role • Peer Motion license on the destination system • Any Peer Motion configuration that includes a source and destination system whose status is Normal and that has no admitted or importing volumes. Perform the following tasks before using the wizard: • Configure the data migration process by using the Create PM Configuration wizard.
NOTE: A warning message displays if either of the following licenses is missing: • Thin provisioning (needed to create a thin volume) • Domain (needed to add the volumes to a domain that is not the domain) When the migration host exists on the source array, a warning displays indicating to clean it up. To migrate data: 1. Select Peer Motion in the Manager Pane. 2. In the Common Actions panel, click Migrate Data and the wizard displays. Creating Peer Volumes 1. 2.
NOTE: All virtual volumes exported to overlapping hosts (Linked Hosts) must be exported. For example: VV1 is exported to Host1, VV2 is exported to Host2 and Host3, and VV3 is exported to Host1 and Host3. To migrate VV1, you must also migrate VV2 and VV3. 3. 4. If the system is using offline migration, select the virtual volumes to migrate to the destination system and click Add.
Figure 10 Migrate Data, Import Volumes — Selecting all volumes: Figure 11 Migrate Data, Import Volumes — Selecting sub-set of volumes: 3. Select a User CPG (required) and Copy CPG (optional). NOTE: If there is no CPG available for the specified domain, you must exit the wizard and create the CPG first. 4. If you selected Copy CPG, you have the option of selecting the Create virtual copies after importing volumes checkbox.
a. b. 5. 6. Select Suffix or Full Name. Enter a suffix or name in the text box. If not already selected, select the virtual volumes to be configured during import to the , then click Add. (You can also add the virtual volumes one at a time.) If you are using Offline migration, click Finish to create the peer volumes and begin the migration. If you are using Online migration or MDM, click Finish to create the peer volumes.
Figure 13 Migration Data Confirmation dialog — when migrating sub-set of volumes 7. Click Continue. If the systems are zoned correctly, the importing tasks start. Minimally Disruptive Data Migration Confirmation 1. 2. 3. 4. 5. Shut down the host system. (You must use Shut Down, not Restart.) Click Verify. Click OK to exit the Verify dialog box. Click Continue. After the import task starts, an information dialog box displays. Click OK.
This wizard guides you in importing peer volumes to the destination system. The wizard automatically selects a migration type based on your system setup and the data migration selections you made for the Peer Motion configuration.
To remove peer volumes: 1. 2. 3. 4. Select Peer Motion in the Manager Pane. In the Common Actions panel, click Remove Peer Volumes to open the Remove Peer Volumes dialog box. Select the Select to also delete checkbox if you want to delete any listed volumes currently exported to a host and listed volumes that are part of a volume set. If this checkbox is selected, a warning dialog displays. Click Delete to remove the volumes. Click OK.
To use the Post Migration Cleanup command, the following conditions are required: • Super user role. • A Peer Motion configuration that has a source and destination system. • No admitted (peer) volumes or importing volumes on the destination system. • A migration host exists. After the system completes the post-migration cleanup, you can start a new migration using the existing Peer Motion configuration and the current peer ports.
3. 4. Select the Unconfigure the Peer Ports checkbox. Click OK. When the migration host exists on the source system, click OK to remove the migration host. (The Remove PM Configuration dialog box that displays depends on whether the migration host exists on the source system.
Summary Tab The Summary tab is divided into a left pane and a right pane. The left pane displays the Peer Motion topology in one of the following views. • Overview – displays the source and destination systems, the direction of data migration, the number of ports and their status, and the View Physical Connectivity checkbox. • Physical Connectivity View – displays the source and destination systems, the host and peer ports, and port connectivity.
Group Field Description Port The Peer Motion ports associated with each system.
The detail pane displays the following information: Group Field Description General System Name The name of the system on which the task was started. System SN The system's serial number. ID The task ID. Type The task type. Status Indicates whether a task is Running, Canceled, Failed, or Completed. Progress The task progress, if currently running. Start Time The time the task started. Finish Time The time the task finished. Duration The amount of time it took to complete the task.
The list pane provides the following information: Column Description Position The port location in Node:Slot:Port format. Label Indicates whether the port is a peer port. WWN/MAC The WWN or MAC address of the connected device. State The state of the port. Type Indicates whether the port is FC, iSCSI, RCIP, or RCFC. Connection Mode Indicates whether the connection mode is Host or Peer. Connected Device Type Indicates whether the connection device type is Host or Peer.
Group Resources Field Description Connected Device The name of the system associated with the selected port. Mode Port firmware mode setting. Ports in Initiator mode are connected to drive cages and ports in Target mode export to hosts. Suspended mode is for target ports that have not yet been initialized by the system (this is rare). Peer mode is for Ethernet ports. State Current state of the port. Total Data Throughput The throughput in KB/s.
Group Field Description Remote Port WWN The port WWN. Displayed if the port is an RCFC port. Mode Change Indicates whether port mode change from initiator to target or vice versa is Allowed or Prohibited. This setting is configured using the CLI controlport command. Hosts The number of hosts connected to the port. This is only displayed if the port is connected to hosts. Physical Disks The number of physical disks connected to the port.
The following information displays for both Source and Destination systems: Column Description Name The host name. Domain The domain (if any) the host is associated with. Set The host set (if any) the host is associated with. Storage System Ports The number of storage system ports associated with the host. Volumes Exported The number of exported volumes on the host. Total Exported Size The total size (in GiB) of the exported volumes .
Security and Domains Node Summary Tab The Summary screen displays the following information: Group Field Description General Users The number of users on the system. LDAP configuration Whether the system is configured for LDAP authentication. Domains The number of domains on the system Domain Sets The number of domain sets on the system. User Roles Capacity Global/Domain Browse The number of users with Browse permission. Create The number of users with Create permission.
Security and Domains Node Users Tab The screen displays user information for the source and destination systems: Column Description User Name User name on the specified system. System The name of the system to which the user has access. Domain Domains on the specified system. Role Role give to the specified user. Default Domain Indicates whether there is a default domain associated with the user.
Security and Domains Node Domain Sets Tab The screen displays the following for both Source and Destination systems: Column Description Name The name of a domain set on the specified system. Domains The number of domains in the specified domain set. Hosts The number of hosts. Comments User-created comments. Security and Domains Node LDAP Tab The Security and Domains Node LDAP tab displays all LDAP properties and their associated values for both Source and Destination systems.
“Available/Imported Hosts Screen” (page 46) “Available/Imported Host Sets Screen” (page 48) “Available/Imported Linked Hosts Screen” (page 48) “Admitted/Importing Hosts Screen” (page 49) “Admitted/Importing Linked Hosts Screen” (page 49) “Available/Imported Volumes Screen” (page 50) “Admitted/Imported Volumes Screen” (page 50) Available/Imported Hosts Screen The Hosts screen displays the hosts that can be migrated. It is divided into a list pane and a detail pane.
Column Description Volumes Exported The number of exported volumes on the system. Total Exported Size The total size (in GiB) of the exported volumes. The detail pane contains a Summary, Virtual Volumes, and VLUNs tab.
Available/Imported Host Sets Screen The Host Sets screen is divided into a list pane and a detail pane. The list pane provides the following information: Column Description Name The name of a host set on the source system. Domain The domain (if any) to which the host set belongs. Hosts The number of hosts on the system. Total Reserved Size The total amount of reserved space (in GiB). Total Exported Size The total size (in GiB) of the exported volumes. Comments User-created comments.
Admitted/Importing Hosts Screen The Admitted Hosts screen displays hosts that have volumes that are in the Admitted (peer) state. The Importing Hosts screen displays hosts that have volumes that are in the Importing state. The screens are divided into a list pane and a detail pane. The list pane displays a 1:1 mapping between the source and destination hosts. (The source system must be connected for the source information to be displayed.) Column Description Source Host The name of the source host.
The list pane provides the following information: Column Description Name The name of a host set on the source system. Domain The domain (if any) to which the host set belongs. Host Ports The number of host ports on the system. Volumes Exported The number of exported volumes. Total Exported Size The total size (in GiB) of the exported volumes. Total Reserved Size The total amount of reserved space (in GiB). Persona The persona information for the specified port (for example, 1–Generic).
The screen is divided into a list pane and a detail pane. The summary screen displays a side-by-side mapping between the source and destination volumes. The source system must be connected to display source volume information. The list pane displays the following information: Column Description Source Name The name of the source volume Source State The state of the source volume. Source Provisioning The type of provisioning of the source volume (Thin or Full).
The detail pane displays Summary, Settings, Active VLUNs, and Hosts information. For information on the detail pane screens, see “Summary Screen” (page 52), “Settings Screen” (page 52), “Active VLUNs Screen” (page 53), and “Hosts Screen” (page 53). Summary Screen The Summary screen provides the following information for both the source and destination systems: Group Field Description General Name The virtual volume's name. ID The virtual volume ID. Domain The domain in which the volume is located.
Group Field Description Device RPM The disk speed. NOTE: The Device RPM number does not represent a rotational speed for the drives without spinning media (SSDs). It is meant as a rough estimation of the performance difference between the drive and the other drives in the system. For FC and NL drives, the number corresponds to both a performance measure and actual rotational speed.
Viewing Source and Destination Systems The Source and Destination systems screens include a “Summary Tab” (page 54)and an “Alerts Tab” (page 55). The Summary screen provides information for the source and destination systems. The Alerts screen displays alerts that are associated with the specified system. Summary Tab The Summary screen provides the following information. Click any highlighted text to open the corresponding screen and view more detailed information.
Group Host Provisioning Security and Domains Field Description Physical Disks The total number of physical disks in the system, followed by the type and number of each type of disk (for example, FC, NL, SSD). Hosts The number of hosts on the system. Host Sets The number of host sets on the system. Operating System Lists current operating system in use. Paths The total number of paths on the system and the number of unassigned paths. CPGs The number of CPGs on the system.
Ports Screen The Ports screen contains a Peer Capable Ports tab and a Host Ports tab when viewing both source and destination systems. When viewing the destination system, the Peer Ports tab is also included. All three tabs are divided into a list pane and a detail pane and provide similar information. The list pane provides the following information: 56 Column Description Position The port location in Node:Slot:Port format. Label The port label. WWN/MAC WWN or MAC address of the connected device.
The detail pane contains the following information: Group Field Description General Position The port location in Node:Slot:Port format. Port WWN The port’s World Wide Name. Node WWN The node’s World Wide Name. Type Indicates whether the port is FC, iSCSI, RCIP, or RCFC. Rate The rate that data can be transferred over the port (1, 2, 4, or 8 Gbps). When there is no specified value, no connection exists. Connected Device Type The type of device that the port is connected to: Host or Peer.
Group Field Fibre Channel Topology Settings Class (displayed for FC and RCFC ports) Adaptor Type Mode Change Description The type of connection (for example, Fabric Attached). Identifies which Fibre Channel classes of service are enabled (2, 3, or 2/3). A value of 2/3 indicates that both Class 2 and Class 3 are enabled. Model of the Fibre Channel adapter that contains the port (such as QLOGIC 2302). Indicates whether port mode change from initiator to target or vice versa is Allowed or Prohibited.
Migration Phase Issues See Migration Phase Issues in “Troubleshooting” (page 104) Migration Phase Issues 59
4 Using the HP 3PAR Peer Motion Utility HP 3PAR Peer Motion Utility controls the migration of a host and its data from a source HP 3PAR StoreServ Storage system to a destination HP 3PAR StoreServ Storage system with as little disruption to the host as possible. It provides a set of commands for performing the migration operations.
• Create the fourth zone, Z4 with Host HBA (HBA1) zoned to host ports of destination • Save and enable the config with Z1, Z2 Installing the HP 3PAR Peer Motion Utility System Requirements The following are operating system requirements: Software HP 3PAR Peer Motion Utility can be installed and run on: • Windows 2008/R2, Windows 2012/R2 (both server and client), components of HP 3PAR PMU can be installed • Windows 7/8/8.
2. In the License Agreement screen, read the HP EULA, then select the I accept the terms in the license agreement radio button to proceed and click Next. 3. In the Custom Setup screen, you can specify a folder where you want to install the application for the client, server, or both (optional). The default location is:\ProgramFiles(x86\Hewlett-Packard\hp3parpmu.
To change the current destination folder, click Change, click Browse and select or enter a folder location. Then click OK and Next.
NOTE: Both server and client components are installed and two user groups (HP Storage Migration Admins and HP Storage Migration Users) are created (depending on whether client, server, or both were selected). • 4. The Certificate Authority Signed Certificate dialog box displays if HP 3PAR Peer Motion Utility Server is selected. Click No to generate and install the self-signed certificate, then click Browse and select a folder location to store the certificate.
NOTE: If you are assigning new port numbers, enter the new port numbers in the Server Port and Shutdown Port fields, then click Next. For example, if you specify port 9090 during the installation, then edit the OIUCli.bat file at:\Hewlett-Packard\hp3parpmu\CLI with new port: java -jar ..\CLI\oiucli-1.0.0-jar-with-dependencies.jar %* -port 9090. 5. Click Install in the Ready to Install the Program screen to complete installation. The installation may take several minutes to complete.
6. Click Finish to exit the installation wizard. To view the installer log details after the installation completes, select the Show the Windows Installer log checkbox before clicking Finish. After installation, you must add users to these groups to grant administrator and user access rights. See “Adding Users to Groups” (page 67). Installation on a Linux System Use the following procedures to install the HP 3PAR Peer Motion Utility on a Linux system.
NOTE: Use the following: HP3PARPMUtility_x86.tar for 32 bit or HP3PARPMUtility_x64.tar for 64 bit systems. Pre-requisites • Logged in user should have root permissions • Supported RHEL versions (5.X and 6.X) • Disk space should be more than 100MB • JRE should be greater than or equal to 1.7 To install on a Linux system: 1. Extract the tar file by running Linux command, “tar -xvf HP3PARPMUtility_x86/x64” on the console. 2. See the Linux installer on the console using the ls command. 3.
Launching the HP 3PAR Peer Motion Utility Double-click the HP 3PAR Peer Motion Utility shortcut created on your Desktop. To log into the CLI: 1. For the IP address, type the IP address of the system running the HP 3PAR Peer Motion Utility server. 2. For the USER NAME, type the user name which the HP 3PAR Peer Motion Utility server can log into. 3. For the PASSWORD, type the user password.
◦ windows2008 ◦ mswindows NOTE: If you selected an OS in the HP 3PAR Management Console (3.1.2 versions and above) in a drop-down menu, you do not need to change the OS value when using Peer Motion Utility. For Read-Only Commands • Default behavior is to display all details with headings in a readable format. • If nothing is specified with the commands, the default parameter is –all. • For any entry that is not known, |unknown| is displayed.
8. IMPORTANT: • Re-run a scan on the host systems to discover the new volume. • Verify that the host paths to the destination system are active. • On fabric, remove zone Z3 and add zone Z4 upon successful preparation completion. 9. startmigration –migrationid 10. showmigrationdetails –migrationid . This completes the successful flow of the migration. The following optional commands are to be used to remove the added source and destination storage systems: 1.
8. IMPORTANT: • Re-run a scan on the host systems to discover the new volume. • Verify that the host paths to the destination system are active. • On fabric, remove zone Z3 and add zone Z4 upon successful preparation completion. 9. startmigration –migrationid 10. showmigrationdetails –migrationid . This completes the successful flow of the migration. The following optional commands are to be used to remove the added source and destination storage systems: 1.
NOTE: Removing a source/destination storage system also removes the migration history for the respective source/destination storage system. Minimally Disruptive Migration To perform MDM, follow the steps and execute the commands in the following order: 1. addsource -mgmtip -user -password -type 3PAR 2. showsource 3. adddestination -mgmtip -password -type 3PAR 4. showdestination 5. showconnection 6.
NOTE: In case there is a need to abort the prepared migration, use the removemigration command for the same: removemigration -migrationid . 8. 9. startmigration –migrationid showmigrationdetails –migrationid . This completes the successful flow of the migration. The following optional commands are to be used to remove the added source and destination storage systems: 1. removesource -uid -type 3par 2.
Command syntax: createmigration -sourceuid 270002AC001BA1 -srcvolmap "[{set:volset1, thin, TEST_CPG}]" -destcpg TEST_CPG -destprov thin –migtype online 2. When volume set is presented to host set and volume-based migration is triggered, all volumes of set are migrated and presented to all hosts of the host set. Command syntax: createmigration -sourceuid 270002AC001BA1 -srcvolmap "[{set:volset1, thin, TEST_CPG}]" -destcpg TEST_CPG -destprov thin –migtype online 3.
HP 3PAR Peer Motion Utility Commands Quick Reference Table 2 CLI commands quick reference Command Definition “addsource” (page 92) Adds source storage system Details Parameters Adds a source storage system to the • type HP 3PAR Peer Motion Utility for • name migration.
Table 2 CLI commands quick reference (continued) Command Definition Details Parameters Motion Utility to be treated as destination of migration job. • all • listcols • peer_ports • firmware • name • type • csvtable • filewrite • management_server • operational_state • help “showconnection ” (page 96) Lists connected destination/source storage systems Given a source storage system, • all shows a map of all connected source • source_unique_id and destination storage systems.
Table 2 CLI commands quick reference (continued) Command Definition Details Parameters progress percentage, and failure reason. • listcols • all • filewrite • csvtable • sourcename • destinationname • help “showmigrationdetails” Shows details of a (page 101) specific migration For a given migration, details at volume level are provided.
In the console, execute ./Linux_local_install.sh and enter y when prompted to uninstall (the file is located under the directory where the binaries are extracted).
5 Post-Migration Tasks System Post-Migration Tasks Use the Post Migration Cleanup operation to remove the migration host after the data migration process is complete.
6 Support and Other Resources Contacting HP For worldwide technical support information, see the HP support website: http://www.hp.
For information about: See: Migrating data from one HP 3PAR storage system to another HP 3PAR-to-3PAR Storage Peer Motion Guide Configuring the Secure Service Custodian server in order to monitor and control HP 3PAR storage systems HP 3PAR Secure Service Custodian Configuration Utility Reference Using the CLI to configure and manage HP 3PAR Remote Copy HP 3PAR Remote Copy Software User’s Guide Updating HP 3PAR operating systems HP 3PAR Upgrade Pre-Planning Guide Identifying storage system components
For information about: See: Planning for HP 3PAR storage system setup Hardware specifications, installation considerations, power requirements, networking options, and cabling information for HP 3PAR storage systems HP 3PAR 7200, 7400, and 7450 storage systems HP 3PAR StoreServ 7000 Storage Site Planning Manual HP 3PAR StoreServ 7450 Storage Site Planning Manual HP 3PAR 10000 storage systems HP 3PAR StoreServ 10000 Storage Physical Planning Manual HP 3PAR StoreServ 10000 Storage Third-Party Rack Physic
Typographic conventions Table 3 Document conventions Convention Element Bold text • Keys that you press • Text you typed into a GUI element, such as a text box • GUI elements that you click or select, such as menu items, buttons, and so on Monospace text • File and directory names • System output • Code • Commands, their arguments, and argument values • Code variables • Command variables Bold monospace text • Commands you enter into a command line interface • System
7 Documentation feedback HP is committed to providing documentation that meets your needs. To help us improve the documentation, send any errors, suggestions, or comments to Documentation Feedback (docsfeedback@hp.com). Include the document title and part number, version number, or the URL when submitting your feedback.
A Peer Motion in a Remote Copy Environment Peer Motion allows the seamless migration of data from a legacy system to a modern array. Use the following procedures when migrating both primary and secondary storage Remote Copy volumes to a new system using Peer Motion. NOTE: When configuring Peer Motion, it may be necessary to make modifications to the FC switch because the WWNs will change when moving from peer to host modes.
NOTE: You may not need to do this step as these would typically be available for host on the old array. 3. 4. • controlport offline -f n:s:p • controlport config host -ct point -f n:s:p Configure the new array as a host and export the VV. • createhost • showport n:s:p • createlun On new array C: Import the exported VV. When showtarget is executed, two ports should now be active.
New volume has now been migrated from old primary to new primary, and remote copy re-established. *This will only operate with mvar rcopy_snap_vv_init set to 1: tcli --exec 'mvar set -n rcopy_snap_vv_init -v 1' Migration of a Secondary System The following details migrating from B to C, where B is currently acting as a secondary volume for A. During a Peer Motion migration, no data can be written to the original volume (in this case, B).
• admitvv RCNewSecVV:50002AC003E80091 • 6. importvv -tpvv -snap @vvname@.ro -snp_cpg cpg_pri cpg_pri On A, restart the group. You do not have to wait for the importvv to complete. • 7. 8. 9. startrcopygroup RCPM_Group At this point, maintain a full primary->secondary relationship for the duration of the import, minimizing downtime. Once the Peer Motion migration completes, stop and delete the Remote Copy group.
B Additional Steps to Migrate HP-UX Hosts NOTE: The procedures described in this section are only for disks under HP-UX's LVM volume management. Rescanning for New LUN Paths Before continuing with migration, it is recommended that you rescan for new LUN paths and make a note of the new paths to the volumes: #ioscan -fnC disk HP-UX 11i V3 HP-UX 11i v3 standalone and Serviceguard clustered hosts can be migrated by using the online migration procedure. No additional configuration is required on the hosts.
6. On node1, change the activation mode to exclusive by issuing the following command: # vgchange -a e -x vg_shared 7. On node1, make a note of the new pv_paths to the PVs already in the volume group (from the output of the LUN rescan; see “Rescanning for New LUN Paths” (page 89)). Add all the new paths to the volume group, using the following command: # vgextend vg_shared pv_path 8. Export the changes to other cluster nodes: a.
1. 2. Make a note of the new pv_paths to the lock disks from the output of the LUN rescan (see “Rescanning for New LUN Paths” (page 89). Issue the following command: # vgcfgrestore -n /dev/vg_lock pv_path 3. For each node in the cluster configuration file, modify the values of FIRST_CLUSTER_LOCK_PV and SECOND_CLUSTER_LOCK_PV. 4. To check the configuration, run the cmcheckconf command. 5. To apply the configuration, run the cmapplyconf command.
C HP 3PAR Peer Motion Utility Commands NOTE: Examples shown in this sections are examples only and may not reflect your system output. addsource Adds a source storage system. DESCRIPTION The addsource command adds a source storage system to the Peer Motion Utility that is intended to be migrated. While adding a new source or destination HP 3PAR StoreServ Storage System that has 3.1.2 MU3 P16 or later. applied, the following error message appears: “ERROR: OIUERRDST0010 Unable to validate certificate.
managed under same IP address. uid Unique number that represents a source in the HP 3PAR Peer Motion Utility. Optional port Port number on which Optional management application accepts request to connect and provide source storage system details. If not found default based on storage system type will be used. secure True/False. This enables or disables secure channel communication with source storage system, wherever applicable.
These column names can be used for filtering using the showcols command. firmware Firmware version. Optional management_server The IP address/FQDN of the management server that manages this storage system. Optional operational_state Operational state of the storage Optional system (Good, Failed, Attention). csvtable This command can be used to print delimited output. Optional filewrite Redirects the output of the command to a file.
PARAMETERS Name Description Mandatory/optional mgmtip IP address of the management Mandatory station to connect to get details. user Username to be used to connect Mandatory to management application. password Plain text password to be used. Mandatory type Storage system family type like Optional 3PAR name Friendly name of the storage system. This is required especially when there are multiple storage systems managed under same IP address.
type This is storage system family name (e.g. 3PAR). Optional csvtable This command can be used to print delimited output. Optional filewrite Redirects the output of the command to a file. Optional all Display all details with headings. Optional showcols Any argument that follows Optional showcols depicts field to display (columns).Accepts a comma separated list of column names. unique_id This is serial number or WWN Optional or hyphenated WWN.
filewrite Redirects the output of the command to a file. Optional all Displays all details with headings. Optional source_unique_id UID of the source storage Optional system. Displays all peer connections for the given source storage system. destination_unique_id UID of the destination storage system. Displays all peer connections for the given destination storage system. showcols Any argument that follows Optional showcols depicts field to display (columns).
NOTE: After using this command and before start of migration, you should perform unzoning activities and/or rescan of HBA and/or reboot of source host and/or any other management jobs as required. 1. 2. 3. 4. 5. 6. An entry of destination storage system is created on source storage system. It is treated as a Linux host. Source volumes are made available to this host representing HP 3PAR destination.
srchost Name of the host/host set or full name including path of the host for which all source volumes should be considered for migration. This should not be there if srcvolmap or volmapfile is there. Note: In the case of host set, the name of host set should be preceded by “set:” destcpg CPG’s friendly name where the migrated volumes will be made available.
createmigration -sourceuid 2FF70002AC001B0 -srchost "h1" -migtype MDM -destcpg FC_r1 -destprov full >SUCCESS: Migration job submitted successfully. Please check status/details using showmigration command. Migration id: 1397243589759 createmigration -sourceuid 2FF70002AC001BA1 -volmapfile "C:\\testmigrationcommands.txt" >SUCCESS: Migration job submitted successfully. Please check status/details using showmigration command. Migration id: 1397243589759 showmigration Lists migrations.
used for filtering using the showcols command. sourcename Source storage system name. Displays migrations created between this source and destination storage systems connected to it. Optional destinationname Destination storage system Optional name. Displays migrations created between this destination and source storage systems connected to it.
sourcevolume Source volume name. Displays Optional information corresponding to this volume. destinationvolume Destination volume name. Displays information corresponding to this volume. Optional EXAMPLES showmigrationdetails -migrationid 1397244158146 SOURCE_VOLUME DESTINATION_VOLUME TASK_ID PROGRESS test test 6134 Completed startmigration Starts the data transfer of a migration.
removesource Removes source storage system. DESCRIPTION The removesource command removes already added source storage system and clears all related migrations.
D Troubleshooting The following describes troubleshooting for HP 3PAR Peer Motion data migration and the Peer Motion Utility. Troubleshooting Peer Motion Data Migration If issues arise, you can access the event log through the HP 3PAR Management Console Event Manager. Additionally, the HP 3PAR Management Console has a log file directory on the client system. This directory is located at C:\Users\\InFormMC\log. Very often, errors in data migration are caused by zoning issues.
6. 7. On the source system - Remove the VLUN exports to the destination system from the source system. On the source system - Remove the host representing the destination system from the source system. If a failure occurs after volume import tasks have started, the hosts' access to the volumes on the source system will have been interrupted. A failed import returns the system to the point where the import can be retried after the cause of failure is resolved.
Ensure that there is one host port zoned to one peer port and another host port zoned to another peer port or network connectivity from server to source is proper or 3PAR source/destination array is in communication." Source/Destination array is unreachable It may be necessary to restart HP 3PAR Peer Motion Utility to solve this problem. Symptom: While adding an HP 3PAR storage system as a source/destination, it took too long to load the 3PAR details.
4. 5. The required LUN number is available on the host object on the destination storage system. There is no host on the destination storage system with a duplicate name. HP 3PAR Peer Motion Utility log in fails with the message: oiu.keystore (Access is denied), when logging in with User privileges Log in as administrator in order to run HP 3PAR Peer Motion Utility.
OIURSLDB1003 Ensure that the correct object type is specified. OIURSLDB1004 Contact HP Support Center. OIURSLDB1005 Retry the operation after some time. If the problem persists contact HP Support Center. OIURSLDB1006 Ensure that the object is not already added and that the dependent objects are available OIURSLDB1007 Ensure that the object is already added. OIURSLDB1008 Failed to unlock a file. Please restart the application service. OIURSLDB1009 Contact HP Support Center.
OIURSLMS10001 Ensure that destination array specified is already added and that the correct array ID is specified. OIURSLMS10002 Ensure that the source array specified is already added to OIU and that valid UID is used. OIURSLMS10003 Ensure that the unique name specified for the source host is valid. OIURSLMS10004 Ensure that the volume you are trying to migrate is present in the source array. Wait for sometime and retry.
OIURSLSRC0007 Contact HP Support Center. OIURSLSRC0009 Contact HP Support Center if the problem persists. OIURSLSRC0010 Contact HP Support Center if the problem persists. OIURSLSRC0011 Contact HP Support Center if the problem persists. OIURSLSRC0101 Contact HP Support Center if the problem persists. OIURSLSRC0102 Contact HP Support Center if the problem persists.
Index adddestination, 94 Addsource, 92 port information viewing, 38 Post Migration Cleanup, 33 Post-MIgration Tasks, 79 C R constraints pre-migration, 16 conventions text symbols, 83 Copy Storage Settings and Configurations wizard, 24 createmigration, 97 removedestination, 103 removemigration, 102 removesource, 103 requirements ALUA, 16 general, 14 volume, 16 A D Data Migration Troubleshooting, 104 documentation providing feedback on, 84 H HP 3PAR Peer Motion Manager, 18 HP 3PAR Peer Motion Utility,