HP 3PAR Recovery Manager 4.4.2 Software for Microsoft SQL Server User Guide This document is designed for System Administrators and Microsoft SQL Server Administrators who are experienced in using Microsoft™ Windows™ and Microsoft SQL Server™ and responsible for backing up Microsoft SQL Server databases.
© Copyright 2013 Hewlett-Packard Development Company, L.P. Confidential computer software. Valid license from HP required for possession, use or copying. Consistent with FAR 12.211 and 12.212, Commercial Computer Software, Computer Software Documentation, and Technical Data for Commercial Items are licensed to the U.S. Government under vendor's standard commercial license. The information contained herein is subject to change without notice.
Contents 1 Overview of Recovery Manager...................................................................7 System Requirements.................................................................................................................7 Windows Server Requirements...............................................................................................7 Windows Server 2008....................................................................................................
Requirements ....................................................................................................................27 Setting Up the HP Data Protector Backup Specification............................................................27 Setting Up HP Data Protector Cell Manager Access................................................................28 Configuring Backup Exec.........................................................................................................28 Requirements......
Removing a Virtual Copy.........................................................................................................51 Viewing Event Message Descriptions.........................................................................................51 Viewing Online Help..............................................................................................................52 6 Using the Recovery Manager CLI................................................................
Setting Up a Remote Copy Volume Group for Instances..........................................................92 Recovering an SQL Database from a Remote Copy Backup Server................................................92 12 Support and Other Resources...................................................................93 Related Documents.................................................................................................................93 Typographical Conventions...............................
1 Overview of Recovery Manager System Requirements Windows Server Requirements Microsoft Windows Server 2008, Windows Server 2008 R2 or Windows Server 2012 Windows Server 2008 x86-based computer: • 2 GHz processor • 2 GB or more RAM • 40 GB hard disk space x64-based computer: • 1.4 GHz processor • 2 GB or more RAM • 40 GB hard disk space Windows Server 2008 R2 or Windows Server 2012 • Either 1.4 GHz (x64) or 1.
NOTE: If any of the components mentioned in the additional system requirements are not installed, HP 3PAR Recovery Manager might not function properly. Recovery Manager Requirements • Using a single backup server • Creating online virtual copies of a database for performing one-click backup. • Adding the database online to perform a file copy restore at the database level.
• Recovery Manager for SQL supports English, Japanese, and Chinese version of Microsoft SQL Server For more information on localization support, see Single Point of Connectivity Knowledge for HP Storage Products (SPOCK) website www.hp.com/storage/spock • Support for HP 3PAR OS 3.1.2 MU2, HP 3PAR OS 3.1.1 MU3 and HP 3PAR OS 2.3.
• Support for backup server and production server running in VMware VM Direct Environment • Support for concurrent virtual copy or remote virtual copy creations, concurrent backup jobs, and concurrent virtual copy or remote virtual copy creation with backup jobs. NOTE: ◦ Backup of different databases with same policy cannot be taken using Symantec NetBackup. Concurrent backups with different policies can be taken.
• Performing a restore on a Windows Fibre channel based host that resides in virtual environment • Customizing date format Recovery Manager supports date format in month/day/year • Windows auto-mount feature NOTE: • • Virtualization support Windows Hyper-V: ◦ Only iSCSI LUNs are supported. ◦ Pass-through Disks are not supported. ◦ Virtual fiber channel is not supported. VMware ESX ◦ Only iSCSI and VM Direct path is supported. ◦ Raw device mapping is not supported.
Writer: • Microsoft SQL Server 2005, 2008, 2008 R2, and 2012 with SQL Server VSS Writer NOTE: For platform-specific release levels, refer the latest Single Point of Connectivity Knowledge for HP Storage Products (SPOCK) document. To obtain a copy of this documentation, see http:// www.hp.com/storage/spock. How HP 3PAR VSS Software Works with Microsoft SQL Server Figure 1 HP 3PAR VSS provider software for Microsoft Windows operation overview 1. 2. 3. 4.
Recovery Manager Layout Figure 2 Centralized Backup Configuration HP 3PAR Recovery Manager Software for SQL provides off-host backup and mounting capabilities. These features reduce the impact on the production server and also provide centralized management for the backup and restore functions across all SQL servers. • Backup Server A backup server is the central control point for Recovery Manager. It controls and manages the backup and restore on different SQL servers.
2 Installing and Uninstalling HP 3PAR Recovery Manager for SQL During the installation, an automated installer verifies the correct user authority before analyzing all components required for installation. To start the installation, you must have Microsoft 2008, Microsoft 2008 R2 or Microsoft 2012 administrative privileges and the following required components: • Microsoft .NET Framework v4.0 or later • Microsoft Visual C++ 2010 Redistributable Package • HP 3PAR CLI (3.1.
necessary installation and the overall progress is shown for completing that step in the process. There are two options for using the installation wizard to load the prerequisite components: • You can perform the installation by clicking the start/retry button and the required components are automatically installed one by one where you only have to supply the correct path for the application. If necessary, refer to the user guide of the respective components for installation instructions.
2. 3. 4. Click Start→Control Panel→Programs→Programs and Features. Verify Recovery Manager appears in the Currently installed programs column. Verify that the HP 3PAR Recovery Manager for Microsoft SQL Server icon appears on the desktop when using the Recovery Manager for Backup Server option to install the application.
Upgrading from Recovery Manager 4.4.0 for SQL or Recovery Manager 4.4.1 for SQL to Recovery Manager 4.4.2 for SQL You can upgrade to HP 3PAR Recovery Manager 4.4.2 Software for Microsoft SQL Server from Recovery Manager 4.4.0 for SQL or Recovery Manager 4.4.1 for SQL . While doing an upgrade, user is prompted for upgrade confirmation. Confirming to do an upgrade will uninstall the older version and install Recovery Manager 4.4.2 for SQL. Upgrading from Recovery Manager 4.3.0 for SQL to Recovery Manager 4.
Upgrading from Recovery Manager 4.2.0 for SQL to Recovery Manager 4.4.2 for SQL When upgrading, you need to uninstall the existing HP 3PAR Recovery Manager for SQL application along with the dependent components (for example, VSS and CLI) before installing the latest version of Recovery Manager for SQL. Upgrading the Production Server 1. 2. Uninstall HP 3PAR Recovery Manager for SQL. For more information, see “Uninstalling HP Recovery Manager for SQL” (page 18). Install HP 3PAR Recovery Manager 4.4.
4. Click Uninstall. NOTE: After uninstalling Recovery Manager, virtual copies and scheduled tasks still reside locally in the Data folder as well as on the system. You can remove virtual copies and scheduled tasks later, if desired.
3 Configuring Recovery Manager Configuring the SQL Database When you configure the SQL database: • Use database files and transaction logs created on basic disks using the NTFS file system. Recovery Manger for SQL Server does not support other types of disks. • Maintain a 1:1 relationship between databases and volumes. ◦ Avoid adding more than one database plus its transaction log files to a volume. ◦ Avoid adding files from a database to multiple volumes.
Changing a Production Server Port from the Backup Server 1. On the backup server, run the following Recovery Manager CLI command: HpRmCli Sql portconfig -s -n 2. On the production server, restart the HP 3PAR Recovery Manager for SQL service. Configuring Recovery Manager Policies • To use the Recovery Manager GUI to set database policies, see “Using the Recovery Manager GUI” (page 34).
Figure 3 HP 3PAR Recovery Manager for SQL with Two Availability Replica Nodes In Figure 3 (page 22), HP 3PAR Recovery Manager for SQL is configured with two availability replica nodes. The configuration can be extended up to five replica sites, one primary replica node and up to four secondary replica nodes.
Before you start configuring Recovery Manager for Availability Group: • Make sure all the prerequisites for Availability Group are met before discovering Availability Group in the Recovery Manager for SQL. For list of prerequisites, see http:// msdn.microsoft.com/en-us/library/ff878487%28v=SQL.110%29.aspx. • Make sure all the nodes participating in the Availability Group are part of the same Windows cluster and user has a Domain account and is an administrator for the system.
9. Ensure the HP 3PAR StoreServ Storage System connection is good. NOTE: For more information on HP 3PAR CLI commands, see the HP 3PAR Command Line Interface Reference. For more information on HP 3PAR VSS Provider Software, see the HP 3PAR VSS Provider Software for Microsoft Windows User’s Guide.
4. Click Connect. A window appears as follows: If you are able to connect, the installation and configuration is complete. If the connection cannot be made, you must check the SQL configuration. For more information, see “Troubleshooting SQL Connectivity” (page 25). Troubleshooting SQL Connectivity 1. Log onto the SQL production server as system administrator and check connectivity: • From the SQL production server, launch SQL Server Management Studio to make sure the connection can be made locally.
4 Configuring Backup Software Overview HP 3PAR Recovery Manager Software for Microsoft SQL Server can be used with either HP Data Protector, Symantec NetBackup, or Symantec Backup Exec to back up and restore the virtual copies created by Recovery Manager. If you are using backup software in the backup environment, you must install a backup master or a backup client or a backup media on the backup server.
To configure Symantec NetBackup to function with Recovery Manager for SQL, set the following parameters during the configuration process: Backup Policy Parameter Setting Policy type MS-Windows-NT Clients Select the machine on which the Recovery Manager Backup Server component is installed. Add the client to backup policy by entering NetBIOS name. Collect disaster recovery information for Bare Metal Restore Ensure that this option is not selected.
5. 6. 7. 8. 9. Select the device that Data Protector is to use for backups. Click Next until the Manual add... appears. Click Manual add... Select Windows filesystem and click Next. Enter the appropriate client system, mount point, and description. HP recommends: Client system Mount point C: Description default NOTE: Recovery Manager uses this information only to create a backup template. Recovery Manager does not use the actual data entered. 10.
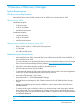
4. Backup Exec is installed on C:\Program Files\Symantec\Backup Exec then \\hostname\c$\ Program Files\Symantec\Backup Exec must be accessible To support Symantec Backup Exec Remote media server, HP 3PAR Recovery manager for SQL must be running with domain administrator privileges. To run the HP 3PAR Recovery manager for SQL with domain administrator privileges: a. To open the services, select Windows→Control Panel→Administrative Tools→Services. b.
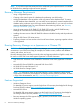
Figure 5 HP 3PAR Recovery Manager for SQL Properties d. 30 Select This account. Enter the domain administrator username and password.
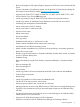
Figure 6 HP 3PAR Recovery Manager for SQL Properties Account e. Click Apply and then select OK. You must restart the service when asked for. NOTE: These changes must be done on all the servers wherever the HP 3PAR Recovery Manager for SQL is running.
Using Your Backup Software • The default mount point for virtual copy backups is: :\3parSnapshot • You must manually synchronize backups. If a backup expires in your backup software, you must manually remove the backup from Recovery Manager. If you remove a valid backup from Recovery Manager, you must manually remove it from your backup software. • Recovery Manager does not track restore progress. You must use backup software to monitor restore progress.
NOTE: While performing concurrent backup operations: • Backup of different databases with different policies is allowed while using Symantec NetBackup. • Backup of different databases is allowed, while using HP Data Protector or Symantec Backup Exec. • Backups of different databases can be taken concurrently using Symantec NetBackup, HP Data Protector, or Symantec Backup Exec.
5 Using the Recovery Manager GUI Overview of the Recovery Manager GUI HP 3PAR Recovery Manager Software for SQL Server provides a Graphical User Interface (GUI) for managing SQL servers. The Recovery Manager GUI enables you to create, remove, mount, unmount, back up, or restore a virtual copy of an individual database or an entire instance (that is, all databases within an instance).
Status and Summary Information After launching HP 3PAR Recovery Manager for SQL, you can click the MS SQL Server node to see a detailed status and summary of relevant information in a tabular format: • Sever Name • Cluster (True/False) • Version • Number of Instances • Instance Names • Database Count • Virtual Copy Count for each instance • Backup Count for each instance Table management features like Sorting are available for each column in the table.
a. b. • Select the Register checkbox for the server instance. Click OK. If the list does not display the SQL server to be registered, you must manually register the instance. To manually register the instance: 1. In the Server Name text box, enter the SQL server name and instance name. Use the format SQLServerName\instanceName as follows: ◦ To register the default instance, either enter the SQL server name only, or enter the SQL server name and default, separated by a backslash.
1. 2. Right-click the MS SQL Server node. Select Rescan Server Configuration. If Availability Group databases are configured on Microsoft SQL Server 2012, rescan is recommended in following instances: • There is a change in Availability Group configuration. • An SQL Server is migrated to SQL 2012 from its previous versions. NOTE: When a database is removed from Availability Group, running the RESCAN command will remove Availability Group information from the database information list.
If you specify an expiration time for a remote virtual copy: • If Remote Copy is set up in asynchronous periodic mode, Recovery Manager sets the expiration time for the remote virtual copy on the Remote Copy backup server. • If Remote Copy is set up in synchronous mode, Recovery Manager sets the expiration time for both the virtual copy on the primary server and the remote virtual copy on the Remote Copy backup server. For more information, see the HP 3PAR Remote Copy Software User’s Guide.
3. To modify the default retention time for the instance and its virtual copies, enter the number of hours or days you want to keep the instance and its contents. The minimum retention period is 1 hour; the maximum is 43,800 hours/1,825 days (5 years). For more information about retention time restrictions, see “How Recovery Manager Policies Work” (page 37). 4. Click Finish. The virtual copy policy is effective immediately for all future virtual copies.
3. • Sender Email Address - Email address of the sender • Password - Password for the sender’s email address • Receiver Email Address - Email address of the person to be notified of task activity or errors or both To send email notifications via the Secure Sockets Layer protocol, select the SSL checkbox. NOTE: 4. 5. To send e-mails to multiple recipients, provide recipient name separated by semicolon. To make sure the email configuration works, click the Test Connection button.
If you have Remote Copy set up, you can also create a virtual copy to be saved on the Remote Copy backup server; this type of copy is called a remote virtual copy. NOTE: For more information about setting up instances, databases, and volumes to avoid data loss, see “Configuring the SQL Database” (page 20). NOTE: Recovery Manager creates copy-only backup for availability databases on secondary replica. Manually Creating a Virtual Copy To create a virtual copy: 1.
4. To immediately create one virtual copy, click Finish in the Create Virtual Copy dialog box. To schedule virtual copies, see “Scheduling Automatic Virtual Copies” (page 43) NOTE: For Microsoft SQL Server 2012 Availability Group configuration: • You can not create virtual copy on all the replica sites at once. You can create virtual copies on the replica sites only one at a time. • You can not create virtual copies of the secondary replica databases which are not set for read mode.
Displaying Remote Virtual Copies The Recovery Manager GUI on the backup server does not automatically display remote virtual copies. To display a remote virtual copy: • To display the virtual copy in the Recovery Manager GUI on the Remote Copy backup server, refresh the Virtual Copy Management node on the Remote Copy backup server. • To use a Recovery Manager CLI command to display the virtual copy, enter the CLI command HpRmCli Sql display with the -rc option on the Remote Copy primary server.
displayed depends on the frequency of the automatic virtual copies selected in the left pane of the Schedule Pattern area. • Once - Schedules one automated virtual copy. In the right pane, select the month and the year in which to create the virtual copy from the drop-down list above the calendar view, then select the day on the calendar. • Hourly - Schedules automated virtual copies multiple times for specified number of days at the interval you specify.
4. • Run Now - Performs the selected task immediately (in addition to its scheduled run time). • Refresh - Updates the list and status of scheduled tasks. To exit the Task Manager dialog box, click OK.
Unmounting a Virtual Copy 1. 2. In the node tree pane, right-click the timestamp for the virtual copy you want to unmount, and select Unmount. Recovery Manager displays a dialog box asking you to confirm the unmount. Click OK.
2. 3.
1. 2. 3. 4. In the node tree pane, right-click the instance or the database you want to back up, and select Backup to Media. In the Backup to Media dialog box, enter the appropriate information. For more information, see “Manually Creating Backups at the Instance or the Database Level” (page 46). Click Next. In the Task Scheduler, schedule backups as desired. For more information, see “Scheduling Automated Tasks with Task Scheduler” (page 43).
Restoring Instances, Databases, and Volumes You can use either the volume restore feature or the file copy feature of Recovery Manager to restore an instance or a database from a virtual copy, or you can perform a media restore from a backup.
2. Under the Virtual Copy Management node in the node tree pane, right-click the timestamp of the virtual copy you want to use for the restore, and select Restore Using→File Copy. NOTE: The Vendor Restore Method field of the File Copy Restore dialog box automatically displays Virtual Copy (File Copy). By default, Recovery Manager restores the virtual copy to its parent instance or database (specified in the Target Server field). 3.
Restoring an Instance or a Database from Backup You can restore backups to their original location (that is, to the instance or the database location of the virtual copy that was used to create the backup, not to the original SQL database or instance location), or you can specify an alternate location. 1. Under the Backup Management node in the node tree pane, right-click the timestamp for the backup you want to use for the restore, and select Restore.
2. Select About→Event Messages. Recovery Manager uses your default browser to display the Event Messages file. The file contains all the events for HP 3PAR Recovery Manager Software for Microsoft SQL Server arranged in order as per the event ID. Viewing Online Help To view online help for Recovery Manager for Microsoft SQL Server, select Help→Help. Online Help for HP 3PAR Recovery Manager for Microsoft SQL Server appears in a web browser.
6 Using the Recovery Manager CLI HP 3PAR Recovery Manager for Microsoft SQL Server Command Line Interface (CLI) HP 3PAR Recovery Manager Software for Microsoft SQL Server provides a Command Line Interface (CLI). The CLI allows users to manage Recovery Manager functionality using commands rather than the Graphical User Interface (GUI).
Recovery Manager Commands The following sections describe how to administer HP 3PAR Recovery Manager for SQL from the Command Line Interface. HpRmCli Sql analyze SYNTAX HpRmCli Sql analyze -s [-sync] [-f] DESCRIPTION The HpRmCli Sql analyze command validates all virtual copy records by matching virtual copies in the HP 3PAR StoreServ Storage System against records in the HP 3PAR Recovery Manager for SQL repository.
HpRmCli Sql backup SYNTAX HpRmCli Sql backup -s [-i ] [-d ] [-t | -r ] [-ts ][[-p -u -M ]|[-dl ]|[-be mediaserver -device ]] [-noemail] DESCRIPTION The HpRmCli Sql backup command backs up a virtual copy to the specified media. The backup can be an existing virtual copy, or it can be a new virtual copy created by this command.
Optional: If not specified, Recovery Manager proceeds as if the backup software used is Symantec NetBackup. Backup software specified is Symantec Backup Exec. -be Optional: If not specified, HP 3PAR Recovery Manager for SQL proceeds as if the backup software used is Symantec NetBackup. -mediaserver Backup Exec media server name. Only valid if Symantec Backup Exec software is in use. -device Backup Exec device name configured for Backup.
-w Optional. Wait time in seconds. Recovery Manager uses this wait time to poll the status of the remote copy before creating a virtual copy at the secondary site. If not specified, the wait time is 120 seconds by default. -rc Remote Copy target server. To use this option, the Recovery Manager Backup Component server, with HP 3PAR Recovery Manager for Microsoft SQL Server installed, must be located at the secondary site. -noemail Optional.
NOTE: Retention time restrictions are: • You must have a Virtual Lock license to use the -retain option. • The minimum retention period is 1 hour; the maximum is 43,800 hours/1,825 days (5 years). • The default retention time is 336 hours (14 days). • The retention time cannot exceed the value of the StoreServ's VVRetentionTimeMax. • You can set a retention time regardless of whether the policy is numeric or expiration-based.
NOTE: HP 3PAR VSS Software waits up to 10 seconds for a virtual copy operation; and this interval can not be configured. In most of the cases, 10 seconds is a sufficient interval to successfully create a virtual copy. However, in some circumstances under very heavy loads, 10 seconds may not be enough time, and the virtual copy might fail on this attempt. This failure is a VSS framework requirement on Microsoft’s part. If such a failure occurs, VSS does not automatically retry the shadow copy creation.
HpRmCli Sql display SYNTAX HpRmCli Sql display -s [-rc ] [-i ] [-d ] [-t ] DESCRIPTION The HpRmCli Sql display command displays all virtual copies in the server at a local site or a remote site. PARAMETERS The following options are supported: -s SQL server associated with the database. -i Optional. The SQL instance associated with the database. If not specified, MSSQLSERVER is used as the default value.
HpRmCli Sql listbackup SYNTAX HpRmCli Sql listbackup -s [-i ] [-d ] [-t ] DESCRIPTION The HpRmCli Sql listbackup command displays all virtual copies being backed up via Symantec NetBackup or HP Data Protector. PARAMETERS The following options are supported: -s SQL server to which the database belongs. -i Optional. SQL server instance to which the database belongs. If not specified, MSSQLSERVER (local) is used as the default.
HpRmCli Sql mount Verify that the following conditions are complete before performing the mount operation: • The SQL server must be in healthy state for attach operation • The disk residing on the database must be online and visible • The original database must be online for the attach operation to succeed • The name of target server and the SQL server must be same for attach operation to succeed • The secondary database files (.
NOTE: When mounting in read-write mode, the system uses VDS API to make the volume read and write enabled. However, if there is another operation on the disk and the device is locked, you cannot unmount the volume. If you attempt to unmount a locked volume, the system displays the following error message: ERROR: COM call “pVolumeMF->Dismount(TRUE,FALSE)” failed.
HpRmCli Sql policy SYNTAX HpRmCli Sql policy -s [-i ] [-q] [-exp
-retain
EXAMPLE The following command sets the maximum number of virtual copies to 5 at all times for the default SQL instance: HpRmCli Sql policy –n 5 -s The following command sets the expiration time of virtual copies to 30 days for the default SQL instance: HpRmCli Sql policy -exp 30d -s NOTE: By default, the HP 3PAR Recovery Manager for SQL policy is set to a maximum of 10 virtual copies each for the instance level and the database level.
HpRmCli Sql remove SYNTAX HpRmCli Sql remove -s -t DESCRIPTION The HpRmCli Sql remove command removes a virtual copy from the system and the Recovery Manager repository. The virtual copy must not be mounted; if the virtual copy is mounted, HP 3PAR Recovery Manager for SQL does not remove it. PARAMETERS The following options are supported: -s The SQL server to which the database belongs. -t The timestamp of the virtual copy to remove.
HpRmCli Sql repository SYNTAX HpRmCli Sql repository [-a ] [-r] DESCRIPTION After HP 3PAR Recovery Manager for SQL is installed, by default the repository directory is located under the Recovery Manager install directory. To provide the highest level access to the repository, you can change the repository destination to the location of the HP 3PAR virtual volume.
EXAMPLE The following rescans the SQLserverA with instanceB HpRmCli Sql rescan -s SQLserverA -i instanceB. NOTE: In SQL 2012, by default, sysadmin role is not selected for NT account. For HP 3PAR Recovery Manager for SQL to work, user has to explicitly configure the sysadmin role.
-t The timestamp for the virtual copy to restore. -ts Optional. (Symantec NetBackup Media Restore only) The target server for the restore request. If not specified, the current server name is used as the default. -M Optional. (Media Restore only) The Symantec NetBackup master server name. Valid only if the backup software in use is Symantec NetBackup. Optional: If not specified, the current server name is used as the default. -a Optional.
The following command performs a media restore of a virtual copy 020405162103 using Data Protector. HpRmCli Sql restore -s server1 -i inst -d testdb -t 020405162103 -dp HpRmCli Sql restore -s server1 -i inst -d testdb -t 020405162103 -dp -a J:\Test The following command performs a media restore of a virtual copy 020405162103 using NBU.
HpRmCli Sql setvc SYNTAX HpRmCli Sql setvc -s [-i ] [-d ] -t -exp
NOTE: Retention time restrictions are: • You must have a Virtual Lock license to use the -retain option. • The minimum retention period is 1 hour; the maximum is 43,800 hours/1,825 days (5 years). • The default retention time is 336 hours (14 days). • The retention time cannot exceed the value of the StoreServ's VVRetentionTimeMax. • You can set a retention time regardless of whether the policy is numeric-based or expiration-based.
HpRmCli Sql timeconfig SYNTAX HpRmCli Sql timeconfig [-s ] [-prt ][-bkt ] [-ai ] DESCRIPTION After you install Recovery Manager for SQL, by default, the wait time for snap volume restore is 30 seconds, the wait time for backup is 5 minutes, and the wait time for analysis of the repository with the HP 3PAR StoreServ Storage System is 60 minutes. You can use this command to change these values.
HpRmCli Sql unmount Verify that the following tasks are complete before performing the unmount operation: • The SQL server must be in healthy state for attach operation • The disk residing on the database must be online and visible The following results of the unmount operation may occur: • Unmounting of a virtual copy does not occur if unmounting operation is unsuccessful • Detach operation proceeds automatically following the unmount operation NOTE: There is not a separate command for attaching an
10. In the New Action dialog box, click Browse. 11. Navigate to the Recovery Manager install location. The default location is: C:\Program Files\3PAR\RM\SQL 12. In the Add arguments text box, enter: HpRmCli.exe Sql create –s –i -d If the name has spaces, use double-quotes (““) to surround the name. For more information, see the HpRmCli Sql Create command. For example: “C:\Program Files\3par\RM\SQL\HpRmCli.exe” Sql create –i inst01–d test -s SQLserver 13.
7 Recovery for Microsoft SQL Server Microsoft SQL Server Recovery Models Microsoft SQL Server offers three disaster-recovery models: • Simple Recovery Model - The Simple Recovery model enables you to restore a database to the point at which a virtual copy or backup was created; it does not enable you to restore a database to a specific point in time. Therefore, any data modifications made between the time of the most recent backup and the time of the failure are lost.
To perform a point-in-time recovery, use Recovery Manager to perform a file copy restore or a volume restore. The restore steps depend on whether SQL servers are in clustered environment or non-clustered environment. 1. Schedule downtime before performing the restore. 2.
Determining Whether You Can Perform a Point-of-Failure Recovery In point-of-failure recovery, a database is completely recovered up to the point of the failure. You can perform a point-of-failure recovery if all of the following conditions are met: • You have performed a full backup of the SQL database. • You have subsequently used the SQL backup utility to perform one or more transaction log backups.
3. To apply the transaction logs as well as to recover the database to the point in time desired, enter the following restore commands at the command prompt: a. Enter the following command for the first to the penultimate backed-up transaction logs in the sequence: RESTORE log database name from transaction log backup media with norecovery; The database is still in “no recovery” mode. You can now apply the backed-up transaction logs to update the database to the point of failure. b.
Performing a File Copy Restore If you are performing a Point of Failure file copy restore, be sure to complete the following prerequisite tasks before initializing restore: • Ensure that there is at least one virtual copy of the database available or create one before performing the restore operation • Ensure to always select the latest virtual copy when performing a point-of-failure restore • Do not use third party tools, including SQL management studio, to create database backups or transaction log b
3. From an Instance level, select the applicable Database Names.
NOTE: SQL services remains active during a Point of Failure restoration operation. NOTE: When multiple database restore option is selected, SQL services stops and restarts when operation is complete. Only point-in-time restore option is available with this feature for this release. 4. 5. 6. Click Next. Read the warning before checking the Click to continue box and clicking Finish to proceed with restoration. Review the Restore Virtual Copy log and click Ok. Performing a Volume Restore 1. 2.
secondary databases will be in restoring state. All secondary databases must be restored manually after the restore operation is completed on primary node by HP 3PAR Recovery Manager for SQL. To manually restore availability database on secondary replica node: 1. Take Full backup of the availability database and transaction log at primary replica node. 2. Manually restore the secondary availability database and its log from the backup taken at primary replica node using RESTORE WITH NO RECOVERY option.
8 Coexistence of HP 3PAR Recovery Manager for SQL and HP 3PAR Recovery Manager for Exchange Prerequisites • Only backup server component of HP 3PAR Recovery Manager for SQL and HP 3PAR Recovery Manager for Exchange applications can be installed on the same server. • Mixing the backup server components and production server components in coexistence scenario is not supported.
9 Using HP 3PAR Peer Motion Manager Software with Recovery Manager HP 3PAR Peer Motion Manager is a feature of the HP 3PAR Software and manages the migration of data in between existing storage systems or third party storage arrays. HP 3PAR Recovery Manager now supports HP 3PAR Peer Motion Manager data migration activities without any impact on host operations while monitoring the primary storage system.
10 Using HP 3PAR CLX with Recovery Manager SQL Server Failover Clustering is a shared storage failover cluster solution which consists of two or more nodes. There is one copy of the SQL databases with this solution. However, because this solution is based on a shared storage, third-party array-based replication solution like HP Remote Copy, synchronous and asynchronous replication can be used to have more than one copy of the SQL databases.
NOTE: Ensure that only one array is configured on each backup server. • The Create Remote virtual copy operation should use “Remote Virtual Copy” option. • This will ensure corresponding virtual copy is created on other site. • The remote site backup server information is required to specify as input for remote virtual copy operation.
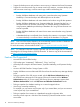
11 Remote Copy for Recovery Manager Overview HP 3PAR Remote Copy Software helps you to safeguard against disasters that might occur at one location, by allowing you to keep copies of data on a separate server which can be placed at a remote location. For example, if there were a fire or earthquake at one location, all of the data stored there could be lost unless a backup copy can be recovered from a separate location not affected by the disaster.
Figure 13 Remote copy configuration Setting Up Remote Copy 1. Install and configure Remote Copy. For more information, see the HP 3PAR Remote Copy Software User’s Guide. NOTE: Be sure to configure the Remote Copy backup server with the same names, structure, and Windows authentication mode settings as the primary server. 2. 3. 90 After you have set up Remote Copy on two HP 3PAR StoreServ Storage Systems, create a Remote Copy volume group for testing purposes.
Support for Remote Copy Modes and Policies Recovery Manager supports Remote Copy in synchronous and asynchronous periodic mode. • If you are using synchronous Remote Copy, the policies on the production system (the Remote Copy primary system) and the Remote Copy backup system must match. If the policies do not match, Recovery Manager cannot create virtual copies on a synchronous Remote Copy system.
3. Add the virtual volumes belonging to the database and log files to the primary Remote Copy volume group, and add the associated secondary virtual volumes to the secondary volume group on the Remote Copy backup server. CAUTION: Do not disperse files from one database over multiple primary Remote Copy volume groups. Recovery Manager does not support database and log files from one database existing in any location other than the one primary Remote Copy volume group created for that database. 4.
12 Support and Other Resources Related Documents For Information About… Read the… Using the HP 3PAR OS Command Line Interface (CLI) to configure and manage the HP 3PAR StoreServ Storage System HP 3PAR Command Line Interface Administrator’s Manual Using the HP 3PAR Management Console to configure and InForm Management Console Help Release 4.2 administer HP 3PAR StoreServ Storage Systems Assigning the appropriate user roles and rights HP 3PAR StoreServ Storage Concepts Guide (OS 3.1.
Advisories To avoid losing or damaging data, be sure to observe the cautions and warnings in this document. WARNING! Warnings alert you to actions that can cause injury to people or irreversible damage to data or the operating system. CAUTION: Cautions alert you to actions that can cause damage to equipment, software, or data. NOTE: Notes are reminders, tips, or suggestions that supplement the procedures included in this document.
13 Documentation feedback HP is committed to providing documentation that meets your needs. To help us improve the documentation, send any errors, suggestions, or comments to Documentation Feedback (docsfeedback@hp.com). Include the document title and part number, version number, or the URL when submitting your feedback.
A Server Virtualization Environments VMware and Microsoft Hyper-V Environments VMware and Microsoft Hyper-V environments are supported under specific conditions in an FC configuration. For VMware and Microsoft Hyper-V support in a virtualization environment, the setup must meet the following requirements in an FC configuration: • The disks presented to the SQL servers must be raw devices. • The backup server must be connected directly to the HP 3PAR StoreServ Storage System.
B Troubleshooting Known Issues • When HP 3PAR CLI is not installed using HP 3PAR Recovery Manager Software for SQL setup: ◦ If the certificate is not saved for current StoreServ username used by HP 3PAR Recovery Manager Software for SQL, errors occur for all HP 3PAR Recovery Manager Software for SQL tasks or HP 3PAR VSS Provider tasks, except for new StoreServ registration command in HP 3PAR VSS Provider.
Validation might fail without proper notification. Restart the HpRmCli Sql agent service on the backup and production servers. Problem: A restore of a backup, which was created using Symantec NetBackup via the Recovery Manager GUI, fails. Suggestion: When you use the Recovery Manager GUI to back up a virtual copy using Symantec NetBackup and a directory is specified for backup, you must enter the directory name and path precisely, including the upper- and lower casing (for example, MuTenFF).
5. Select the COM Security tab. 6. Under Access Permissions, click Edit Default. 7. Add a Cluster Service account and select Local Access and Remote Access. 8. Reboot the machine. 9. Perform these steps on the second node. Problem: You attempt to perform a media restore using the Recovery Manager CLI -ts command and the attempt fails.
UDP 16.154.142.171: 9932 *:* 1252 UDP 127.0.0.1: 9932 *:* 1252 This will list the process id of the application that is using the default port. (The process id of the application is 1252 in the example.). To find out the application name for the process id which is using the port: ◦ Run tasklist | find "" Example: c:\ >tasklist | find "9932" application.
After volume promote, on few occasions, the volume involved in the restore operation might not come online. Suggestion: From the Disk Management utility of the server, select the volumes involved in Restore operation and manually make them online. If the problem persists, present the LUN which was to be restored to the same host again through HP 3PAR Management Console (MC) using a LUN ID different from the original LUN ID.
Suggestion: Use the provcfg.exe utility provided with HP 3PAR VSS Provider to recreate an expired, an invalid, or a new certificate. Problem: If you have configured StoreServ during HP 3PAR VSS Provider installation or using HP 3PAR VSS Provider provcfg utility, and later changed the TPDCERTDIR environmental variable or moved certificate from one location to another location, then you might encounter following error: Suggestion: Use the provcfg.
C Event Messages This appendix provides information for the event messages generated by HP 3PAR Recovery Manager Software for Microsoft SQL Server. Table 4 HP 3PAR Recovery Manager Software for Microsoft SQL Server Event Messages Event ID Event Message Description/Action 5312 RMS5312: ERROR: Some of your volumes Some of the target volumes are not HP 3PAR virtual volumes. are either non-3PAR volumes or All of the drives need to be HP 3PAR drives. unsupported types of disk drives.
Table 4 HP 3PAR Recovery Manager Software for Microsoft SQL Server Event Messages (continued) Event ID Event Message Description/Action 5325 RMS5325: ERROR: The virtual copy timestamp does not exist for the snapshotset ID. When you created the virtual copy, Recovery Manager could not store the virtual copy timestamp in the repository for the specified snapshotset ID. • Wait a few minutes and then retry the operation. 5326 RMS5326: ERROR: Volume Restore failed.
Table 4 HP 3PAR Recovery Manager Software for Microsoft SQL Server Event Messages (continued) Event ID Event Message Description/Action 5341 RMS5341: ERROR: Could not find the header information in the command output. Failed to parse the header information from the CLI command output. • Verify that you can connect to the required HP 3PAR StoreServ Storage System from the CLI command window. • Wait a few minutes and try the operation again.
Table 4 HP 3PAR Recovery Manager Software for Microsoft SQL Server Event Messages (continued) Event ID Event Message Description/Action 5372 RMS5372: ERROR: Failed to connect to the NetBackup master server. Recovery Manager could not connect to the NetBackup server. • Ensure that you can connect to the NetBackup master server. • For more details, check the application event log and NetBackup logs on the NetBackup server. 5373 RMS5373: ERROR: No storage units available for use.
Table 4 HP 3PAR Recovery Manager Software for Microsoft SQL Server Event Messages (continued) Event ID Event Message Description/Action 5379 RMS5379: ERROR: Failed to mount virtual HP 3PAR Recovery Manager for SQL failed to mount the virtual copy. Please check the application and copy. system event logs for the most recent error. • Check the application and system event logs for the most recent error messages.
Table 4 HP 3PAR Recovery Manager Software for Microsoft SQL Server Event Messages (continued) Event ID Event Message Description/Action 5384 RMS5384: ERROR: Error encountered while running the Data Protector command. Data Protector failed to execute the specified command. • For more details, check the Data Protector logs on the Data Protector Cell Manager server.