
Basic Operation Guide 2013/06


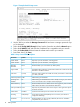
Table Of Contents
- Switch Software
- Contents
- 1 Commands found in the Basic Operation Guide
- 2 Getting started
- 3 Using the Menu Interface
- 4 Using the Command Line Interface (CLI)
- Overview
- Accessing the CLI
- Using the CLI
- Return message types with CLI commands
- CLI interactive commands
- CLI control and editing
- 5 Using the HP WebAgent
- 6 Switch memory and configuration
- Overview
- Configuration file management
- Using the CLI to implement configuration changes
- Creating a custom default configuration
- Using the menu and WebAgent to implement configuration changes configuration file
- Zeroization
- Using Primary and Secondary flash image options
- Multiple configuration files
- Display configuration of selected interface
- Automatic configuration update with DHCP Option 66
- 7 Interface access and system information
- 8 Configuring IP addressing
- Overview
- IP configuration
- Loopback interfaces
- IP Preserve: retaining VLAN-1 IP addressing across configuration file downloads
- Configuring a single source IP address
- 9 Software management
- Downloading switch documentation and software from the web
- Viewing or downloading the software manual set
- Downloading software updates for your switch
- Software signing and verification
- Saving configurations while using the CLI
- Important: Best Practices for software updates
- Updating the switch: overview
- Updating the switch: detailed steps
- Rolling back switch software
- Viewing or transferring alternate configuration files
- Downloading switch documentation and software from the web
- Index

2 Getting started
Initial switch set-up
Initial setup includes:
• setting a Manager password
• assigning an IP (Internet Protocol) address and subnet mask
• configuring optional banners
Recommended minimal configuration
In the factory default configuration, the switch has no IP (Internet Protocol) address and subnet
mask, and no passwords. In this state, it can be managed only through a direct console connection.
To manage the switch through in-band (networked) access, you should configure the switch with
an IP address and subnet mask compatible with your network. Also, you should configure a
Manager password to control access privileges from the console and web browser interface. Other
parameters in the Switch Setup screen can be left at their default settings or you can configure
them with values you enter.
For more information on IP addressing, see “Configuring IP addressing” (page 105).
NOTE: By default, the switch is configured to acquire an IPv4 address configuration from a DHCP
or Bootp server. To use DHCP/Bootp instead of the manual method described in this chapter, see
DHCP/Bootp Operation in the Management and Configuration Guide for your switch.
For information on configuring IPv6 addressing, see to the latest IPv6 Configuration Guide for your
switch.
Using the switch setup screen
The quickest and easiest way to minimally configure the switch for management and password
protection is to use a direct console connection to the switch, start a console session, and access
the Switch Setup screen.
1. Using the method described in the Installation and Getting Started Guide for your switch,
connect a terminal device to the switch and display the switch console command (CLI) prompt
(the default display).
The CLI prompt appears displaying the switch model number, for example:
HP E8200zl#
2. Screen. The following illustration is an example of a Setup screen with default settings. Your
screen may vary slightly.
Initial switch set-up 9