
Basic Operation Guide 2013/06
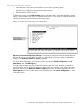


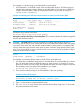
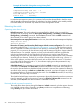

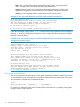
Table Of Contents
- Switch Software
- Contents
- 1 Commands found in the Basic Operation Guide
- 2 Getting started
- 3 Using the Menu Interface
- 4 Using the Command Line Interface (CLI)
- Overview
- Accessing the CLI
- Using the CLI
- Return message types with CLI commands
- CLI interactive commands
- CLI control and editing
- 5 Using the HP WebAgent
- 6 Switch memory and configuration
- Overview
- Configuration file management
- Using the CLI to implement configuration changes
- Creating a custom default configuration
- Using the menu and WebAgent to implement configuration changes configuration file
- Zeroization
- Using Primary and Secondary flash image options
- Multiple configuration files
- Display configuration of selected interface
- Automatic configuration update with DHCP Option 66
- 7 Interface access and system information
- 8 Configuring IP addressing
- Overview
- IP configuration
- Loopback interfaces
- IP Preserve: retaining VLAN-1 IP addressing across configuration file downloads
- Configuring a single source IP address
- 9 Software management
- Downloading switch documentation and software from the web
- Viewing or downloading the software manual set
- Downloading software updates for your switch
- Software signing and verification
- Saving configurations while using the CLI
- Important: Best Practices for software updates
- Updating the switch: overview
- Updating the switch: detailed steps
- Rolling back switch software
- Viewing or transferring alternate configuration files
- Downloading switch documentation and software from the web
- Index

For example, to copy the image in secondary flash to primary flash:
1. Verify that there is a valid flash image in the secondary flash location. The following figure
indicates that a software image is present in secondary flash. (If you are unsure whether the
image is secondary flash is valid, try booting from it before you proceed, by using boot
system flash secondary.)
Example 46 Indicating two different software versions in Primary and Secondary flash
HP Switch(config)# show flash
Image Size (bytes) Date Version
----------------- ------------ -------- --------------------
Primary Image : 10167529 10/14/11 K.14.89
Secondary Image : 15085139 08/17/12 K.15.10.0001
Boot ROM Version : K.15.28
Default Boot : Primary
Execute the copy command as follows:
HP Switch(config)# copy flash flash primary
Erasing the contents of Primary or Secondary flash. This command deletes the software image file
from the specified flash location.
CAUTION: No undo! Before using this command in one flash image location (primary or
secondary), ensure that you have a valid software file in the other flash image location (secondary
or primary). If the switch has only one flash image loaded (in either primary or secondary flash)
and you erase that image, then the switch does not have a software image stored in flash. In this
case, if you do not reboot or power cycle the switch, you can recover by using xmodem or tftp to
download another software image.
Syntax:
erase flash <primary | secondary>
For example, to erase the software image in primary flash, do the following:
1. First verify that a usable flash image exists in secondary flash. The most reliable way to ensure
this is to reboot the switch from the flash image you want to retain. For example, if you are
planning to erase the primary image, then first reboot from the secondary image to verify that
the secondary image is present and acceptable for your system:
HP Switch# boot system flash secondary
2. Then erase the software image in the selected flash (in this case, primary):
Example 47 Erase Flash Prompt
HP Switch# erase flash primary
The Primary OS Image will be deleted, continue [y/n]?
3. Type ‘y’ at the prompt to complete the flash erase.
4. Use show flash to verify erasure of the selected software flash image. The “0” shows that
the primary flash has been erased.
Using Primary and Secondary flash image options 67