
Basic Operation Guide 2013/06
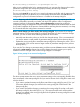


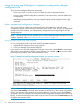
Table Of Contents
- Switch Software
- Contents
- 1 Commands found in the Basic Operation Guide
- 2 Getting started
- 3 Using the Menu Interface
- 4 Using the Command Line Interface (CLI)
- Overview
- Accessing the CLI
- Using the CLI
- Return message types with CLI commands
- CLI interactive commands
- CLI control and editing
- 5 Using the HP WebAgent
- 6 Switch memory and configuration
- Overview
- Configuration file management
- Using the CLI to implement configuration changes
- Creating a custom default configuration
- Using the menu and WebAgent to implement configuration changes configuration file
- Zeroization
- Using Primary and Secondary flash image options
- Multiple configuration files
- Display configuration of selected interface
- Automatic configuration update with DHCP Option 66
- 7 Interface access and system information
- 8 Configuring IP addressing
- Overview
- IP configuration
- Loopback interfaces
- IP Preserve: retaining VLAN-1 IP addressing across configuration file downloads
- Configuring a single source IP address
- 9 Software management
- Downloading switch documentation and software from the web
- Viewing or downloading the software manual set
- Downloading software updates for your switch
- Software signing and verification
- Saving configurations while using the CLI
- Important: Best Practices for software updates
- Updating the switch: overview
- Updating the switch: detailed steps
- Rolling back switch software
- Viewing or transferring alternate configuration files
- Downloading switch documentation and software from the web
- Index

Using USB
To transfer a custom default configuration file off the switch using USB, enter the following command.
Syntax:
copy default-config usb stored_config.cfg
Copies the custom default configuration file to the stored_config.cfg file on the USB
device.
Using SFTP and SCP to transfer the custom configuration
While the switch supports an SSH server with SCP and/or SFTP running on it, the switch is not an
SCP or SFTP client. To transfer the default custom configuration file to or from the switch, you must
connect to the switch’s SSH server using any SCP or SFTP client. Instead of the actual name of the
custom default configuration file, an alias name of "default-config" is displayed in the file listings
and for get/store functions.
When you use an SCP client to connect to the switch, you must know the name of the file you wish
to get or store. When you use SFTP client to connect to the switch, you are provided with a list of
filenames that can be accessed by the switch.
NOTE: You must have an SCP/SFTP client implemented in order to execute copy scp or copy
sftp commands on the switch.
The following example shows the output from running puTTY psftp on a remote PC.
Example 34 Using SFTP
C:\PuTTY> psftp 10.1.243.209
We'd like to keep you up to date about:
* Software feature updates
* New product announcements
* Special events
Please register your product at: www.register.hp.com
Remote working directory is /
psftp> ls
Listing directory /
drwxr-xr-x 2 J9145A J9145A 0 Jan 01 00:01 cfg
drwxr-xr-x 2 J9145A J9145A 0 Jan 01 00:01 core
drwxr-xr-x 2 J9145A J9145A 0 Jan 01 00:01 log
drwxrwxrwx 2 J9145A J9145A 0 Jan 01 00:01 os
drwxrwxrwx 3 J9145A J9145A 0 Jan 01 00:01 ssh
psftp> ls /cfg
Listing directory /cfg
-rwxrw-r-- 1 J9145A J9145A 1749 Jan 01 00:01 default-config
-rw-r--r-- 1 J9145A J9145A 745 Jan 01 01:19 running-config
-rwxrw-r-- 1 J9145A J9145A 360 Jan 01 01:19 startup-config
psftp>
Erasing a configuration file
If a custom default configuration file exists and the erase startup-config command is executed, the
current active configuration is erased and the switch is booted with the custom default configuration.
Creating a custom default configuration 57