
Basic Operation Guide 2013/06

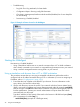


Table Of Contents
- Switch Software
- Contents
- 1 Commands found in the Basic Operation Guide
- 2 Getting started
- 3 Using the Menu Interface
- 4 Using the Command Line Interface (CLI)
- Overview
- Accessing the CLI
- Using the CLI
- Return message types with CLI commands
- CLI interactive commands
- CLI control and editing
- 5 Using the HP WebAgent
- 6 Switch memory and configuration
- Overview
- Configuration file management
- Using the CLI to implement configuration changes
- Creating a custom default configuration
- Using the menu and WebAgent to implement configuration changes configuration file
- Zeroization
- Using Primary and Secondary flash image options
- Multiple configuration files
- Display configuration of selected interface
- Automatic configuration update with DHCP Option 66
- 7 Interface access and system information
- 8 Configuring IP addressing
- Overview
- IP configuration
- Loopback interfaces
- IP Preserve: retaining VLAN-1 IP addressing across configuration file downloads
- Configuring a single source IP address
- 9 Software management
- Downloading switch documentation and software from the web
- Viewing or downloading the software manual set
- Downloading software updates for your switch
- Software signing and verification
- Saving configurations while using the CLI
- Important: Best Practices for software updates
- Updating the switch: overview
- Updating the switch: detailed steps
- Rolling back switch software
- Viewing or transferring alternate configuration files
- Downloading switch documentation and software from the web
- Index

1. In the navigation tree, select Security > Device Passwords. The Device Passwords screen
displays.
2. Click on Change on the right side of the screen. The pane expands to allow you to enter
information.
3. Enter a username, password, and access level.
4. Click on Save to save your entries.
NOTE: Passwords assigned in the WebAgent will overwrite previous passwords assigned in
either the WebAgent, the CLI, or the menu interface. The most recently assigned passwords are
the switch’s passwords, regardless of which interface was used to assign them.
If you lose the password
If you lose the passwords, you can clear them by pressing the Clear button on the front of the
switch. This action deletes all password and user name protection from all of the switch’s interfaces.
The Clear button is provided for your convenience, but its presence means that if you are concerned
with the security of the switch configuration and operation, you should make sure the switch is
installed in a secure location, such as a locked wiring closet. (For more information, refer to "Front
Panel Security" in the chapter titled "Configuring Username and Password Security" in the Access
Security Guide for your switch.)
Online Help for the WebAgent
Online Help is available for the WebAgent. You can use it by clicking on the "?" in the upper right
corner in any of the WebAgent panes. Context-sensitive help is provided for the pane you are on.
You can access the WebAgent online help at www.hp.com/rnd/device_help/
Downloading the WebAgent Help to a local server
To download the WebAgent help files to a local server, go to:
www.hp.com/rnd/device_help/download.htm
Follow the directions on the web page to download the WebAgent help for your device.
Connecting to the WebAgent from HP PCM+
To access the WebAgent with HP PCM+:
1. Select the device in the PCM+ navigation tree.
2. Right-click on Device in the navigation tree and select Device Access > Connect to WebAgent.
48 Using the HP WebAgent