
Basic Operation Guide 2013/06


Table Of Contents
- Switch Software
- Contents
- 1 Commands found in the Basic Operation Guide
- 2 Getting started
- 3 Using the Menu Interface
- 4 Using the Command Line Interface (CLI)
- Overview
- Accessing the CLI
- Using the CLI
- Return message types with CLI commands
- CLI interactive commands
- CLI control and editing
- 5 Using the HP WebAgent
- 6 Switch memory and configuration
- Overview
- Configuration file management
- Using the CLI to implement configuration changes
- Creating a custom default configuration
- Using the menu and WebAgent to implement configuration changes configuration file
- Zeroization
- Using Primary and Secondary flash image options
- Multiple configuration files
- Display configuration of selected interface
- Automatic configuration update with DHCP Option 66
- 7 Interface access and system information
- 8 Configuring IP addressing
- Overview
- IP configuration
- Loopback interfaces
- IP Preserve: retaining VLAN-1 IP addressing across configuration file downloads
- Configuring a single source IP address
- 9 Software management
- Downloading switch documentation and software from the web
- Viewing or downloading the software manual set
- Downloading software updates for your switch
- Software signing and verification
- Saving configurations while using the CLI
- Important: Best Practices for software updates
- Updating the switch: overview
- Updating the switch: detailed steps
- Rolling back switch software
- Viewing or transferring alternate configuration files
- Downloading switch documentation and software from the web
- Index
• Troubleshooting
◦ Ping/Link Test—Ping test details, link test details
◦ Configuration Report—Running config file information
◦ Core dump—Management/Interface modules enabled/disabled, list of core dump files
for downloading
◦ Port Mirroring—Enabled/disabled
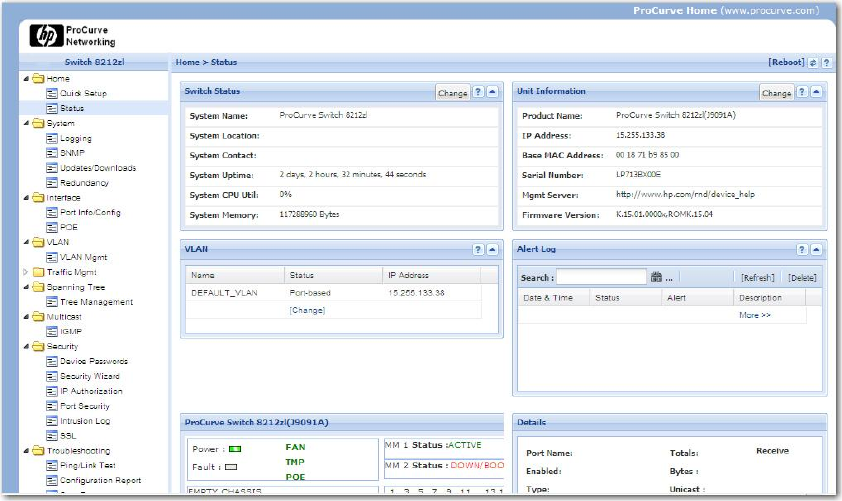
Figure 10 Example of Status Screen for the WebAgent
Starting the WebAgent
Port Mirroring—Enabled/disabled
• Using a standalone web browser on a network connection from a PC or UNIX workstation
that is directly connected to your network or connected through remote access to your network
• Using a network management station running PCM+ on your network
Using a standalone web browser from a PC or UNIX workstation
This procedure assumes that you are using a compatible web browser and that the switch is
configured with an IP address accessible from your PC or workstation. (For more on assigning an
IP address, refer to “IP configuration” (page 105).)
1. Ensure that the Java™applets are enabled for your browser. For more information on this
topic, refer to your browser’s online Help.
2. Use the web browser to access the switch. If your network includes a Domain Name Server
(DNS), your switch’s IP address may have a name associated with it (for example, switch8212)
that you can type in the URL field instead of the IP address. Using DNS names typically improves
browser performance. Contact your network administrator to enquire about DNS names
associated with your HP switch.
Type the IP address (or DNS name) of the switch in the browser’s URL field and press [Enter].
(It is not necessary to include http://.)
switch5308 [Enter] (example of a DNS-type name)
46 Using the HP WebAgent