
Basic Operation Guide 2013/06
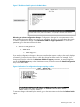

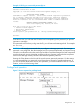
Table Of Contents
- Switch Software
- Contents
- 1 Commands found in the Basic Operation Guide
- 2 Getting started
- 3 Using the Menu Interface
- 4 Using the Command Line Interface (CLI)
- Overview
- Accessing the CLI
- Using the CLI
- Return message types with CLI commands
- CLI interactive commands
- CLI control and editing
- 5 Using the HP WebAgent
- 6 Switch memory and configuration
- Overview
- Configuration file management
- Using the CLI to implement configuration changes
- Creating a custom default configuration
- Using the menu and WebAgent to implement configuration changes configuration file
- Zeroization
- Using Primary and Secondary flash image options
- Multiple configuration files
- Display configuration of selected interface
- Automatic configuration update with DHCP Option 66
- 7 Interface access and system information
- 8 Configuring IP addressing
- Overview
- IP configuration
- Loopback interfaces
- IP Preserve: retaining VLAN-1 IP addressing across configuration file downloads
- Configuring a single source IP address
- 9 Software management
- Downloading switch documentation and software from the web
- Viewing or downloading the software manual set
- Downloading software updates for your switch
- Software signing and verification
- Saving configurations while using the CLI
- Important: Best Practices for software updates
- Updating the switch: overview
- Updating the switch: detailed steps
- Rolling back switch software
- Viewing or transferring alternate configuration files
- Downloading switch documentation and software from the web
- Index

4 Using the Command Line Interface (CLI)
Overview
The CLI is a text-based command interface for configuring and monitoring the switch. The CLI gives
you access to the switch’s full set of commands while providing the same password protection that
is used in the web browser interface (WebAgent) and the menu interface.
Accessing the CLI
Like the menu interface, the CLI is accessed through the switch console, and in the switch’s factory
default state, is the default interface when you start a console session. You can access the console
out-of-band by directly connecting a terminal device to the switch, or in-band by using Telnet either
from a terminal device or through the WebAgent.
Also, if you are using the menu interface, you can access the CLI by selecting the Command Line
(CLI) option in the Main Menu.
Using the CLI
The CLI offers these privilege levels to help protect the switch from unauthorized access:
1. Operator
2. Manager
3. Global Configuration
4. Context Configuration
NOTE: CLI commands are not case-sensitive.
When you use the CLI to make a configuration change, the switch writes the change to the
Running-Config file in volatile memory. This allows you to test your configuration changes before
making them permanent. To make changes permanent, you must use the write memory command
to save them to the Startup-Config file in non-volatile memory. If you reboot the switch without first
using write memory, all changes made since the last reboot or write memory (whichever is later)
will be lost. For more on switch memory and saving configuration changes, see Chapter 6, "Switch
Memory and Configuration".
Privilege levels at logon
Privilege levels control the type of access to the CLI. To implement this control, you must set at least
a Manager password. Without a Manager password configured, anyone having serial port, Telnet,
or web browser access to the switch can reach all CLI levels. (For more on setting passwords, refer
to the chapter on usernames and passwords in the Access Security Guide for your switch.)
When you use the CLI to log on to the switch, and passwords are set, you will be prompted to
enter a password. For example:
26 Using the Command Line Interface (CLI)