
Basic Operation Guide 2013/06
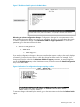
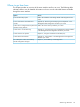

Table Of Contents
- Switch Software
- Contents
- 1 Commands found in the Basic Operation Guide
- 2 Getting started
- 3 Using the Menu Interface
- 4 Using the Command Line Interface (CLI)
- Overview
- Accessing the CLI
- Using the CLI
- Return message types with CLI commands
- CLI interactive commands
- CLI control and editing
- 5 Using the HP WebAgent
- 6 Switch memory and configuration
- Overview
- Configuration file management
- Using the CLI to implement configuration changes
- Creating a custom default configuration
- Using the menu and WebAgent to implement configuration changes configuration file
- Zeroization
- Using Primary and Secondary flash image options
- Multiple configuration files
- Display configuration of selected interface
- Automatic configuration update with DHCP Option 66
- 7 Interface access and system information
- 8 Configuring IP addressing
- Overview
- IP configuration
- Loopback interfaces
- IP Preserve: retaining VLAN-1 IP addressing across configuration file downloads
- Configuring a single source IP address
- 9 Software management
- Downloading switch documentation and software from the web
- Viewing or downloading the software manual set
- Downloading software updates for your switch
- Software signing and verification
- Saving configurations while using the CLI
- Important: Best Practices for software updates
- Updating the switch: overview
- Updating the switch: detailed steps
- Rolling back switch software
- Viewing or transferring alternate configuration files
- Downloading switch documentation and software from the web
- Index

Table 3 How to navigate the Menu interface (continued)
Actions:Task:
6. If you are finished editing parameters in the displayed screen, press [Enter] to return to the Actions
line and do one of the following:
• To save and activate configuration changes, press [S] (for the Save action). This saves the
changes in the startup configuration and also implements the change in the currently running
configuration. (See Chapter 6, "Switch Memory and Configuration".)
• To exit from the screen without saving any changes that you have made (or if you have not
made changes), press [C] (for the Cancel action).
Note: In the menu interface, executing Save activates most parameter changes and saves them
in the startup configuration (or flash) memory, and it is therefore not necessary to reboot the
switch after making these changes. But if an asterisk appears next to any menu item you
reconfigure, the switch will not activate or save the change for that item until you reboot the
switch. In this case, rebooting should be done after you have made all desired changes and
then returned to the Main Menu.
7. When you finish editing parameters, return to the Main Menu.
8. If necessary, reboot the switch by highlighting Reboot Switch in the Main Menu and pressing
[Enter]. (See the Note, above.)
Press [B] (for the Back action).Exit from a
read-only screen.
To get Help on individual parameter descriptions. In most screens there is a Help option in the
Actions line. Whenever any of the items in the Actions line is highlighted, press [H], and a separate
help screen is displayed.
To get Help on the actions or data fields in each screen: Use the arrow keys ([←], [→], [↑], or [↓])
to select an action or data field. The help line under the Actions items describes the currently
selected action or data field.
For guidance on how to navigate in a screen: See the instructions provided at the bottom of the
screen, or refer to “Screen structure and navigation” (page 20).)
Rebooting the switch
Rebooting the switch from the menu interface:
• Terminates all current sessions and performs a reset of the operating system
• Activates any menu interface configuration changes that require a reboot
• Resets statistical counters to zero
(Note that statistical counters can be reset to zero without rebooting the switch.)
To Reboot the switch, use the Reboot Switch option in the Main Menu. (Note that Reboot Switch
is not available if you log on in Operator mode; that is, if you enter an Operator password instead
of a manager password at the password prompt.)
22 Using the Menu Interface