
Basic Operation Guide 2013/06

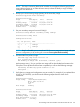
Table Of Contents
- Switch Software
- Contents
- 1 Commands found in the Basic Operation Guide
- 2 Getting started
- 3 Using the Menu Interface
- 4 Using the Command Line Interface (CLI)
- Overview
- Accessing the CLI
- Using the CLI
- Return message types with CLI commands
- CLI interactive commands
- CLI control and editing
- 5 Using the HP WebAgent
- 6 Switch memory and configuration
- Overview
- Configuration file management
- Using the CLI to implement configuration changes
- Creating a custom default configuration
- Using the menu and WebAgent to implement configuration changes configuration file
- Zeroization
- Using Primary and Secondary flash image options
- Multiple configuration files
- Display configuration of selected interface
- Automatic configuration update with DHCP Option 66
- 7 Interface access and system information
- 8 Configuring IP addressing
- Overview
- IP configuration
- Loopback interfaces
- IP Preserve: retaining VLAN-1 IP addressing across configuration file downloads
- Configuring a single source IP address
- 9 Software management
- Downloading switch documentation and software from the web
- Viewing or downloading the software manual set
- Downloading software updates for your switch
- Software signing and verification
- Saving configurations while using the CLI
- Important: Best Practices for software updates
- Updating the switch: overview
- Updating the switch: detailed steps
- Rolling back switch software
- Viewing or transferring alternate configuration files
- Downloading switch documentation and software from the web
- Index

NOTE: This step is necessary because HP switches do not support roll back (going from a
newer software version to an older software version) without the ability to copy a backup
config file onto the device.
4. Backup your current running image (primary) to the secondary image.
Switch1# copy flash flash secondary
Switch1# show flash
Image Size(Bytes) Date Version
------ ----------- ------- -------
Primary Image : 9839140 11/06/09 K.14.47
Secondary Image : 9839140 11/06/09 K.14.47
Boot Rom Version: K.12.20
Default Boot : Primary
5. Set your secondary image to boot with Config2.
Switch1# startup-default secondary config config2
Switch1# show config files
Configuration files:
id | act pri sec | name
---+-------------+-----------------------------
1 | * * | config1
2 | * | config2
3 | |
NOTE: Step 5 will enable you to revert from K.15.01.xxxx to your previous image with your
previous configuration just by invoking the command boot system flash secondary.
6. Download the new primary image.
Switch1# copy tftp flash 192.168.1.60
K_15_10_0001.swi primary
The Primary OS Image will be deleted, continue [y/n]?
At the prompt, enter ‘y’ for yes, and the new image will be downloaded and written to the
File system. Once tftp download has been completed you will see the following message:
Validating and Writing System Software to the
Filesystem ...
7. Verify that your images and configuration are set correctly. For example, if you updated from
K.14.47 to K.15.01.0031, you should see the following outputs from the switch show
commands:
Switch1# show version
Image stamp: /sw/code/build/btm(t4a)
Nov 6 2009 13:20:26
K.14.47
188
Boot Image: Primary
Switch1# show flash
Image Size(Bytes) Date Version
------ ----------- ------- -------
Primary Image : 11537788 04/23/10 K.15.01.0031
Secondary Image : 9839140 11/06/09 K.14.47
Boot Rom Version: K.15.09
Default Boot : Primary
Downloading switch documentation and software from the web 135